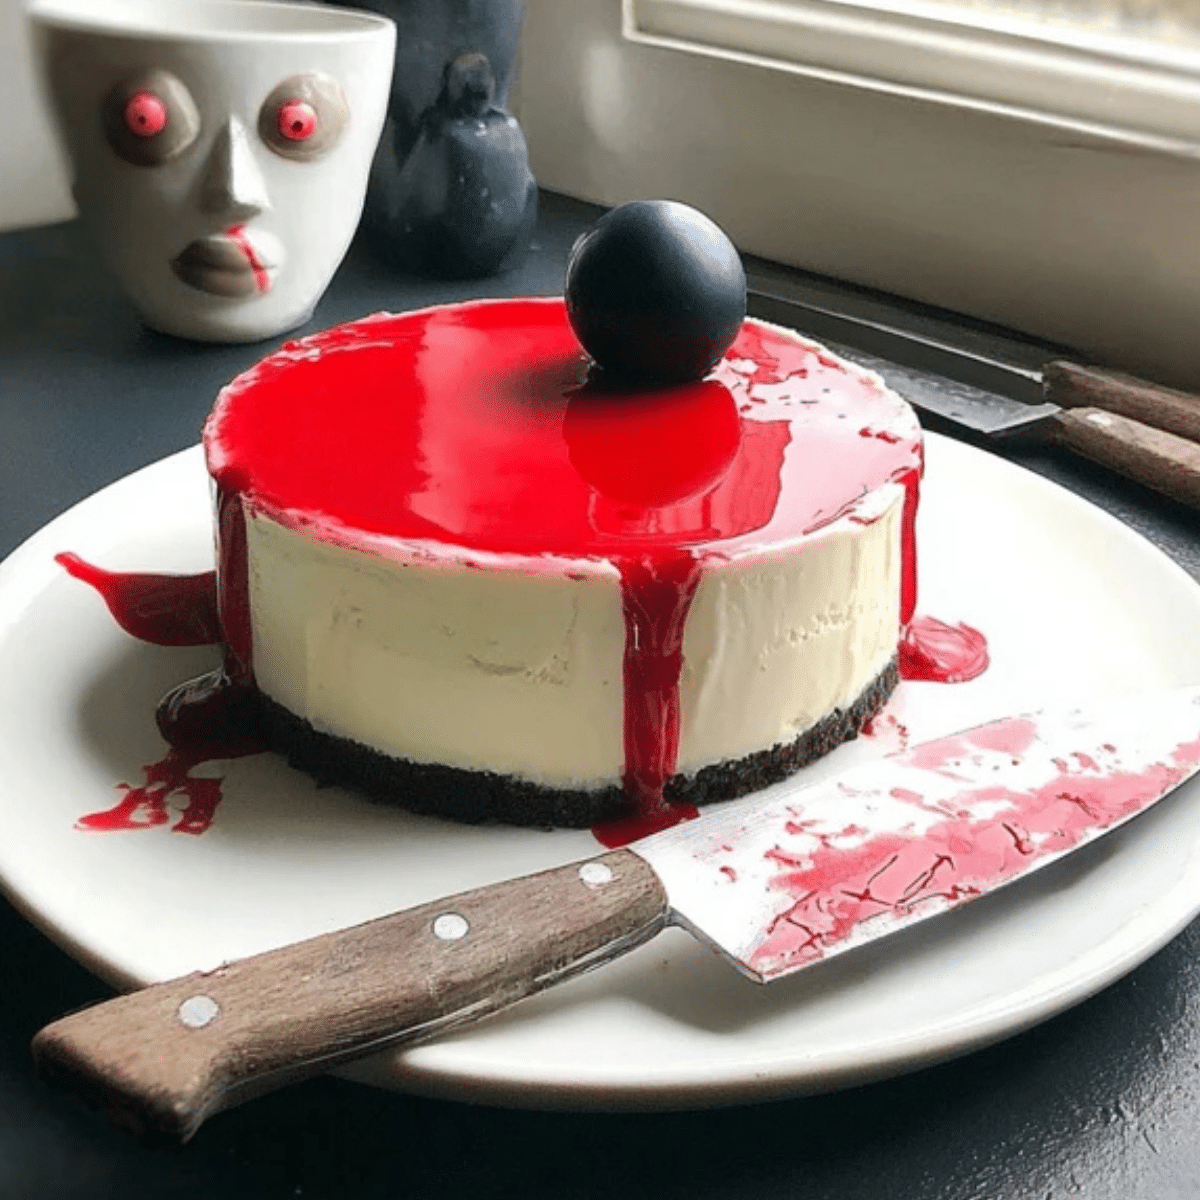
Looking for the ultimate spooky dessert that’s equal parts creepy and creamy? This Bloody Good Halloween Cheesecake is everything you want in a festive treat — a no-bake masterpiece with a dark chocolate cookie base, silky white chocolate cheesecake filling, and a blood-red drip made from condensed milk and cocoa. It’s gruesome in the best way possible and will be the highlight of your Halloween spread, whether you’re throwing a monster bash or enjoying scary movies on the couch.
Table of Contents
A Gory Treat That’s Easy, No-Bake, and Scarily Delicious
This Bloody Good Halloween Cheesecake isn’t just eye-catching — it’s easy to make and no oven is required. Perfect for busy party prep or a cozy fall evening in, this dessert delivers rich flavor, dramatic visuals, and an eerie twist that’s fun without the fuss. The crisp Oreo base brings crunch and cocoa intensity, while the fluffy white chocolate filling balances sweetness with a hint of citrus. And let’s not forget the iconic red “blood” drip — a cocoa-vanilla glaze that completes the sinister scene.
What You’ll Need to Create This Halloween Showstopper
• Oreo Cookies: These provide a rich, chocolatey crunch that complements the creamy filling.
• Salted Butter: Helps bind the crust and adds a savory depth to balance the sweetness.
• White Chocolate: Adds creamy, vanilla-forward richness to the cheesecake layer.
• Full-Fat Cream Cheese: The essential base for structure and tang.
• Vanilla Extract: Enhances the sweetness and adds warmth to the overall flavor.
• Lemon Juice: Brightens the filling and balances the richness.
• Salt: Just a pinch to enhance all other flavors.
• Double Cream (Heavy Cream): Whipped to provide volume and a light, fluffy texture.
• Condensed Milk: Creates a thick, sweet base for the red drip.
• Cocoa Powder: Adds dark flavor and color depth to the “blood.”
• Red Food Coloring Gel or Paste: Provides the gory visual that makes this cheesecake Halloween-ready.
Ingredient Swaps for Every Creature in Your Coven
• Chocolate Cookies Instead of Oreos: If you’re avoiding store-bought cookies, any chocolate biscuit will do.
• Coconut Cream for Dairy-Free: Swap double cream with coconut cream and choose a dairy-free cream cheese.
• Dark Chocolate Instead of White: For a richer flavor and darker aesthetic, use dark chocolate in the filling.
• Citrus Twist: Add orange zest instead of lemon for a spooky seasonal flavor.
• Beetroot Powder for Natural Coloring: Use as a plant-based alternative to red food dye.
How to Make a Bloody Good Halloween Cheesecake: Step-by-Step
- Prepare the Tin
Line a standard 23cm (9-inch) springform tin with parchment paper at the base. - Make the Oreo Crust
Crush Oreos into fine crumbs using a food processor or by bashing them in a zip bag with a rolling pin.
Melt the butter and mix it into the crumbs until they resemble wet sand.
Press the mixture into the tin’s base and refrigerate for 30 minutes to firm up. - Make the Cheesecake Filling
Melt the white chocolate until smooth, then let it cool slightly.
In a large bowl, beat together cream cheese, vanilla, lemon juice, and salt until silky.
Whip the double cream until stiff peaks form, then fold gently into the cream cheese mixture.
Stir in the cooled white chocolate until fully incorporated. - Assemble the Cheesecake
Remove the tin from the fridge and pour in the cheesecake mixture.
Smooth the top and chill for at least 2 hours or overnight for best results. - Prepare the Blood Drip
Mix condensed milk, cocoa powder, vanilla extract, and red food coloring until you achieve a deep blood-red tone. - Decorate for Gore
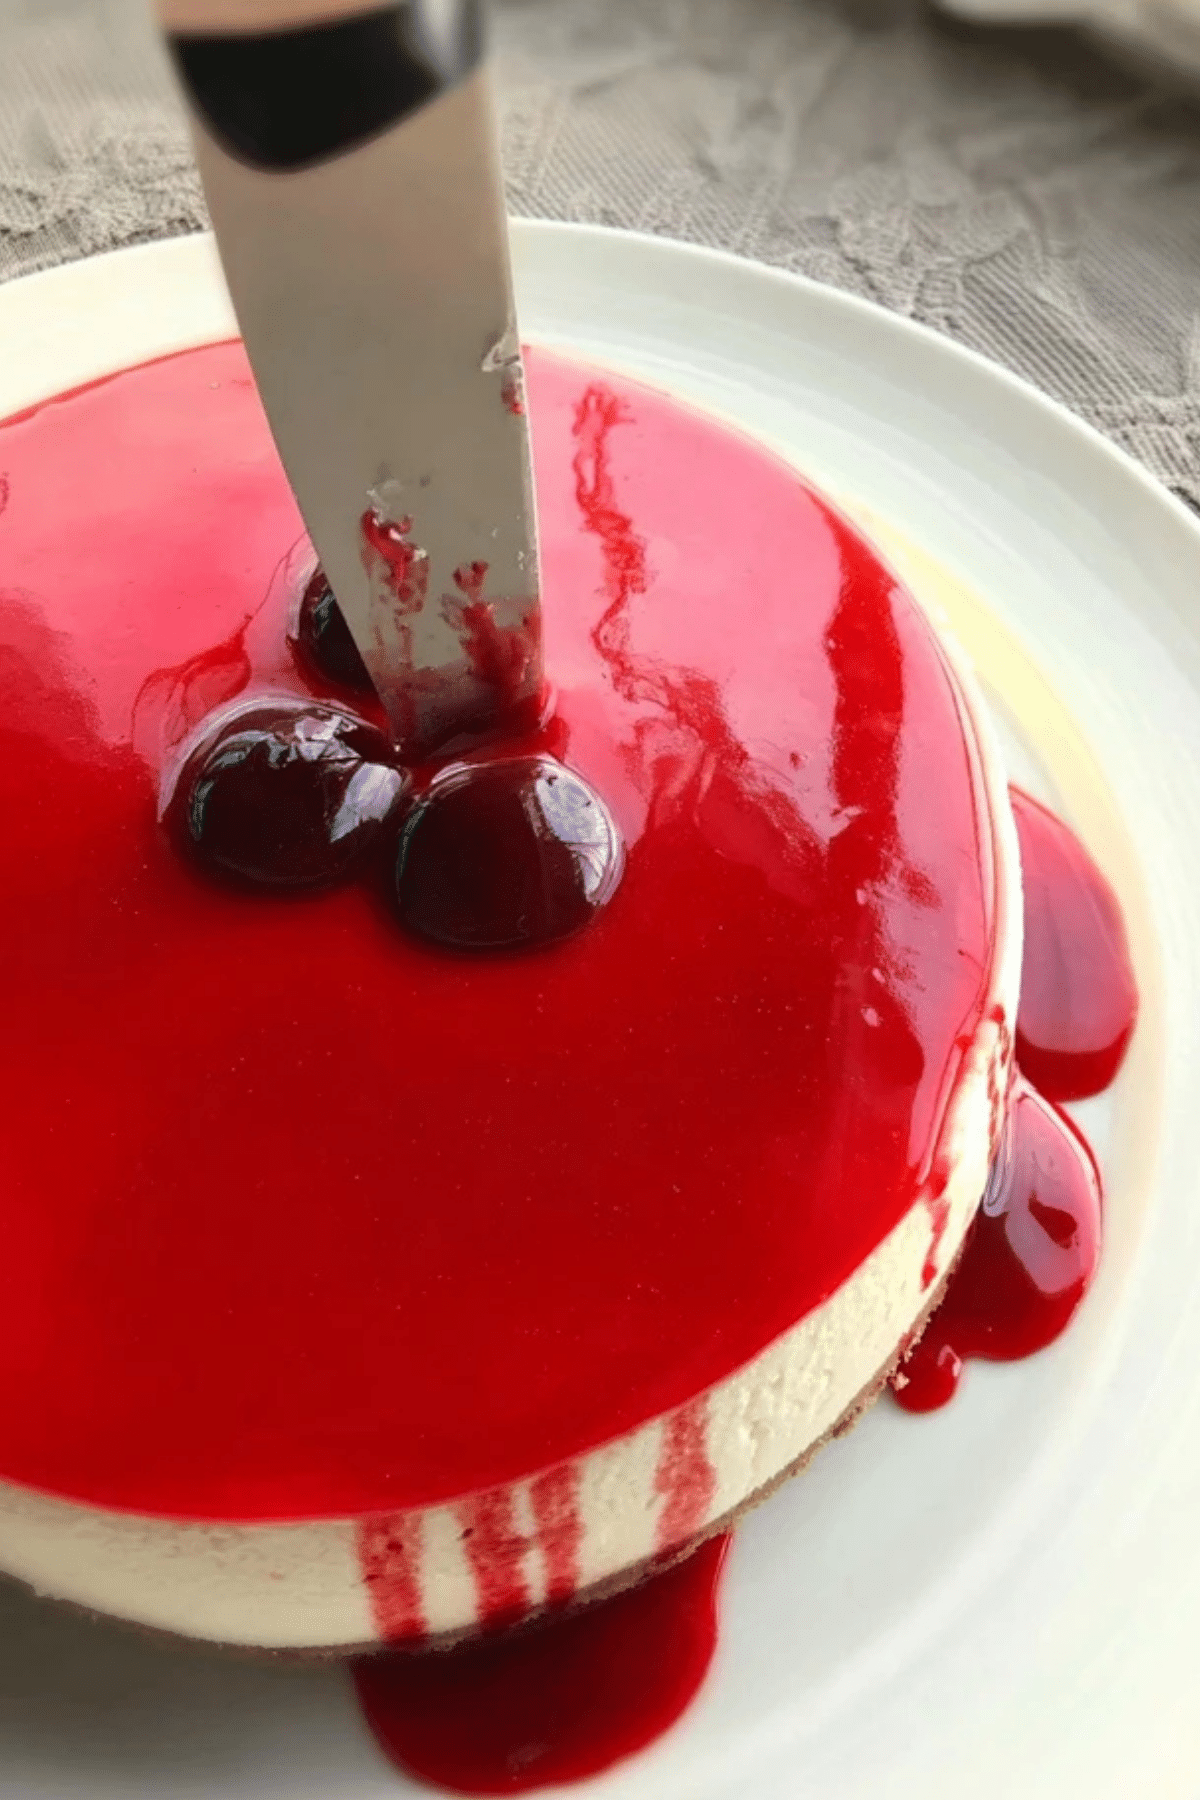
Once set, carefully remove the cheesecake from the tin. Spoon the red drip over the top and let it cascade down the sides.
For dramatic effect, insert a clean knife into the center before serving.

Tips for a Flawless Fright Night Dessert
• Chill Time Is Key: Let the cheesecake set fully to hold its shape and deliver the perfect creamy texture.
• Don’t Overbeat: Fold whipped cream gently to avoid deflating your filling.
• Best Served Fresh: The “blood” glaze looks most realistic right after it’s applied.
• Use Gel Coloring: For intense red without thinning the glaze, always use gel or paste coloring.
• Store Smartly: Keep leftovers in the fridge for up to 3 days in an airtight container.
How to Pair and Customize Your Bloody Good Cheesecake
• Perfect Pairings: Serve with a scoop of vanilla or raspberry sorbet to cut through the richness.
• Spice It Up: Add cinnamon or nutmeg to the crust for a warming fall touch.
• Vegan Option: Use vegan chocolate, dairy-free cream cheese, and coconut cream for a cruelty-free version.
• Mini Cheesecakes: Pour the mixture into cupcake liners for single-serve, party-ready bites.
• Gory Garnishes: Top with fake candy eyeballs or gummy worms for added Halloween horror.
The Ultimate Halloween Dessert, Year After Year
This Bloody Good Halloween Cheesecake is more than just a gimmick — it’s a delicious, indulgent dessert you’ll want to make long after Halloween. The combination of smooth white chocolate, rich Oreo base, and that creepy-cool red glaze makes it the star of any seasonal celebration. Whether you’re feeding a haunted house full of guests or just treating yourself to a slice of spooky joy, this recipe is a no-bake marvel that never fails to impress.
Conclusion
This Bloody Good Halloween Cheesecake is a no-bake showstopper that checks all the boxes — festive, frightful, and fantastically flavorful. With its striking appearance and rich layers of white chocolate and Oreo, it’s the perfect way to indulge during spooky season without the stress of complicated baking. Whether you’re hosting a Halloween party, entertaining kids, or enjoying a horror movie night in, this dessert adds a gruesomely delightful touch to your October 31st lineup. Simple to make, eerie to look at, and utterly irresistible — it’s truly a bloody good idea for any Halloween celebration.
Frequently Asked Questions About Bloody Good Halloween Cheesecake
Can I make this cheesecake ahead of time?
Absolutely! This Bloody Good Halloween Cheesecake can be made up to 2 days in advance. Store it in the fridge, uncovered or lightly covered with foil, to maintain its texture. Just wait to add the red drip until right before serving for maximum visual impact.
Can I freeze the cheesecake for later?
Yes, you can freeze the cheesecake before adding the red topping. Wrap it tightly in plastic wrap and foil, then freeze for up to 1 month. Thaw in the fridge overnight and add the bloody drip just before serving for best results.
What type of food coloring works best for the blood effect?
Gel or paste-based red food coloring works best for achieving a vivid, deep red hue without watering down the cocoa-vanilla glaze. Avoid liquid food dyes as they can alter the consistency.
How do I make this recipe gluten-free?
To make a gluten-free version of the Bloody Good Halloween Cheesecake, simply substitute the Oreos with certified gluten-free chocolate cookies. All other ingredients are naturally gluten-free, but always double-check product labels.
More Relevant Recipes
- Marshmallow Whip Cheesecake Heaven: This dreamy no-bake cheesecake combines fluffy marshmallow whip with a velvety cream cheese filling for a sweet, cloud-like texture. A perfect alternative for fans of the Bloody Good Halloween Cheesecake looking for something just as indulgent, but without the spooky visuals.
- Mini Pumpkin Cheesecakes: These bite-sized treats deliver all the richness of a cheesecake with a seasonal twist. Featuring a spiced pumpkin filling and buttery crust, they’re ideal for Halloween parties or autumn gatherings, and make a great complement to chocolate-based desserts like the Bloody Good Halloween Cheesecake.
- Pumpkin Spice No-Bake Cookies: Bursting with fall flavor and festive spice, these easy no-bake cookies are a quick alternative for those who loved the simplicity of the Bloody Good Halloween Cheesecake. They require zero oven time and still deliver maximum Halloween flavor.

Bloody Good Halloween Cheesecake
- Total Time: 2 hours 30 minutes
- Yield: 8 servings
- Diet: Vegetarian
Description
A spooky and indulgent no-bake dessert perfect for Halloween, the Bloody Good Halloween Cheesecake features a crisp Oreo cookie base, a creamy white chocolate cheesecake filling, and a gory red cocoa-vanilla glaze. It’s fun to make, visually dramatic, and irresistibly delicious.
Ingredients
- 200g (7oz) Oreos: for a rich and crunchy cookie base
- 70g (5 tbsp) salted butter: binds the cookie crust with a hint of saltiness
- 200g (7oz) white chocolate: adds sweetness and creaminess to the cheesecake
- 600g (21oz) full-fat cream cheese: provides the smooth base for the cheesecake layer
- 1 tsp vanilla extract: enhances flavor and warmth
- Juice of 1/2 a lemon: adds brightness and balance
- Pinch of salt: intensifies overall flavor
- 300ml (1 1/4 cups) double cream: whipped for volume and light texture
- 150g (1/2 cup) condensed milk: base for the bloody red topping
- 1 tsp cocoa powder: adds color depth and subtle chocolate notes to the glaze
- 1 tsp vanilla extract (for the drip): adds sweetness and aroma to the glaze
- Red food coloring gel or paste: gives the gory red color to the topping
Instructions
- Line a 23cm (9-inch) springform pan with parchment paper at the base.
- Crush Oreos into crumbs using a food processor or by placing them in a sealed bag and bashing with a rolling pin.
- Melt the butter and mix it into the crumbs until the texture resembles wet sand. Press the mixture into the pan to form the base. Chill for 30 minutes.
- Melt the white chocolate gently and allow it to cool slightly.
- In a large bowl, beat the cream cheese, 1 tsp vanilla extract, lemon juice, and a pinch of salt until smooth.
- Whip the double cream until stiff peaks form and fold it gently into the cream cheese mixture.
- Fold in the melted white chocolate until evenly combined.
- Spread the cheesecake mixture over the chilled cookie base and smooth the top. Chill for at least 2 hours.
- For the red drip, mix together the condensed milk, cocoa powder, 1 tsp vanilla extract, and red food coloring until smooth and vibrant.
- Remove the cheesecake from the tin and place it on a serving plate. Spoon the red drip over the top, letting it drip down the sides.
- Optional: Insert a clean knife into the center for a dramatic gory effect. Serve and enjoy!
Notes
- For a citrus twist, add orange zest to the filling.
- Chill overnight for a firmer, cleaner cut.
- Use gel food coloring for best consistency and color intensity.
- This dessert is best served the day it’s made for optimal texture and presentation.
- Can be stored in the refrigerator for up to 3 days.
- Prep Time: 25 minutes
- Cook Time: 0 minutes
- Category: Dessert
- Method: No-Bake
- Cuisine: American
Nutrition
- Serving Size: 1 slice
- Calories: 510
- Sugar: 32g
- Sodium: 310mg
- Fat: 36g
- Saturated Fat: 22g
- Unsaturated Fat: 11g
- Trans Fat: 0g
- Carbohydrates: 42g
- Fiber: 1g
- Protein: 6g
- Cholesterol: 110mg

