
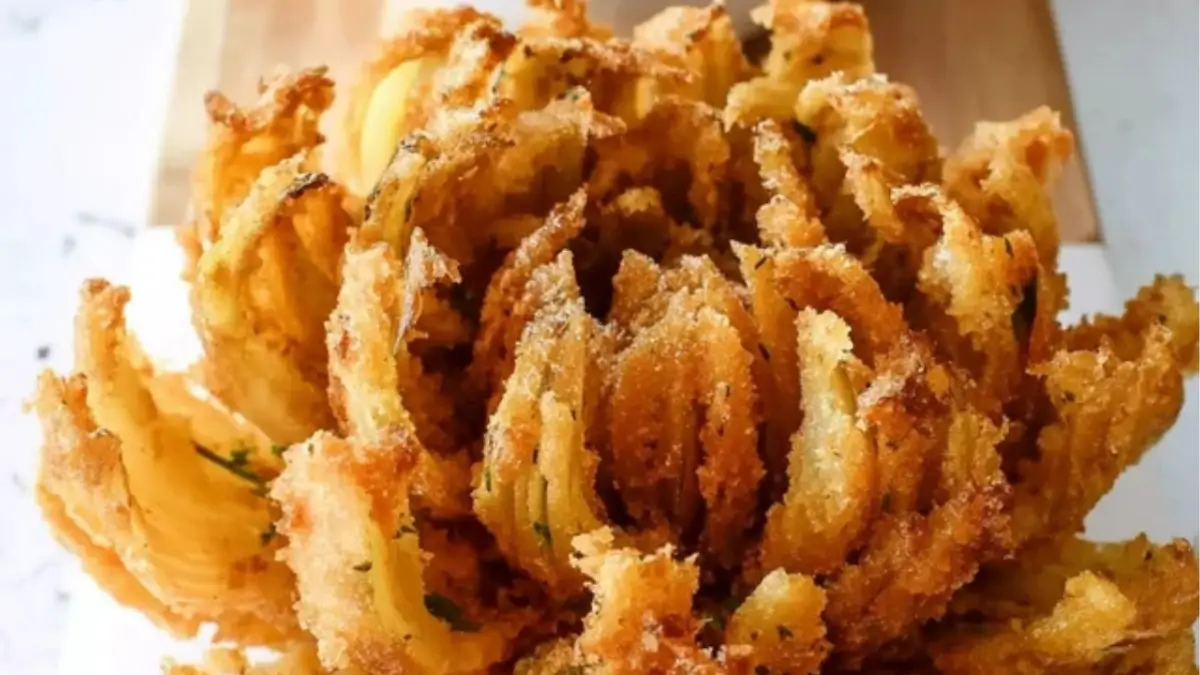
There’s something about a crispy, golden blooming onion that feels like a mini celebration—an appetizer that instantly elevates movie nights, backyard hangouts, or even a quiet dinner for one. I remember the first time I attempted to make one at home. I had always loved ordering them at restaurants, but I assumed it was too complicated for a home cook. One rainy Saturday, curiosity and a bag of sweet onions led me to try it—and to my surprise, it turned out not only delicious but surprisingly doable. Since then, this easy blooming onion recipe has become one of my favorite “wow” dishes to whip up with minimal stress.
If you’re just starting your cooking journey, this recipe is a gem. It’s straightforward, fun, and wildly satisfying to create something so visually impressive with just a few pantry staples. Plus, it’s a baked or fried veggie-based appetizer that’s just as tasty as it looks—perfect for fans of crunchy textures and bold flavor.

Why This Recipe is Special
This isn’t just a fun-looking appetizer—it’s a masterclass in how simple ingredients can create big flavors. Sweet onions get dressed up in a spiced, double-layered breading that fries up to a crispy shell while staying tender inside. The best part? You don’t need fancy equipment or chef skills to make it work. The method is simple and beginner-friendly, with tips along the way to ensure success. Whether fried, baked, or even air-fried, this blooming onion is customizable, tasty, and an absolute crowd-pleaser.
Ingredients and Preparation
Sweet Onions – Sweet yellow or Vidalia onions are ideal because they soften beautifully while keeping a gentle sweetness. Their size and structure make them perfect for fanning out into that signature “bloom.”
All-Purpose Flour – This is your breading base. It helps form that iconic crispy exterior and carries all the spices with it.
Eggs and Milk – These two act as the glue between the flour layers, ensuring the breading sticks and forms that crunchy coating. Whole milk adds extra richness.
Spices (Paprika, Cumin, Cayenne, Garlic Powder, Oregano, Thyme, Black Pepper, Salt) – This combination delivers warmth, smokiness, and depth. Cayenne adds a little heat, but feel free to reduce it for a milder version.
Vegetable Oil – Use a neutral oil with a high smoke point like canola or sunflower for deep frying. You’ll need just enough to submerge the onion.
Optional Sauce Ingredients (Mayonnaise, Sour Cream, Horseradish, Ketchup) – These make a tangy, creamy dipping sauce with a kick. You can swap in Greek yogurt for sour cream or use hot sauce instead of horseradish.
Substitutions & Flexibility:
- Swap gluten-free flour for a GF version.
- Use buttermilk in place of milk for extra tang.
- For a lighter version, skip the frying and opt for baking or air frying.
Step-by-Step Instructions
Step 1: Prepare the dipping sauce first if you’re making it. Mix mayonnaise, sour cream, horseradish, ketchup, paprika, garlic powder, and cayenne in a small bowl. Cover and chill while you work on the onion.
Step 2: Peel the onion and cut a small, flat spot on the non-root end to stabilize it. Place it root side up on a cutting board. Using a sharp knife, cut the onion into quarters, being careful to stop about ½ inch from the root so it stays intact.
Step 3: Cut each of those quarters into three or four thinner slices, again stopping short of the root. Turn the onion over and gently fan out the layers using your fingers to form the “bloom.”
Step 4: In one bowl, mix your flour and spices thoroughly. In a separate bowl, whisk together eggs and milk.
Step 5: Coat the entire onion with the flour mixture, separating layers to get flour into every petal. Then dip the onion into the egg mixture, ensuring it’s fully soaked. Finally, return it to the flour mix for a second coating, pressing gently to help the flour stick.
Step 6: Heat oil to 375°F in a deep pot or fryer. Carefully place the onion root side up into the hot oil. Fry for 7–10 minutes until it’s a rich golden brown. Remove with a slotted spoon and drain on paper towels.
Step 7: Serve the blooming onion hot with your dipping sauce. Enjoy the crispy, spiced layers and tender interior.
Beginner Tips and Notes
- If your onion petals aren’t separating easily, soak it in cold water for a few minutes after cutting—this helps it bloom more dramatically.
- To avoid over-browning, keep an eye on the oil temperature. Too hot, and it burns the outside before cooking through. Use a thermometer if you have one.
- No deep fryer? Use a Dutch oven or any heavy pot with tall sides. Just make sure the oil covers the onion halfway at minimum.
- Don’t skip the double coating. This is key to achieving that signature crispy crust.
- Baking or air frying? Preheat your oven or air fryer, and spritz the onion with oil for a golden finish.
Serving Suggestions
Pair your blooming onion with a variety of dips like ranch, chipotle mayo, or sriracha yogurt. It also goes well with grilled meats or veggie burgers for a casual dinner.
Leftovers can be reheated in an air fryer at 350°F for 5–6 minutes to restore crispness. Avoid microwaving—it’ll lose the crunch.
Conclusion
Ready to wow your guests—or just yourself—with a restaurant-style treat you made in your own kitchen? This easy blooming onion recipe is here to prove that you don’t need to be a pro to create something delicious and impressive. Try it once, and you’ll want to make it every time you crave something crunchy, savory, and fun. Let me know how your first blooming onion turns out in the comments—I’d love to hear your twists and tips.
FAQ About Easy Blooming Onion Recipe
Absolutely. A deep fryer is convenient, but not necessary. You can use a heavy-bottomed pot like a Dutch oven and a cooking thermometer to maintain the oil temperature around 375°F for best results.
The key is in the cutting technique. Make quarter cuts down to about ½ inch above the root to keep the onion intact. Then slice each quarter into thinner sections and gently fan them out. If it’s stiff, soak the onion in cold water for 10 minutes after slicing to help it bloom.
Yes. For baking, preheat your oven to 400°F, cover the onion with foil for the first 10 minutes, then bake uncovered for another 20 minutes. For an air fryer, cook it at 350°F for about 20 minutes, checking for a golden brown finish.
Sweet onions like Vidalia or yellow onions work best. They have a mild, slightly sweet flavor that balances beautifully with the seasoned coating.
More Relevant Recipes
- Easy Blooming Onion Sauce Recipe
- Crispy Bite-Sized Blooming Onions for Easy Entertaining
- Hearty Chicken and Sausage Gumbo
Easy Blooming Onion
- Total Time: 30 minutes
- Yield: 3 blooming onions
- Diet: Vegetarian
Description
This easy blooming onion recipe features sweet onions coated in a spiced, crispy breading and fried or baked to golden perfection—ideal for beginners.
Ingredients
- 3 medium sweet onions
- 2 eggs
- 1 cup milk
- 2 cups all-purpose flour
- 1 tablespoon paprika
- 2 teaspoons ground cumin
- 1 teaspoon dried oregano
- 1 teaspoon dried thyme
- 1 teaspoon salt
- 1 teaspoon ground cayenne pepper
- 1/2 teaspoon ground black pepper
- 1/2 teaspoon garlic powder
- Vegetable oil for frying
- 1/4 cup mayonnaise (for dipping sauce)
- 1/4 cup sour cream
- 1 1/2 tablespoons creamy horseradish
- 1 1/2 tablespoons ketchup
- 1/2 teaspoon paprika
- 1/2 teaspoon garlic powder
- 1/4 teaspoon ground cayenne pepper
Instructions
- Combine all dipping sauce ingredients (mayonnaise, sour cream, horseradish, ketchup, paprika, garlic powder, cayenne) in a bowl and chill.
- Peel the onions and cut a small flat spot on the non-root end. Place the onion root-side up and slice into quarters, stopping about 1/2 inch from the root. Cut each quarter into 3–4 thin sections, then turn root-side down and gently fan out.
- In one bowl, whisk together the eggs and milk. In another, combine the flour with all dry seasonings.
- Coat the onion fully in the flour mixture, gently separating petals to get even coverage. Dip into the egg mixture, then back into the flour mixture, pressing flour in gently.
- Heat oil to 375°F in a deep pan. Carefully place the onion root side up in the hot oil and fry for 7–10 minutes or until golden brown. Remove and drain on paper towels.
- Serve warm with dipping sauce.
Notes
- Use sweet Vidalia onions for best results.
- Soak onion in cold water after cutting to help it bloom.
- Use a thermometer to keep frying oil at 375°F.
- Baking alternative: 400°F for 30 minutes (covered first 10 min).
- Air fry alternative: 350°F for 20 minutes until golden.
- Best served immediately for optimal crispness.
- Prep Time: 20 minutes
- Cook Time: 10 minutes
- Category: Appetizer
- Method: Frying
- Cuisine: American
Nutrition
- Serving Size: 1 blooming onion
- Calories: 638
- Sugar: 12g
- Sodium: 1084mg
- Fat: 25g
- Saturated Fat: 7g
- Unsaturated Fat: 16g
- Trans Fat: 0.04g
- Carbohydrates: 86g
- Fiber: 6g
- Protein: 18g
- Cholesterol: 138mg