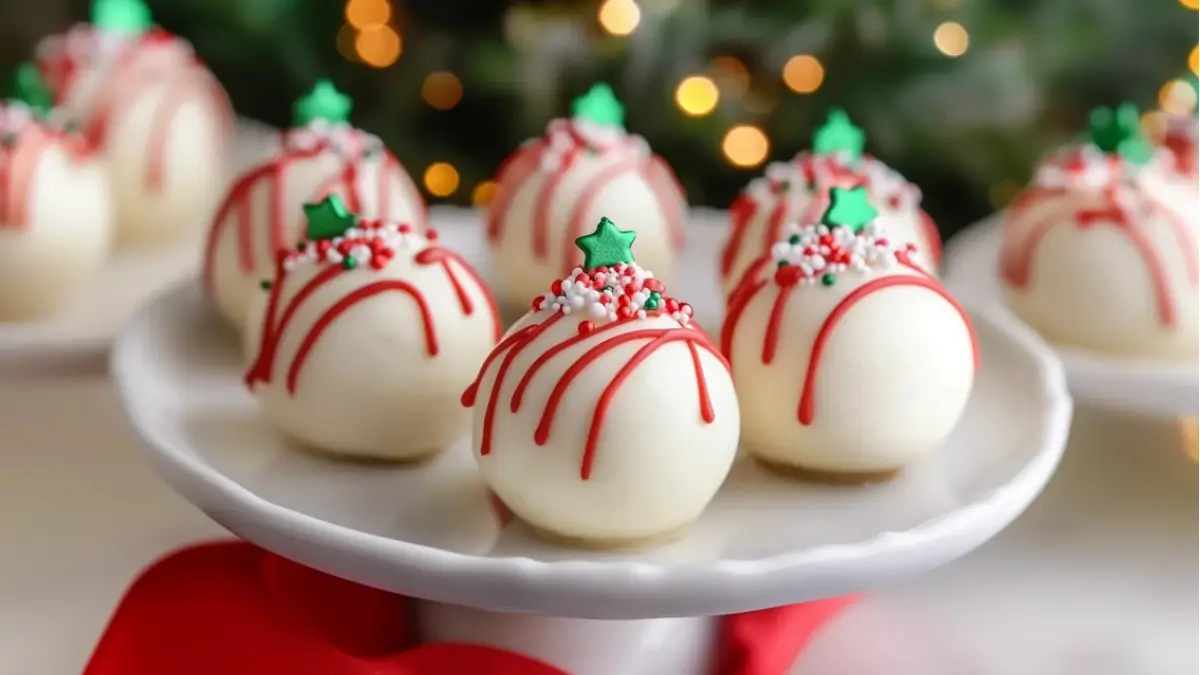
When it comes to holiday treats, the magic lies in simplicity, nostalgia, and a touch of festive flair. Little Debbie Christmas Cake Balls tick all the boxes, blending the beloved flavors of Little Debbie Christmas Tree Cakes with a fun, easy-to-make recipe. Whether you’re a baking novice or a seasoned pro, this guide will show you how to create the perfect holiday dessert that’s sure to impress guests and family alike.

Why You’ll Love Little Debbie Christmas Cake Balls
These delightful bite-sized desserts are more than just a treat—they’re a holiday tradition in the making. Here’s why they’re a must-have on your festive menu:
- Quick and Easy: Minimal prep and no need for advanced baking skills.
- Festive Appeal: Vibrant decorations make them stand out at parties or on dessert platters.
- Customizable: Add your own twist with flavors, decorations, or coatings.
- Perfect for Gifting: These cake balls are ideal for wrapping up as holiday gifts.
Let’s dive into the full recipe, along with tips and tricks to make it foolproof and delicious!
Ingredients for Success
To make Little Debbie Christmas Cake Balls, you only need a few pantry staples and some creativity. The star of the show is Little Debbie Christmas Tree Cakes, paired with cream cheese for creaminess and chocolate for a smooth coating. Optional sprinkles and sanding sugar add the festive finishing touch.
While the ingredient list is simple, the magic happens in how they come together.
Step-by-Step Directions
1. Crumbling the Cakes
The first step is breaking down the Little Debbie Christmas Tree Cakes. Crumble them into a large mixing bowl, ensuring you eliminate any large chunks. The finer the crumb, the better the dough will form.
2. Mixing with Cream Cheese
Add softened cream cheese to the crumbled cakes and mix thoroughly. This step is crucial—it binds the ingredients into a cohesive, dough-like consistency. Use a spatula or your hands to ensure everything is well incorporated.
3. Shaping the Cake Balls
Roll the mixture into evenly sized balls, about one inch in diameter. Uniformity matters, as it ensures even coating and a professional appearance. Place the balls on a parchment-lined baking sheet and freeze them for 30 minutes. Freezing helps them firm up and makes coating easier.
4. Coating with White Chocolate
Melt the white chocolate wafers according to the package instructions. Dip each cake ball into the melted chocolate, ensuring full coverage. Use a fork to lift the balls out of the chocolate and let the excess drip off before placing them back on the parchment paper.
5. Adding Festive Decorations
Melt the red candy wafers and drizzle them over the coated cake balls. For a final holiday touch, sprinkle with green sanding sugar or your favorite festive sprinkles. This step not only enhances the look but also adds texture and flavor.
6. Setting the Cake Balls
Refrigerate the decorated cake balls until the chocolate sets completely. Once firm, they’re ready to serve or package for gifting!
Tips for the Perfect Little Debbie Christmas Cake Balls
Achieving the Right Consistency
If the dough feels too sticky to roll, refrigerate it for 10-15 minutes before shaping. This small step can make handling much easier.
Avoiding Chocolate Cracks
Ensure your cake balls are chilled but not frozen solid before dipping. Letting the chocolate cool slightly before coating can also prevent cracks.
Decorating Like a Pro
Use piping bags for precise candy drizzle or get creative with edible glitter, mini candies, or crushed peppermint.
Creative Twists and Variations
The beauty of Little Debbie Christmas Cake Balls is their versatility. Here are some fun variations to try:
- Flavor Swaps: Use chocolate or strawberry-flavored Little Debbie cakes for a different taste.
- Alternative Coatings: Replace white chocolate with milk or dark chocolate for a richer flavor.
- Themed Decorations: Adapt the colors and sprinkles for different holidays, like Easter or Halloween.
Nutritional Information & Health Benefits
These cake balls are a festive indulgence, so they’re best enjoyed in moderation. Here’s a breakdown of the nutritional content for one cake ball:
Nutrition Details
- Serving Size: 1 cake ball
- Calories: ~150
- Carbohydrates: 18g
- Protein: 1g
- Fat: 8g
- Saturated Fat: 5g
- Cholesterol: 15mg
- Sodium: 70mg
- Fiber: 0g
- Sugar: 12g
- Vitamin D: Trace
- Calcium: 20mg
- Iron: 0.5mg
FAQs About Little Debbie Christmas Cake Balls
1. Can I Freeze These Cake Balls?
Yes! These cake balls freeze beautifully. Place them in an airtight container and store them for up to three months. Thaw in the refrigerator before serving.
2. How Far in Advance Can I Make Them?
You can make these cake balls up to a week in advance if stored in the refrigerator. This makes them perfect for holiday prep.
3. What’s the Best Way to Melt Chocolate?
For best results, use a double boiler or microwave in 30-second intervals, stirring frequently. This prevents the chocolate from burning.
4. Can I Make Them Gluten-Free?
Unfortunately, Little Debbie Christmas Tree Cakes aren’t gluten-free. However, you can substitute them with gluten-free cake options to adapt the recipe.
5. What’s a Good Substitute for Sanding Sugar?
If you don’t have sanding sugar, colored sugar sprinkles or even crushed candies work just as well.
Why These Cake Balls Deserve a Spot on Your Dessert Table
Holiday baking can feel overwhelming, but Little Debbie Christmas Cake Balls make it simple and fun. Their small size makes them ideal for portion control, while their festive decorations bring the holiday spirit to any occasion. Plus, they’re so easy to share, whether at a party, as a gift, or just with family over a cup of cocoa.
By following this recipe and incorporating the tips shared, you’ll be whipping up the most delightful holiday treat in no time. These cake balls aren’t just a dessert—they’re a holiday memory waiting to be made!
Ready to Make Your Own Little Debbie Christmas Cake Balls?
Gather your ingredients, follow this guide, and let the festive baking begin. Whether you’re making them for yourself or to share with loved ones, these treats are sure to bring smiles all season long.
More Relevant Recipes
Print
Little Debbie Christmas Cake Balls
- Total Time: 1 hour (includes chilling time)
- Yield: 24 cake balls
Description
Little Debbie Christmas Cake Balls are a festive, no-bake dessert made with crumbled Christmas Tree Cakes, cream cheese, and a white chocolate coating, topped with holiday decorations.
Ingredients
- 10 Little Debbie Vanilla Christmas Tree Cakes (from two 8.62 oz boxes)
- 8 oz cream cheese, softened
- 20 oz white chocolate melting wafers (Ghirardelli recommended)
- 6 oz red vanilla-flavored melting wafers (Wilton recommended)
- 1 tbsp green sanding sugar
Instructions
- Crumble the Cakes: Start by placing the Christmas tree cakes in a large mixing bowl. Use your hands or a fork to crumble them into fine pieces. The finer the crumble, the smoother your cake balls will be.
- Mix with Cream Cheese: Add softened cream cheese to the crumbled cakes. Mix thoroughly until you achieve a dough-like consistency. This step is where the magic happens, binding the cake crumbs into a workable mixture.
- Roll into Balls: Roll the mixture into small, uniform balls about an inch in diameter. Place them on a baking sheet lined with parchment paper, and pop them into the freezer for about 30 minutes. This will help them hold their shape during the next steps.
- Coat with White Chocolate: Melt your white chocolate wafers according to the package instructions. Dip each cake ball into the melted chocolate, ensuring they are fully coated. A fork works well here to lift the balls out while letting excess chocolate drip off. Place the coated balls back onto the parchment-lined sheet.
- Decorate: Melt the red candy wafers and drizzle them over the white chocolate-coated balls. For a final festive touch, sprinkle green sanding sugar on top. This step adds that quintessential holiday sparkle!
- Chill and Set: Place the decorated cake balls in the refrigerator until the chocolate is fully set. Once firm, serve chilled and watch them disappear in minutes!
Notes
- Plan Ahead: Freezing the balls before coating them is crucial. It keeps them firm and ensures a smooth chocolate finish.
- Experiment with Flavors: While the vanilla Christmas tree cakes are a classic, feel free to experiment with other flavors or brands to switch things up.
- Storage: These cake balls can be stored in an airtight container in the refrigerator for up to a week, making them great for prepping ahead of time.
- Gifting Tip: Place a few cake balls in a festive box or bag for a charming holiday gift
- Prep Time: 40 minutes
- Cook Time: 0 minutes (no baking required)
- Category: Dessert
- Method: No-Bake
- Cuisine: American, Holiday Treats
Nutrition
- Serving Size: 1 cake ball
- Calories: 150kcal
- Sugar: 12g
- Sodium: 70mg
- Fat: 8g
- Saturated Fat: 5g
- Unsaturated Fat: 2g
- Trans Fat: 0g
- Carbohydrates: 18g
- Fiber: 0g
- Protein: 1g
- Cholesterol: 15mg

