
There’s something undeniably comforting about a dessert that tastes like home. When I first stumbled across a recipe for Oreo Delight at a family potluck, I was instantly hooked. It was a sweltering summer day, and while everyone else hovered near the grill, I found myself hovering near the dessert table—repeatedly. That first forkful of velvety cream cheese, cool chocolate pudding, and those familiar crunchy cookie bits sealed the deal.
What makes this dessert a staple in my kitchen is how foolproof it is. There’s no baking required, it can be made ahead, and the ingredients are common pantry staples. If you’re just getting started in the kitchen, this no-bake Oreo Delight is one of the easiest ways to impress family and friends without breaking a sweat.

Why This Recipe is Special
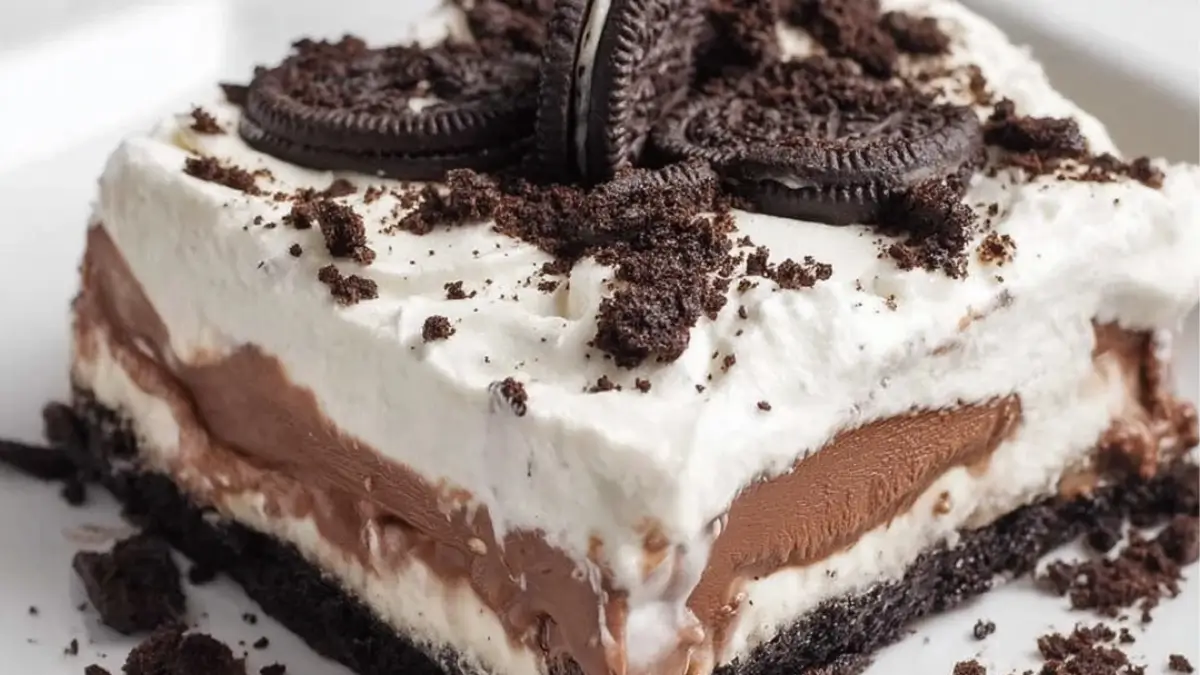
Oreo Delight isn’t just a quick treat—it’s a layered masterpiece with the perfect balance of creamy, chocolatey, and crunchy textures. It’s a go-to for busy weeknights, casual get-togethers, or just when you’re craving something indulgent without turning on the oven. With simple steps and flexible ingredients, it’s practically made for beginner cooks who want to build confidence in the kitchen.
Ingredients and Preparation
Oreo Cookies – These are the backbone of the dessert, creating both the crust and a crunchy topping. Their deep cocoa flavor adds richness and contrast to the cream layers. You can substitute with any chocolate sandwich cookies if Oreos aren’t available.
Butter – Used to bind the crushed Oreos into a solid crust. Unsalted butter is best for balancing sweetness, but margarine or coconut oil could work in a pinch.
Cream Cheese – Adds a tangy, velvety layer that contrasts beautifully with the sweet components. Make sure it’s softened for easier mixing. Mascarpone can be used for a milder flavor.
Confectioners’ Sugar – Provides sweetness without graininess. If you only have granulated sugar, blend it in a food processor to mimic powdered texture.
Cool Whip – This whipped topping brings fluffiness and lightness. Can’t find it? You can make homemade whipped cream with cold heavy cream and a touch of sugar.
Instant Chocolate Pudding – Offers a creamy, chocolaty middle layer. Just whisk with milk and you’re done—no heating required. If desired, swap in vanilla or butterscotch pudding for a twist.
Milk – Needed to activate the pudding mix. While 2% milk is ideal, whole or plant-based options like oat or almond milk also work, though textures may vary.
Step-by-Step Instructions
Step 1
Prepare a 9×13-inch baking dish by lining it with parchment paper or lightly greasing it. This prevents sticking and makes cleanup easier.
Step 2
Crush all of the Oreo cookies (yes, with the cream filling) using a food processor or by placing them in a sealed bag and pounding with a rolling pin. Reserve about ¾ cup of crumbs for the topping.
Step 3
Melt the butter and stir it into the remaining Oreo crumbs until fully combined. Press this mixture into the bottom of the baking dish to form an even crust, then pop it in the freezer for a few minutes while you make the next layer.
Step 4 In a mixing bowl, beat softened cream cheese with confectioners’ sugar until smooth and creamy. Add in one tub of Cool Whip and mix gently—about 30 seconds is enough. Be careful not to overmix to maintain a light texture.
Step 5
Spoon the cream cheese mixture in dollops over the chilled crust. This makes it easier to spread without disrupting the Oreo base. Gently smooth it into an even layer and return the dish to the freezer briefly.
Step 6
In a clean bowl, whisk the dry chocolate pudding mix with milk for about 2 minutes until thickened. The pudding will continue to set as it chills.
Step 7
Spread the pudding evenly over the cream cheese layer using a spatula, taking care to not mix the layers.
Step 8
Top with the second tub of Cool Whip, spreading it all the way to the edges.
Step 9
Sprinkle the reserved Oreo crumbs over the top for a beautiful, crunchy finish.
Step 10
Refrigerate the dessert for at least 6 hours (overnight is even better) to let the layers firm up and flavors meld.
Beginner Tips and Notes
If your crust feels too crumbly, it likely needs more butter—just a tablespoon or two can help. If the cream cheese layer seems too thick to spread, let it sit at room temperature for 5–10 more minutes before working with it.
To save time, crush the Oreos and melt the butter while the cream cheese is softening. If you don’t own a food processor, a sturdy Ziploc bag and a rolling pin work just fine.
Don’t have a hand mixer? A whisk and some patience will get the job done, especially for the pudding and whipped layers.
Serving Suggestions
Oreo Delight pairs beautifully with a hot drink like coffee or hot chocolate for cold nights, or a tall glass of milk for a classic combo. Want to take it up a notch? Drizzle with chocolate syrup or caramel sauce before serving.
For an easy, well-rounded dessert spread, serve this with fresh berries or a fruit salad to balance out the richness. Leftovers store beautifully in the fridge for up to 5 days or can be frozen in individual portions for up to 3 months.
Conclusion
If you’re looking for a sweet treat that’s big on flavor and short on fuss, this easy Oreo Delight hits all the right notes. It’s a quick and healthy (mentally, at least!) way to satisfy your sweet tooth, and an ideal starter recipe for building your no-bake dessert skills. Try it out, make it your own, and let us know in the comments how it turned out. Whether you stuck with the classic or added your own twist, we can’t wait to hear your take on this no-fail crowd favorite.
FAQ About Oreo Delight
1. Can I make Oreo Delight ahead of time?
Yes, Oreo Delight is actually better when made ahead. Refrigerating it overnight allows the layers to firm up and the flavors to meld, making it easier to slice and serve.
2. What can I use instead of Cool Whip?
If you don’t have Cool Whip, you can make your own whipped topping by beating cold heavy cream with a bit of sugar until stiff peaks form. Use about the same volume as the Cool Whip called for in the recipe.
3. How do I know if the pudding layer is set properly?
After mixing the pudding and milk, it should thicken within 2–3 minutes. It doesn’t need to be fully firm before layering—it will continue to set in the fridge.
4. Can I freeze Oreo Delight?
Absolutely. Oreo Delight can be frozen in an airtight container for up to three months. For best results, freeze individual portions and thaw them in the fridge before serving.
More Relevant Recipes
- Oreo Balls for Christmas: A Festive No-Bake Treat!
- Pumpkin Caramel Cheesecake Delight
- No-Bake Oreo Balls
Oreo Delight: The Ultimate No-Bake Dessert
- Total Time: 6 hours 20 minutes (including chilling)
- Yield: 12 servings
- Diet: Vegetarian
Description
This no-bake Oreo Delight is an easy layered dessert made with crushed Oreos, cream cheese, chocolate pudding, and Cool Whip—perfect for beginner cooks.
Ingredients
- 50 Oreo cookies
- 1/2 cup unsalted butter, melted
- 8 ounces cream cheese, softened
- 1 cup confectioners’ sugar
- 16 ounces Cool Whip (two 8-ounce tubs)
- 2 (3.4-ounce) packages instant chocolate pudding
- 2 1/2 cups 2% milk
Instructions
- Prepare a 9×13-inch baking dish by lining it with parchment paper or greasing it lightly.
- Crush all of the Oreo cookies (including filling) using a food processor or in a bag with a rolling pin. Reserve 3/4 cup for topping.
- Mix melted butter with the remaining crushed Oreos and press into the bottom of the dish to form a crust. Freeze while preparing the next layer.
- In a mixing bowl, beat softened cream cheese with confectioners’ sugar until smooth. Fold in one tub of Cool Whip and mix until just combined.
- Dollop the cream cheese mixture over the Oreo crust and spread gently into an even layer. Return to freezer while preparing the pudding.
- In a clean bowl, whisk the chocolate pudding mix with milk for 2 minutes until thickened.
- Spread the pudding over the cream cheese layer evenly.
- Top with the remaining tub of Cool Whip and spread to the edges.
- Sprinkle the reserved Oreo crumbs over the top.
- Refrigerate for at least 6 hours, or overnight, before slicing and serving.
Notes
- Make this dessert a day ahead for best texture and flavor.
- Let the cream cheese soften at room temperature to make mixing easier.
- Use homemade whipped cream if Cool Whip is unavailable.
- Crush Oreos using a food processor or by hand with a rolling pin inside a Ziploc bag.
- Prep Time: 20 minutes
- Cook Time: 0 minutes
- Category: Dessert
- Method: No-Bake
- Cuisine: American
Nutrition
- Serving Size: 1 slice
- Calories: 273
- Sugar: 25g
- Sodium: 267mg
- Fat: 13g
- Saturated Fat: 7g
- Unsaturated Fat: 6g
- Trans Fat: 0.2g
- Carbohydrates: 36g
- Fiber: 1g
- Protein: 3g
- Cholesterol: 25mg