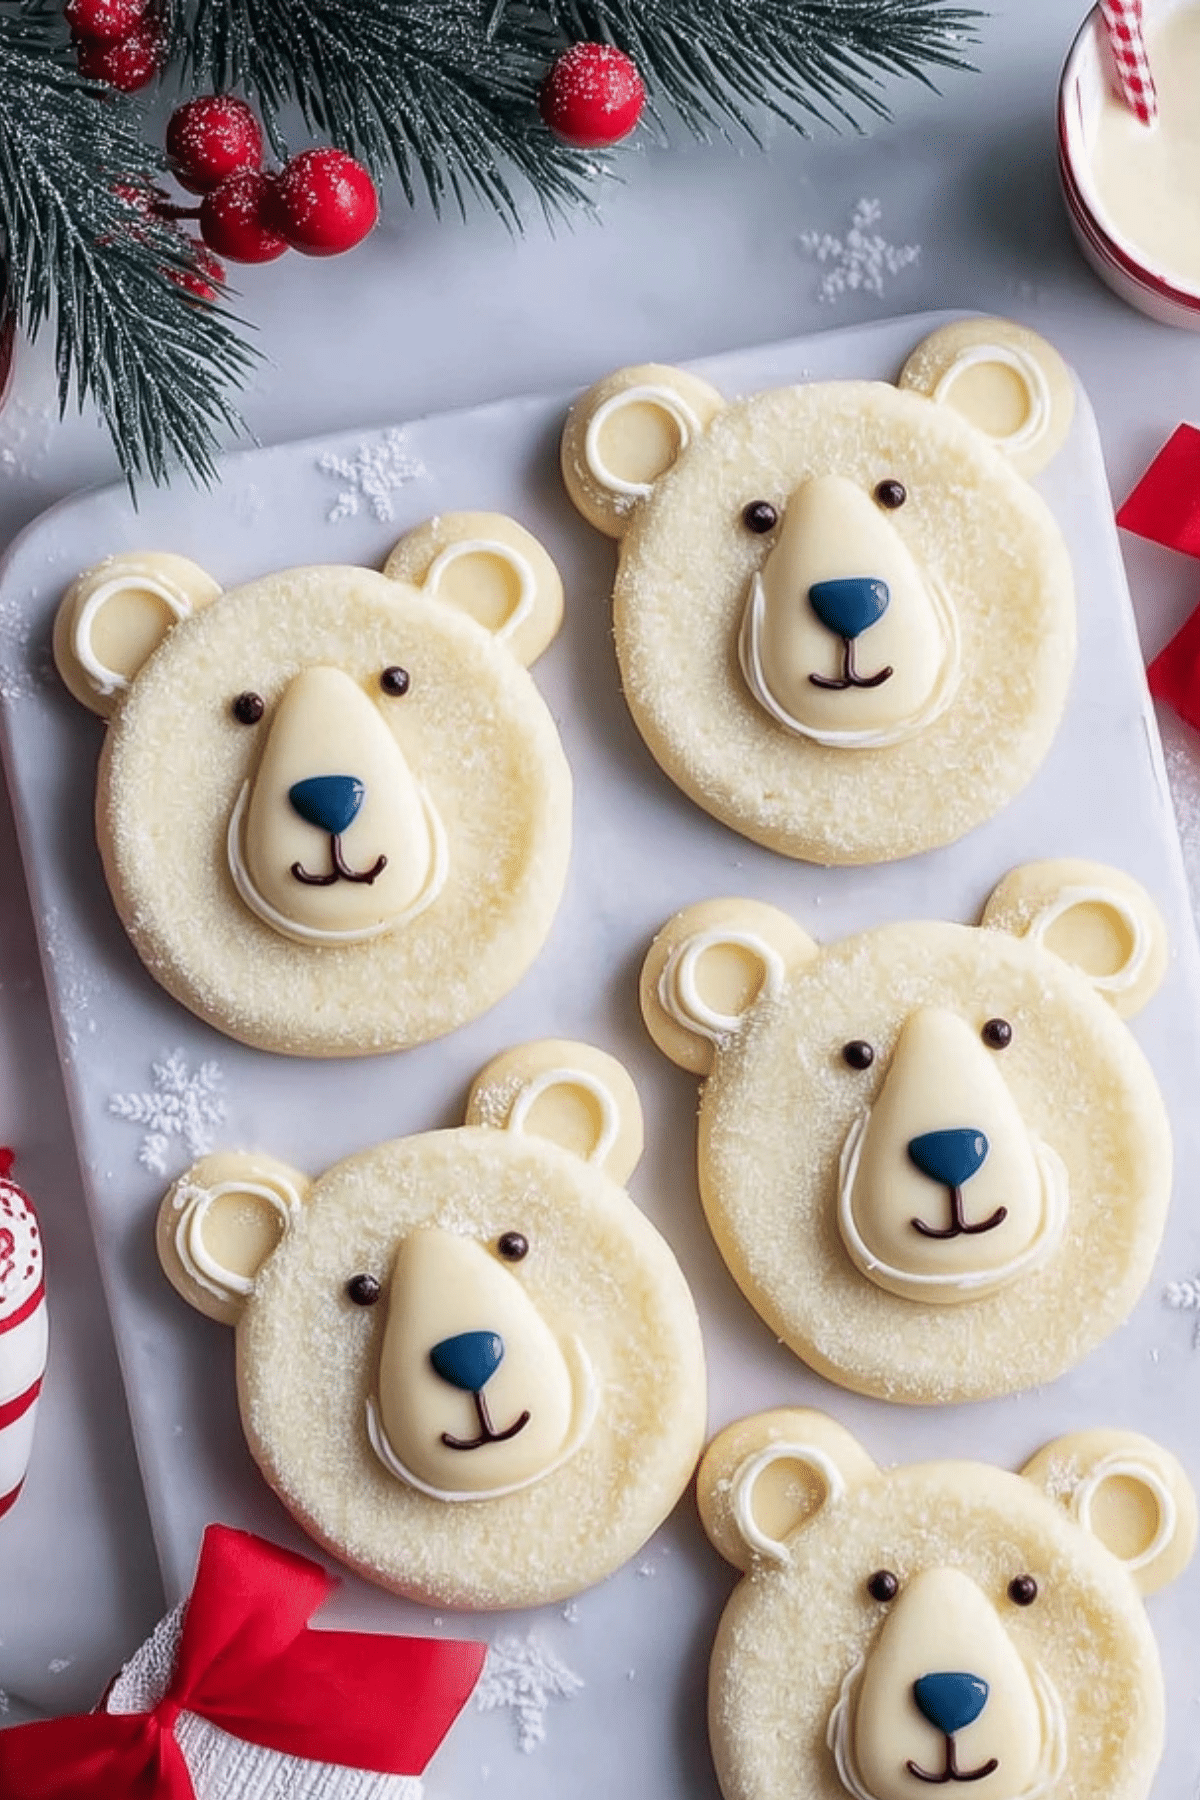
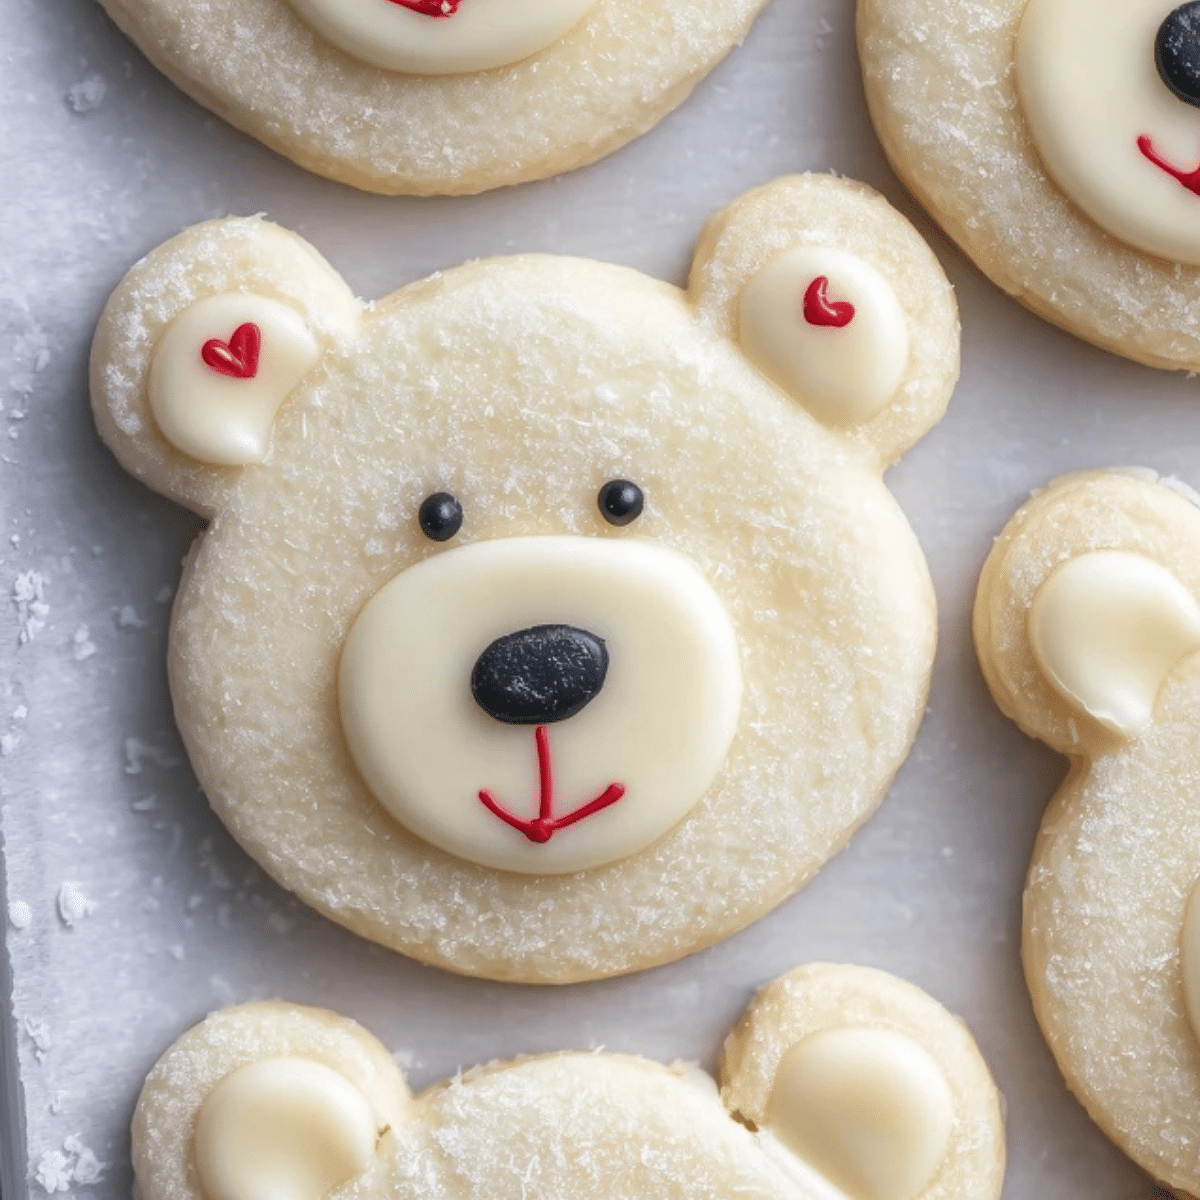
These Polar Bear Cookies are the perfect combination of cute and delicious. Featuring soft cream cheese-based sugar cookies and topped with luscious vanilla buttercream, these cookies bring festive charm to any winter gathering. Whether you’re baking with kids or crafting a holiday cookie box, this recipe is a go-to for seasonal sweetness. With a focus on buttery texture, tender bite, and playful decoration, these Polar Bear Cookies are both fun to make and irresistible to eat.
Table of Contents
Why You’ll Love These Polar Bear Cookies
These Polar Bear Cookies are more than just adorable — they’re soft, chewy, and full of buttery flavor thanks to a rich cream cheese cookie dough. The simple vanilla buttercream adds just the right amount of sweetness, while the playful polar bear faces turn this treat into a winter wonder. Plus, this recipe is easy enough for beginners, fun for families, and adaptable for dietary needs.
- Kid-friendly and fun to decorate
- Soft and tender texture from cream cheese
- Perfect for holiday cookie boxes or parties
- Make-ahead friendly with freezing options
What You Need for the Dough and Frosting
• Unsalted Butter: Adds rich flavor and a soft, tender texture
• Cream Cheese: Key to the soft, moist consistency of the cookies
• Granulated Sugar: Sweetens and helps with structure and spread
• Egg: Binds the dough and adds moisture
• Vanilla Extract or Paste: Infuses warmth and depth of flavor
• All-Purpose Flour: Provides structure to the cookie dough
• Cornstarch: Softens the texture for a melt-in-your-mouth bite
• Baking Powder: Lifts the dough slightly, giving a gentle rise
• Fine Salt: Balances the sweetness and enhances overall flavor
• Powdered Sugar: Sweetens and smooths the buttercream frosting
• Heavy Cream: Helps achieve a fluffy, pipeable frosting consistency
For Decorating:
• White Sanding Sugar: Creates the snowy polar bear effect
• Chocolate Chips: Used for the polar bear’s nose
• Black Sprinkles: Ideal for tiny eyes
• Red or Pink Sprinkles: Accents for the ears
Ingredient Swaps & Allergy-Friendly Options
Don’t worry if you’re out of an ingredient or need an alternative for dietary reasons. These suggestions ensure everyone can enjoy Polar Bear Cookies.
Dairy-Free or Vegan
- Butter: Swap with vegan butter. Omit extra salt
- Cream Cheese: Use a vegan cream cheese block substitute
- Heavy Cream: Replace with coconut cream or non-dairy milk (like oat or almond)
Egg-Free
- Egg: Use a flaxseed egg (1 tbsp flaxseed meal + 3 tbsp water) or a store-bought egg replacer
Gluten-Free
- All-Purpose Flour: Substitute with a 1:1 gluten-free flour blend. Results may vary slightly in texture
Flavor Alternatives
- Vanilla Extract: Try almond or peppermint extract for a festive twist
How to Make Polar Bear Cookies
1. Prepare the Dough
In a large mixing bowl, cream together butter and cream cheese until smooth. Add sugar and beat until light and fluffy. Mix in the egg and vanilla until combined. In a separate bowl, whisk flour, cornstarch, baking powder, and salt. Add dry ingredients to the wet in two additions, mixing just until combined. Divide the dough, wrap in plastic, and chill for at least 2 hours (or 30 minutes in the freezer).
2. Roll & Cut the Cookies
Preheat oven to 350°F (175°C). Generously flour your surface and rolling pin. Roll dough to 1/3-inch thick. Use a 2½-inch circle cutter to make large rounds, and a ¾-inch cutter for ears. Cut a small notch in the ear circles so they fit flush with the larger ones. Attach two ears to each cookie by pressing lightly. Chill the assembled cookies for 15 minutes in the fridge.
3. Bake the Cookies
Bake on the top rack for 12–14 minutes, or until the edges are just set but not browned. Let cookies cool on the sheet for 15 minutes, then move to a wire rack.
4. Make the Buttercream
Beat butter until smooth, then add vanilla and salt. Gradually add powdered sugar and cream until the desired consistency is reached. Mix until light and fluffy, then transfer to a piping bag with a round tip.
5. Decorate the Cookies
Pipe a thin layer of frosting over each cookie and press into white sanding sugar. Add an oval of frosting for the muzzle, then place a chocolate chip nose, sprinkle eyes, and colorful ears. Use edible markers or fondant if needed.

Expert Tips for Perfect Polar Bear Cookies
- Cream butter and sugar well: This aerates the dough for a fluffy texture
- Don’t overmix: Stop mixing as soon as the flour is incorporated to prevent tough cookies
- Use plenty of flour on your surface: Helps prevent sticking during rolling
- Keep the dough chilled: Cold dough holds its shape and prevents spreading
- Watch baking time carefully: Remove cookies before edges brown for soft centers
- Let cookies cool before frosting: Frosting will melt if applied to warm cookies
Serving Ideas and Recipe Variations
- Holiday Toppers: Add tiny fondant scarves or edible glitter for festive flair
- Flavor Upgrades: Try peppermint extract in the frosting for a holiday twist
- Make-Ahead Option: Bake cookies and freeze undecorated. Frost and decorate after thawing
- Gluten-Free Version: Use a certified gluten-free flour blend for the cookie dough
- Mini Polar Bears: Make smaller cookies for party platters or gift boxes
Seasonal Charm & Storage Tips
Polar Bear Cookies are ideal for:
- Christmas cookie swaps
- Winter birthdays or baby showers
- Holiday baking with kids
- Gift-giving in cookie tins
- Snow day baking fun
Storage Notes:
- Store decorated cookies in an airtight container for up to 2 days at room temp
- Keep in the fridge for up to 5 days
- Freeze unfrosted cookies for up to 1 month
- Dough can also be frozen for 1 month and thawed before baking
Let the frosted cookies chill fully before stacking them to prevent smudging. Add parchment paper between layers when storing.
Final Thoughts
These Polar Bear Cookies aren’t just a festive addition to your winter baking list — they’re a complete experience. From the pillowy soft cream cheese cookie base to the smooth vanilla buttercream and charming bear design, every bite is as delightful as it looks. Whether you’re crafting treats for a holiday party, surprising the kids with a fun snow-day activity, or curating a stunning Christmas cookie box, these cookies bring the cozy magic of winter to your kitchen.
Versatile, freezer-friendly, and joyfully creative, Polar Bear Cookies are a sweet tradition waiting to happen.
Frequently Asked Questions
How do I store Polar Bear Cookies after decorating?
Frosted Polar Bear Cookies can be stored in an airtight container for up to 2 days at room temperature, 5 days in the fridge, or 1 month in the freezer. If stacking, chill first and place parchment between layers to preserve the decorations.
Can I freeze the cookie dough in advance?
Absolutely. Wrap the dough tightly in plastic wrap and place it in an airtight container before freezing for up to 1 month. Thaw it overnight in the fridge and let it sit at room temperature for 10 minutes before rolling out.
Can I make these cookies gluten-free?
Yes, simply replace the all-purpose flour with a 1:1 gluten-free flour blend. The texture may differ slightly, but the cookies will still hold their shape and taste delicious. Be sure to chill the dough well before rolling for best results.
More Relevant Recipes
- Pumpkin Cookies with Cinnamon Frosting: These soft pumpkin cookies topped with spiced cinnamon frosting offer a cozy flavor profile perfect for fall or winter, similar to the comforting appeal of Polar Bear Cookies.
- Halloween Chocolate Chip Cookies: Packed with chocolate and festive flair, these cookies bring a seasonal twist to the classic treat — ideal for those who love themed bakes like Polar Bear Cookies.
- Taylor Swift Chai Cookies: With warm spices and a soft-baked texture, these chai-flavored cookies make a creative and flavorful alternative while keeping the cozy, homemade charm of Polar Bear Cookies.

Polar Bear Cookies
- Total Time: 2 hours 4 minutes
- Yield: 30 cookies
- Diet: Vegetarian
Description
These Polar Bear Cookies are soft, chewy cream cheese sugar cookies topped with vanilla buttercream and decorated to resemble adorable polar bears. Perfect for winter holidays and fun baking projects with kids.
Ingredients
- 3/4 cup unsalted butter (170g): adds richness and soft texture
- 1/2 cup full-fat cream cheese (113g): provides moisture and tenderness
- 1 1/2 cups granulated sugar (300g): sweetens and helps with structure
- 1 large egg (56g): binds the dough and adds moisture
- 2 tsp vanilla extract or vanilla bean paste (8g): adds flavor depth
- 3 cups all-purpose flour (375g): gives structure to the cookies
- 1 tbsp cornstarch (8g): softens the texture
- 1/2 tsp baking powder (2g): gives a light rise
- 1/2 tsp fine salt (3g): enhances flavor
- 1 cup unsalted butter (226g, for frosting): creates a creamy base
- 1 tbsp vanilla extract or paste (12g, for frosting): flavors the buttercream
- 1/2 tsp fine salt (3g, for frosting): balances sweetness
- 3 1/2 cups powdered sugar (454g): sweetens and thickens frosting
- 1/4 cup heavy whipping cream (60g): creates spreadable consistency
- 1 cup white sanding sugar: decorates and adds sparkle
- 30 large chocolate chips: used for bear noses
- Round black sprinkles: used for eyes
- Red or pink sprinkles: used for ears
Instructions
- Cream butter and cream cheese together until smooth.
- Add granulated sugar and beat until light and fluffy.
- Mix in egg and vanilla until incorporated.
- In a separate bowl, whisk together flour, cornstarch, baking powder, and salt.
- Gradually add dry ingredients to wet, mixing until just combined.
- Divide dough into two pieces, wrap in plastic, and chill for 2 hours.
- Preheat oven to 350°F (175°C). Roll dough to 1/3-inch thick on a floured surface.
- Cut large circles for faces and small ones for ears. Attach ears and chill again.
- Bake for 12–14 minutes. Cool on pan for 15 minutes, then transfer to rack.
- For frosting, beat butter, vanilla, and salt. Add powdered sugar and cream, mix until smooth.
- Pipe frosting on cooled cookies and dip into sanding sugar.
- Pipe muzzle, add chocolate chip nose, sprinkle eyes and ears. Repeat for all cookies.
Notes
- Don’t overmix the dough to avoid tough cookies.
- Chill dough before rolling and again before baking to prevent spreading.
- Use fondant or edible markers if specific sprinkles aren’t available.
- Cookies can be frozen before or after baking for make-ahead convenience.
- Frosted cookies should be stored chilled if stacking is required.
- Prep Time: 20 minutes
- Cook Time: 14 minutes
- Category: Cookies
- Method: Baking
- Cuisine: American
Nutrition
- Serving Size: 1 cookie
- Calories: 265 kcal
- Sugar: 24g
- Sodium: 109mg
- Fat: 14g
- Saturated Fat: 8g
- Unsaturated Fat: 5g
- Trans Fat: 0g
- Carbohydrates: 34g
- Fiber: 0g
- Protein: 2g
- Cholesterol: 41mg

