

The first time I bit into a rhubarb bar was at a summer potluck in my grandmother’s backyard. A neighbor had brought a tray of unassuming square treats, their golden tops dusted with sugar and a hint of pink peeking through the middle. One bite—and I was hooked. Sweet, tangy, creamy, and buttery all at once. Years later, I found a nearly identical recipe tucked into one of Grandma’s church cookbooks. Now it’s a tradition in my own kitchen.
If you’re looking for an easy sheet pan dessert that balances bright tartness with silky sweetness, this Rhubarb Dream Bars recipe is your new go-to. With just a handful of pantry staples, it’s perfect for beginner cooks. It’s time-efficient, doesn’t require fancy equipment, and delivers that unbeatable combo of comfort and freshness. Best of all, it works just as well with frozen rhubarb, so you can enjoy it year-round.

Why This Recipe is Special
This recipe is more than just a nostalgic treat—it’s a brilliant introduction to baking for anyone new to the kitchen. Unlike complex layered cakes or time-consuming pastries, Rhubarb Dream Bars use straightforward steps and ingredients that are likely already in your kitchen. Plus, rhubarb offers more than just a punch of flavor; it brings vitamins and fiber to the table too.
These bars feature a buttery shortbread-style crust that holds up a silky custard-like topping infused with diced rhubarb. The contrast of textures and the harmony of sweet and tart make each bite memorable. Even if you’re not usually a fan of rhubarb, this dish might change your mind.
Ingredients and Preparation
Here’s what goes into making Rhubarb Dream Bars and how each ingredient plays a part:
- All-purpose flour: Provides structure for both the crust and the topping. It ensures the bars hold their shape and gives the filling a gentle set.
- Powdered sugar: Used in the crust, it dissolves quickly and creates a tender, melt-in-your-mouth texture.
- Butter: Adds richness and moisture to the crust, helping it hold together and brown slightly at the edges.
- Granulated sugar: The main sweetener in the topping. It balances rhubarb’s natural tartness and contributes to the smooth texture.
- Eggs: Bind the topping together, creating a soft custard layer once baked.
- Salt: Just a pinch helps round out the sweetness and enhances the overall flavor.
- Rhubarb: The star of the show. Its bright, tangy flavor cuts through the richness and adds a fresh, fruity punch.
- Optional ground cinnamon: Adds warmth and depth to the flavor profile.
Ingredient Swaps and Flexibility:
- No rhubarb? Try diced raspberries or cranberries.
- Want a twist? Add a touch of lemon zest or swap half the sugar for honey.
- Gluten-free? Use a 1:1 baking blend for the flour substitute.
- Vegan? Swap butter for plant-based margarine and use an egg replacer.
Step-by-Step Instructions
Step 1
Preheat your oven to 325°F and grease a 9×13-inch baking pan. This will prevent the bars from sticking and help them lift easily after cooling.
Step 2
In a large mixing bowl, combine flour, powdered sugar, and room temperature butter. Mix with a hand mixer or food processor until crumbly, but not fully dough-like—this keeps the crust tender.
Step 3
Gently press the crumbly mixture into the greased pan to form an even crust layer. Bake it in the preheated oven for 15 minutes. The crust should remain pale—this is just a partial bake to give it structure.
Step 4
While the crust is baking, lightly beat the eggs in a separate bowl. Stir in granulated sugar, flour, salt, and cinnamon (if using). Mix until smooth and uniform.
Step 5
Fold in the diced rhubarb until evenly distributed. Pour the mixture gently over the partially baked crust, spreading it evenly to the edges.
Step 6
Return the pan to the oven and bake for 60 minutes. The bars are ready when the center is set and no longer jiggles when you gently shake the pan.
Step 7
Allow the bars to cool completely in the pan. This helps the filling fully set and makes slicing easier. Once cool, cut into squares and serve.
Beginner Tips and Notes
- If your rhubarb is frozen, thaw it first, pat dry thoroughly, and toss with a tablespoon of flour to prevent sogginess.
- Don’t overmix the crust—keep it crumbly to avoid a dense bottom layer.
- If your bars brown too quickly on top, loosely cover them with foil halfway through baking.
- To tell if the bars are done, give the pan a light shake—if the center still jiggles, give it another 5–10 minutes.
- Use a sharp knife and wipe it clean between cuts for tidy slices.
Serving Suggestions
These bars are delicious served slightly chilled or at room temperature. To elevate the experience, try:
- A dollop of lightly whipped cream or vanilla yogurt on top
- A side of fresh strawberries or raspberries for added brightness
- A drizzle of honey or vanilla glaze if you prefer extra sweetness
Storage Tips:
Store leftovers in an airtight container in the refrigerator for up to five days. These bars also freeze well—wrap individual slices tightly and freeze for up to three months.
Conclusion
Rhubarb Dream Bars are the kind of recipe that welcomes you into the world of baking with open arms. They’re forgiving, flexible, and seriously delicious. Whether you’re baking for a family gathering or just treating yourself to something sweet, this is one of those quick and healthy meals (yes, dessert counts!) that proves you don’t need to be a pastry chef to make something spectacular.
If you give these lemon herb chicken recipe-free (but just as lovely) dessert bars a try, drop a comment and share how they turned out. I’d love to hear your twist—did you add berries, go gluten-free, or try a citrus variation? Let’s swap baking stories!
FAQ About Rhubarb Dream Bars
Can I use frozen rhubarb instead of fresh?
Yes, frozen rhubarb works well in this recipe. Be sure to thaw it completely, pat it dry with paper towels, and toss it with a little flour to absorb excess moisture before adding it to the filling.
Why is my crust too hard or dense?
This usually happens if the crust mixture is overmixed and forms a dough instead of staying crumbly. Use a light hand or food processor and mix only until the ingredients just come together.
How do I know when the bars are fully baked?
The bars are done when the center is no longer jiggly and the top is lightly golden. You can gently shake the pan or insert a toothpick in the center to check—if it comes out clean or with just a few moist crumbs, they’re ready.
Can I make these bars gluten-free?
Absolutely. Substitute the all-purpose flour with a gluten-free 1:1 baking blend. Ensure the blend contains a binder like xanthan gum for best results in both the crust and the filling.
More Relevant Recipes
Print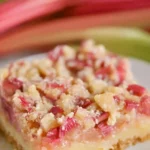
Rhubarb Dream Bars
- Total Time: 1 hr 25 mins
- Yield: 16 servings
- Diet: Vegetarian
Description
Rhubarb Dream Bars are a classic sheet pan dessert featuring a buttery crust and a sweet-tart rhubarb custard topping. Perfect for beginner bakers.
Ingredients
- 2 cups all-purpose flour (for crust)
- 1/2 cup powdered sugar
- 1 cup butter, room temperature
- 4 large eggs
- 2 cups granulated sugar
- 1/2 cup all-purpose flour (for filling)
- 1 teaspoon salt
- 4 cups diced rhubarb
- Optional: 1/2 teaspoon ground cinnamon
Instructions
- Preheat the oven to 325°F and grease a 9×13-inch baking pan.
- In a large bowl, combine flour, powdered sugar, and butter. Mix until crumbly using a hand mixer or food processor.
- Press the mixture into the greased pan to form an even crust layer. Bake for 15 minutes until slightly set but not browned.
- While the crust bakes, beat the eggs lightly in another bowl. Add sugar, flour, salt, and optional cinnamon. Mix until smooth.
- Fold in the diced rhubarb and pour the mixture over the par-baked crust, spreading evenly.
- Bake again at 325°F for 60 minutes or until the center is fully set and no longer jiggles.
- Let the bars cool completely in the pan before slicing and serving.
Notes
- If using frozen rhubarb, thaw completely, pat dry, and toss with a tablespoon of flour before adding.
- Do not overmix the crust mixture—keep it crumbly to avoid a dense base.
- Loosely cover with foil if the top browns too quickly during baking.
- Cool completely for clean slices and better texture.
- Prep Time: 10 mins
- Cook Time: 1 hr 15 mins
- Category: Dessert
- Method: Baking
- Cuisine: American
Nutrition
- Serving Size: 1 bar
- Calories: 307
- Sugar: 29g
- Sodium: 243mg
- Fat: 13g
- Saturated Fat: 8g
- Unsaturated Fat: 4g
- Trans Fat: 0g
- Carbohydrates: 45g
- Fiber: 1g
- Protein: 4g
- Cholesterol: 77mg