
When I first started learning to bake, rhubarb always felt like a mysterious ingredient — tart, unruly, and something only grandmothers knew how to tame. But one spring morning, with a fridge full of leftover rhubarb from my neighbor’s garden, I decided to dive in. What emerged from that experiment were these rhubarb oat bars — a delightful surprise that reminded me of warm kitchen memories, the kind where cinnamon mingles with sweet fruit and golden crusts.
This easy sheet pan dessert is everything a beginner baker could hope for: forgiving, fast, and healthy-ish. It’s packed with fiber-rich oats, uses basic pantry ingredients, and celebrates the bold, bright tang of rhubarb without being fussy. Whether you’re baking for a casual afternoon snack or a brunch with friends, this lemon herb chicken of the dessert world — simple, zesty, and wholesome — is sure to deliver.

Why This Recipe is Special
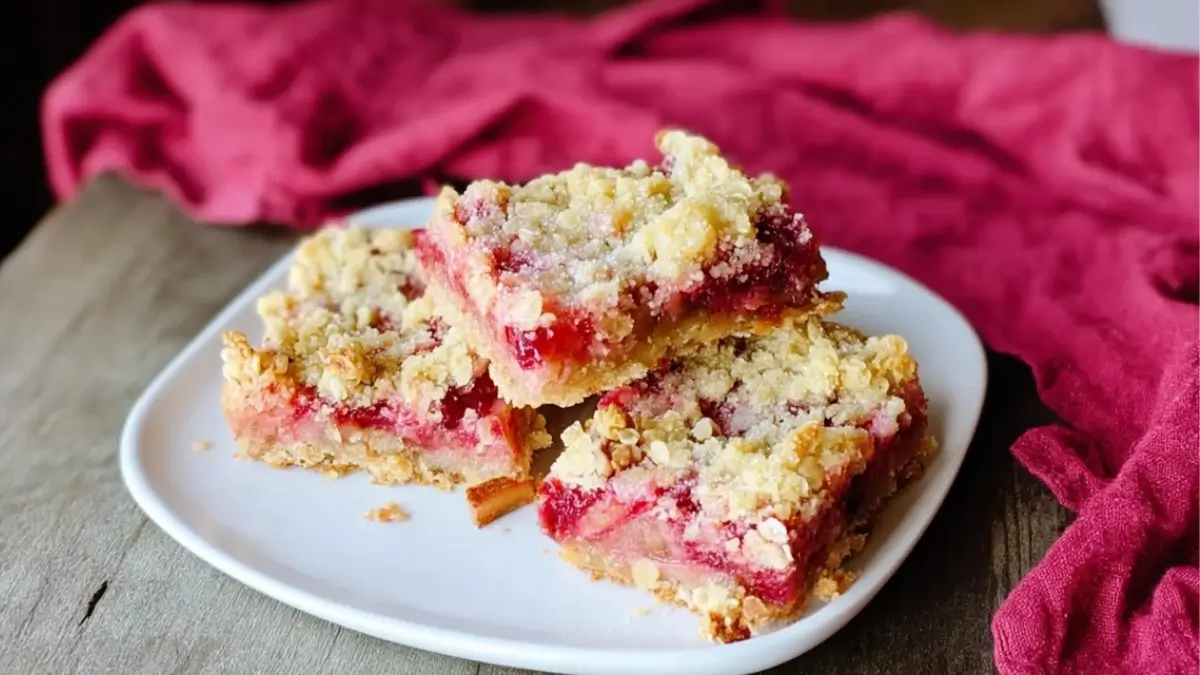
There’s something magical about turning humble ingredients into something extraordinary. These rhubarb oat bars are essentially a cross between a fruit crumble and a snack bar. The soft, tart filling contrasts beautifully with the buttery oat crust and sweet, cinnamon-kissed topping. Unlike fancier desserts that demand precision, this recipe is all about flexibility and fun.
Even better, it’s a quick and healthy meal-like treat that can be made in one pan — minimal mess, maximum flavor. Whether you use fresh or frozen rhubarb, or mix in a handful of strawberries for variety, this is a recipe that grows with your skills.
Ingredients and Preparation
Rhubarb
The star of the show. Rhubarb brings a tangy punch that balances the sweetness of the other ingredients. You can use either fresh or frozen rhubarb — just remember that frozen may release more water, so adjust accordingly.
Sugar
Essential for balancing rhubarb’s tartness. Feel free to use white or raw cane sugar, or swap in coconut sugar for a deeper flavor.
Lemon Juice
Brightens the filling and helps preserve the rhubarb’s pink hue. If you don’t have lemon, try a splash of orange juice or apple cider vinegar.
Quick Oats
Provide texture and heartiness. Rolled oats are also fine, but avoid steel-cut oats which won’t soften enough during baking.
All-Purpose Flour
Gives structure to the base and topping. For a gluten-free version, use a 1:1 gluten-free flour blend.
Butter
Melted butter holds everything together and adds richness. You can substitute coconut oil or vegan butter for a dairy-free option.
Salt
Enhances all the other flavors. Just a pinch goes a long way.
Cinnamon-Sugar Mix
Adds a cozy, familiar finish. Optional, but recommended for an extra touch of sweetness and spice.
Step-by-Step Instructions
Step 1 Preheat your oven to 350°F (175°C) and line a 9×9-inch baking pan with parchment paper, letting it hang over the edges for easy lifting later. This prevents sticking and makes cleanup easier.
Step 2 In a medium saucepan over medium heat, combine chopped rhubarb, sugar, a tablespoon of water, and a generous squeeze of lemon juice. Simmer for about 10 minutes until the rhubarb softens but retains a chunky texture. Set aside to cool slightly.
Step 3 In a large mixing bowl, stir together the flour, quick oats, sugar, and salt. Pour in melted butter and mix until crumbly and well combined. Reserve about ½ cup of this mixture for the topping.
Step 4 Press the remaining oat mixture firmly into the bottom of your prepared pan to form the crust. Make sure it’s even to help it bake uniformly.
Step 5 Spoon the rhubarb filling evenly over the crust, spreading it gently with a spatula. Don’t worry if it looks a little messy — it will all come together beautifully in the oven.
Step 6 Sprinkle the reserved oat mixture over the top of the rhubarb. You can distribute it evenly or leave it in rustic clumps for more texture.
Step 7 Finish with a light dusting of cinnamon-sugar mix, then bake for about 60 minutes. The top should be golden brown and the filling bubbling gently.
Step 8 Remove from the oven and let the bars cool completely — at least two hours — before slicing. This helps the filling set and ensures clean, tidy bars.
Beginner Tips and Notes
- If your rhubarb filling turns greenish, don’t worry — that’s normal and depends on the variety. The lemon juice helps preserve color.
- Don’t overcook the rhubarb or it can become mushy. Ten minutes of simmering is plenty.
- If your crust browns too quickly, tent the pan with foil midway through baking.
- For faster prep, measure and chop your rhubarb the night before and refrigerate it in an airtight container.
- No pastry cutter? Use your hands or a fork to mix the butter into the dry ingredients.
Serving Suggestions
These bars are delicious on their own, but here are some ideas to elevate your rhubarb oat bar experience:
- With a scoop of vanilla ice cream for a warm-and-cold contrast.
- Alongside your morning coffee or as part of a weekend brunch spread.
- Drizzled with honey or maple syrup if you like it a little sweeter.
- With Greek yogurt for a protein-packed breakfast.
To store, keep bars covered on the counter for up to 3 days, or refrigerate them for up to a week. Freezing is technically possible, but the crust may soften — best enjoyed fresh!
Conclusion
Baking should feel approachable, not intimidating. These rhubarb oat bars are an excellent entry point for anyone looking to dive into quick and healthy meals or easy sheet pan dinners in dessert form. The tart rhubarb, buttery oat layers, and comforting cinnamon are more than just a treat — they’re a sweet reminder that homemade doesn’t have to be hard.
If you try this recipe, I’d love to hear how it went! Share your experience in the comments — your tweaks, your tips, or even if your bars disappeared before they cooled. Happy baking!
FAQ About Rhubarb Oat Bars
Q1: Can I use frozen rhubarb instead of fresh?
Yes, you can use frozen rhubarb. There’s no need to add extra water when simmering, as frozen rhubarb releases more moisture during cooking.
Q2: How do I know when the bars are done baking?
The bars are ready when the top is golden brown and the rhubarb filling is bubbling around the edges. This usually takes about 60 minutes at 350°F.
Q3: How long do these rhubarb oat bars stay fresh?
They stay fresh for 3–5 days when stored covered at room temperature or in the refrigerator. For best texture, avoid freezing them.
Q4: Why did my rhubarb filling turn green instead of pink?
Rhubarb color varies naturally based on the variety. Adding lemon juice can help retain brightness, but color doesn’t affect the taste or quality.
More Relevant Recipes
Print
Rhubarb Oat Bars
- Total Time: 3 hours 20 minutes
- Yield: 16 squares
- Diet: Vegetarian
Description
These rhubarb oat bars feature a tangy rhubarb filling layered between a buttery oat crust and crumble topping—perfect for beginners and snack lovers.
Ingredients
- 4 cups chopped rhubarb
- 1/2 cup sugar
- 1 tbsp water
- Generous squeeze of lemon juice
- 1 1/4 cups all-purpose flour
- 1 1/4 cups quick oats
- 2/3 cup sugar
- 1/4 tsp salt
- 1/2 cup butter, melted
- Cinnamon and sugar mix for topping
Instructions
- Preheat your oven to 350°F (175°C) and line a 9×9-inch baking pan with parchment paper.
- In a saucepan, combine chopped rhubarb, 1/2 cup sugar, water, and lemon juice. Simmer for 10 minutes until soft but chunky. Set aside to cool.
- In a mixing bowl, combine flour, oats, 2/3 cup sugar, and salt. Stir in melted butter until crumbly. Reserve 1/2 cup of the mixture.
- Press the remaining oat mixture into the prepared pan to form the crust.
- Spread the cooked rhubarb mixture evenly over the crust.
- Sprinkle the reserved oat mixture over the top, followed by a cinnamon-sugar mix.
- Bake for 60 minutes, until golden and bubbling. Cool completely for at least 2 hours before cutting into bars.
Notes
- Let bars cool fully before cutting to allow the filling to set.
- Frozen rhubarb can be used; omit added water in filling.
- Lemon juice helps preserve the rhubarb’s color.
- Avoid freezing for best crust texture.
- Use rolled oats as an alternative to quick oats if needed.
- Prep Time: 20 minutes
- Cook Time: 1 hour
- Category: Dessert
- Method: Baking
- Cuisine: American
Nutrition
- Serving Size: 1 bar