
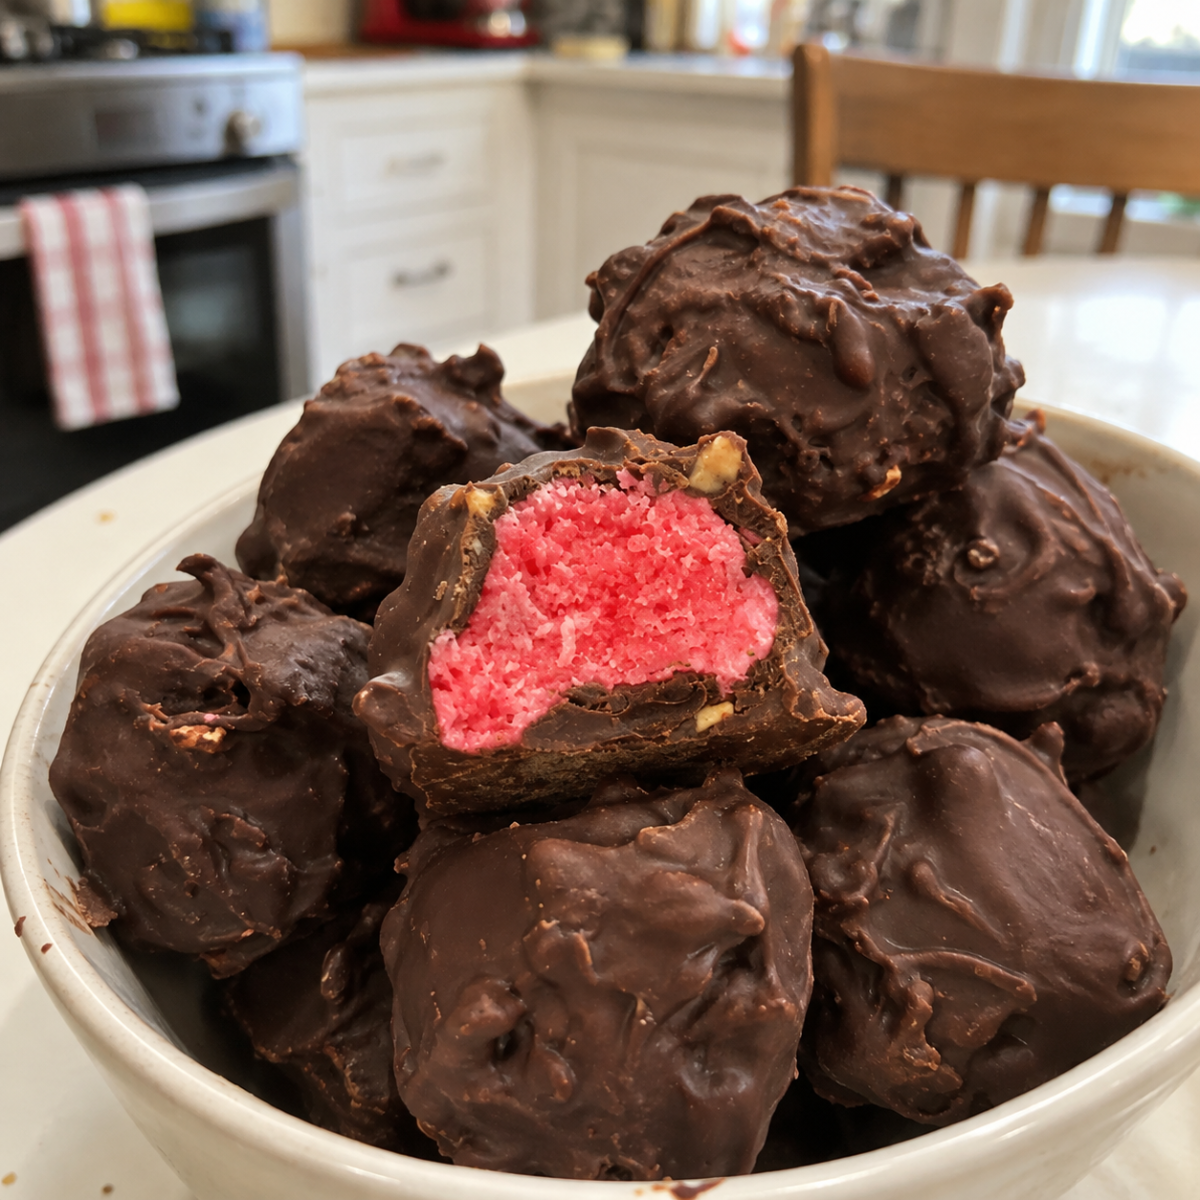
If you love the combination of sweet cherries, rich chocolate, and crunchy peanuts, these Cherry Mash Truffles are a treat you won’t want to miss! Inspired by the classic Cherry Mash candy, these homemade chocolate cherry candies feature a soft, sweet cherry-flavored center wrapped in a delicious semi-sweet chocolate and peanut coating. Every bite delivers the perfect balance of fruity sweetness, rich chocolate, and a little salty crunch.
The best part? You don’t need an oven, complicated equipment, or any candy-making experience to prepare them. With just a handful of simple ingredients and a little chilling time, you can make a batch of beautiful homemade truffles that look impressive and taste wonderful.
Whether you’re preparing Christmas treats, filling a holiday dessert tray, making edible gifts, or simply craving something sweet, these Cherry Mash Truffles are an easy and delicious choice. They’re also perfect for making ahead, so you can enjoy less time in the kitchen when entertaining family and friends.
Table of Contents
What Makes These Homemade Cherry Mash Truffles So Special?
There are plenty of reasons to love this easy chocolate cherry candy recipe. It takes inspiration from old-fashioned Cherry Mash candies while keeping the preparation simple enough for anyone to enjoy.
Here are a few things that make these truffles worth adding to your dessert collection:
- No baking required: Everything comes together without turning on the oven. Simply prepare the cherry filling, chill it, and dip it in chocolate.
- A soft and sweet center: The cherry filling has a smooth, creamy consistency with a delicious fruity flavor.
- A crunchy chocolate coating: Semi-sweet chocolate and chopped peanuts create a wonderful contrast to the soft cherry center.
- Perfect for holidays: Their festive pink centers and chocolate coating make them a lovely addition to Christmas candy trays.
- Easy to prepare ahead: You can make the cherry centers in advance and dip them whenever you’re ready.
- Simple ingredients: Butter, powdered sugar, cherry flavoring, chocolate, and peanuts create a delicious homemade candy.
These Cherry Mash Truffles are also easy to customize. You can experiment with different extracts, adjust the chocolate coating, or use your favorite chopped nuts to create your own version.
Ingredients You’ll Need for Cherry Mash Truffles
One of the best things about this recipe is that it uses everyday baking ingredients alongside a few simple candy-making essentials. Each ingredient plays an important role in creating the signature flavor and texture.
- Unsalted butter: Softened butter forms the base of the cherry filling. It helps create a smooth, rich texture and makes the powdered sugar easier to incorporate.
- Powdered sugar: This provides the sweetness and structure for the cherry centers. It also helps the filling become firm enough to shape into small balls.
- Cherry bakery emulsion: This is the key ingredient that gives the centers their recognizable cherry flavor. It provides a concentrated fruity taste that works beautifully in homemade candies.
- Milk: A little milk helps bring the powdered sugar and butter together, creating a smooth, workable filling.
- Red food coloring: This gives the centers their beautiful bright pink color, making the finished candies look similar to traditional cherry treats.
- Semi-sweet chocolate: The chocolate creates a rich outer shell that balances the sweetness of the cherry filling.
- Coconut oil: This helps thin the melted chocolate, making it easier to dip the truffles and creating a smoother coating.
- Chopped peanuts: Peanuts add a crunchy texture and slightly salty flavor that complements the chocolate and cherry combination.
Easy Ingredient Substitutions
You don’t have to follow every ingredient exactly if you need to make a small adjustment.
Cherry extract instead of cherry emulsion: If you can’t find cherry bakery emulsion, regular cherry extract is an excellent substitute. You can use the same amount as the original ingredient, then adjust slightly if needed according to its strength.
Different flavored extracts: Want to experiment with something different? Strawberry, raspberry, or peppermint extract can give these homemade chocolate truffles a completely different flavor.
Milk chocolate: If you prefer a sweeter coating, replace semi-sweet chocolate with milk chocolate. Dark chocolate is another delicious option if you enjoy a richer, less sweet finish.
Different nuts: Chopped almonds or pecans can replace peanuts. However, peanuts provide the traditional salty crunch that makes this candy combination so appealing.
Dairy-free alternatives: Plant-based butter and milk may work for the cherry filling, although the final texture can vary depending on the products used.
How to Make Cherry Mash Truffles Step by Step
Making Cherry Mash Truffles is easier than you might think. The process involves preparing a simple cherry filling, chilling it until firm, and coating each piece in melted chocolate and peanuts.
Follow these steps for the best results.
Step 1: Prepare the Cherry Filling
Start by placing the softened unsalted butter and about one cup of powdered sugar into the bowl of a stand mixer.
Mix on low speed until the ingredients are combined. Add another cup of powdered sugar and the milk, then continue mixing until the mixture becomes smooth.
Add the remaining powdered sugar, cherry bakery emulsion, and red food coloring.
Mix everything until the filling is evenly combined and has a consistent pink color. Scrape down the sides of the bowl if necessary to make sure there are no pockets of unmixed powdered sugar.
The finished filling should be thick enough to hold its shape when scooped. If it feels too soft, refrigerate it briefly before shaping.
Step 2: Shape and Chill the Cherry Centers
Line a baking sheet with parchment paper.
Using a small cookie scoop or a teaspoon, portion the cherry filling into small, evenly sized balls. A scoop helps keep the truffles uniform, so they look consistent once coated.
Roll each portion gently between your hands if needed to create a smooth round shape.
Arrange the cherry centers on the prepared baking sheet, leaving a little space between each one.
Place the tray in the freezer for approximately two hours, or until the centers are completely firm.
This chilling step is particularly important. Firm centers are much easier to dip into melted chocolate without losing their shape.
Step 3: Melt the Chocolate
Once the cherry centers are almost ready, prepare the chocolate coating.
Place the semi-sweet chocolate and coconut oil in a microwave-safe bowl.
Heat in short intervals, stirring between each one until the chocolate is completely melted and smooth. Avoid overheating because chocolate can become thick or grainy if exposed to too much heat.
You can also melt the chocolate using a double boiler if you prefer more controlled heating.
Once melted, stir in the chopped peanuts until they are evenly distributed throughout the chocolate.
The mixture should be smooth enough for dipping while still containing plenty of peanut pieces for crunch.
Step 4: Dip the Cherry Mash Truffles
Remove a few cherry centers from the freezer at a time, keeping the remaining ones chilled.
Using a dipping fork or a regular fork, lower each cherry ball into the melted chocolate mixture. Turn it gently until the entire surface is covered.
Lift the truffle out and allow the excess chocolate to drip back into the bowl.
Carefully transfer each coated candy onto a parchment-lined baking sheet.
Repeat with the remaining cherry centers, working in small batches to prevent the filling from becoming too soft.
Make sure every truffle has an even chocolate and peanut coating for the best flavor and appearance.
Step 5: Let the Chocolate Coating Set
Once all the Cherry Mash Truffles are coated, place the baking sheet in the freezer until the chocolate becomes firm.
After the coating has completely set, transfer the candies to an airtight container and store them in the refrigerator.
Your homemade cherry chocolate candies are now ready to serve!
Helpful Tips for Perfect Cherry Mash Truffles
Although this recipe is straightforward, a few simple techniques can make a big difference in the final results.
Use properly softened butter. Butter that is too cold can create a lumpy filling, while melted butter can make the mixture too soft. Let it sit at room temperature until easily mixed but not greasy.
Add the powdered sugar gradually. Mixing it in stages helps prevent a cloud of powdered sugar from covering your kitchen and creates a smoother filling.
Don’t skip the freezing time. The cherry centers need to be firm before dipping. If they’re too soft, they may break apart or become difficult to handle in the melted chocolate.
Work in small batches. Keep most of the cherry balls in the freezer while dipping a few at a time. This helps maintain their shape throughout the process.
Stir the chocolate regularly. Chocolate thickens as it cools. Gentle stirring helps maintain a smooth consistency and makes coating easier.
Use a dipping fork. A candy dipping tool or regular fork makes it easier to lift the truffles without damaging the cherry centers.
Allow excess chocolate to drip off. This prevents large pools of chocolate from forming around the bottom of each candy.
Choose finely chopped peanuts. Smaller pieces distribute more evenly across the coating and make the truffles easier to bite into.
Delicious Ways to Customize Your Cherry Chocolate Truffles
One of the nicest things about homemade candy is how easily you can change the flavors while keeping the same basic preparation.
Here are some ideas to try when making your next batch.
Dark Chocolate Cherry Truffles
For a richer flavor, use dark chocolate instead of semi-sweet chocolate. The slightly bitter chocolate creates a delicious contrast with the sweet cherry filling.
Strawberry Chocolate Truffles
Replace the cherry bakery emulsion with strawberry extract. Keep the pink food coloring or adjust it to create a lighter strawberry-colored center.
Raspberry Chocolate Candy
Raspberry extract is another wonderful option. Its fruity flavor pairs particularly well with dark or semi-sweet chocolate.
Holiday Cherry Truffles
Make these candies extra festive by decorating the chocolate coating with a small amount of holiday sprinkles before it sets.
You can also drizzle a little melted white chocolate over the finished truffles for a decorative finish.
Extra Crunchy Peanut Truffles
If you love a little more crunch, increase the amount of chopped peanuts in the chocolate coating. Just make sure the pieces are small enough to coat the cherry centers evenly.
What to Serve With Cherry Mash Truffles
These little chocolate cherry candies are delicious on their own, but they also work beautifully as part of a larger dessert spread.
For Christmas celebrations, arrange them alongside chocolate fudge, sugar cookies, peanut butter balls, peppermint bark, and other homemade holiday candies.
They also make a lovely addition to a dessert platter with fresh strawberries, raspberries, chocolate-covered pretzels, and assorted cookies.
If you’re serving them after dinner, pair them with coffee, hot chocolate, or a cup of tea. Their sweet cherry centers and rich chocolate coating make them a satisfying little treat without needing an elaborate dessert.
For gifting, place the truffles in small paper candy cups and arrange them in a decorative holiday box. Add parchment paper between layers to keep the chocolate coating looking neat.
How to Store Cherry Mash Truffles
Proper storage helps keep the cherry filling soft and the chocolate coating firm.
Refrigerator: Store the finished Cherry Mash Truffles in an airtight container in the refrigerator. They are best enjoyed chilled and should be kept refrigerated because of their butter-based filling.
Freezer: You can freeze the finished truffles in a freezer-safe airtight container. Separate layers with parchment paper to prevent sticking. Thaw them in the refrigerator before serving.
Make-ahead preparation: The cherry centers can be prepared and frozen ahead of time. Once firm, transfer them to a freezer-safe container until you’re ready to dip them in chocolate.
For the best texture and flavor, keep the candies away from warm temperatures and direct sunlight.
Enjoy These Easy Homemade Cherry Mash Truffles!
If you’re looking for a simple homemade candy that combines fruity cherry flavor, rich chocolate, and crunchy peanuts, these Cherry Mash Truffles deserve a place on your dessert list.
They’re easy to prepare, require no baking, and are perfect for Christmas celebrations, homemade edible gifts, or whenever you’re craving something sweet.
The soft pink filling and chocolate-peanut coating create a delicious contrast in every bite. Make a batch ahead of time, keep them chilled, and enjoy these nostalgic-inspired chocolate cherry treats whenever you like!Strawberry Blondie Kitchen
Frequently Asked Questions
Can I use regular cherry extract instead of cherry bakery emulsion?
Yes! Regular cherry extract works as a substitute for cherry bakery emulsion. The original recipe uses cherry emulsion, but cherry extract can provide a similar fruity flavor. Start with the same amount and adjust if necessary depending on its concentration.
Why do I need to freeze the cherry centers before dipping?
Freezing helps the cherry filling become firm enough to handle. This makes dipping easier and prevents the centers from breaking apart or losing their shape when they come into contact with the melted chocolate.
Can I use chocolate chips instead of baking chocolate?
Absolutely! Semi-sweet chocolate chips, milk chocolate chips, or dark chocolate chips can all work. Melt them slowly with the coconut oil, stirring frequently to achieve a smooth coating.
More Relevant Recipes
- Easy Peanut Butter Chocolate Chip Snowball Cookies
- Christmas Tree Cake Dip – Easy No-Bake Holiday Dessert
- White Christmas Punch with Ice Cream – Easy Holiday Drink
Cherry Mash Truffles
- Total Time: 2 hours 10 minutes
- Yield: 25 truffles
- Diet: Vegetarian
Description
These Cherry Mash Truffles are delicious homemade copycat candies featuring a soft, sweet cherry-flavored center covered in rich semi-sweet chocolate and crunchy chopped peanuts. This easy no-bake recipe uses simple ingredients and requires just 10 minutes of preparation before chilling. Perfect for Christmas candy trays, holiday parties, homemade gifts, or whenever you’re craving a sweet chocolate cherry treat!
Ingredients
- 1/4 cup unsalted butter, softened
- 3 cups powdered sugar
- 3 teaspoons cherry bakery emulsion (or cherry extract)
- 2 tablespoons milk
- 1/4 teaspoon red food coloring
- 12 ounces semi-sweet chocolate
- 2 teaspoons coconut oil
- 1/4 cup chopped peanuts
Instructions
- In the bowl of a stand mixer, combine the softened butter and 1 cup of powdered sugar. Mix until combined. Add another cup of powdered sugar followed by the milk, and mix again. Add the remaining powdered sugar, cherry bakery emulsion, and red food coloring. Mix until smooth and evenly combined.
- Using a 2-teaspoon cookie scoop, portion the cherry mixture into small balls and place them on a parchment-lined baking sheet. Once all the mixture has been shaped, freeze for approximately 2 hours or until completely firm.
- In a microwave-safe bowl, melt the semi-sweet chocolate and coconut oil together, stirring between short intervals until smooth. Stir in the chopped peanuts until evenly distributed.
- Working in batches, dip the chilled cherry balls into the chocolate and peanut mixture until fully coated. Place each truffle onto a parchment-lined baking sheet.
- Once all the cherry centers have been coated, return the baking sheet to the freezer until the chocolate coating is completely set. Store the finished Cherry Mash Truffles in an airtight container in the refrigerator.
Notes
- Use cherry extract as a 1:1 substitute for cherry bakery emulsion.
- You can substitute strawberry, raspberry, or peppermint extract for a different flavor.
- Use a 2-teaspoon cookie scoop to create evenly sized truffles.
- Freeze the cherry centers for approximately 2 hours before dipping to make them easier to handle.
- Work in small batches and keep the remaining cherry centers frozen while dipping.
- Milk chocolate or dark chocolate can be substituted for semi-sweet chocolate.
- Store the finished truffles in an airtight container in the refrigerator.
- The cherry centers can be prepared and frozen ahead of time.
- Prep Time: 10 minutes
- Cook Time: 0 minutes
- Category: Dessert
- Method: No-Bake
- Cuisine: American
Nutrition
- Serving Size: 1 truffle
- Calories: 98 kcal
- Sugar: 9 g
- Sodium: 4 mg
- Fat: 7 g
- Saturated Fat: 4 g
- Unsaturated Fat: 3 g
- Trans Fat: 0 g
- Carbohydrates: 11 g
- Fiber: 1 g
- Protein: 0 g
- Cholesterol: 5 mg