
Halloween is all about fun, creativity, and, of course, delicious treats. What better way to celebrate the spooky season than with a batch of Halloween Fudge? This colorful, festive, and delightfully sweet fudge recipe is perfect for Halloween parties, family gatherings, or as a homemade gift to share with neighbors and friends. Plus, it’s easy to make, requiring only a handful of ingredients.
In this guide, we’ll walk you through everything you need to know to make the best Halloween Fudge—from ingredients and step-by-step instructions to tips, variations, and even some health insights. So grab your apron, and let’s get spooky!
What Is Halloween Fudge?
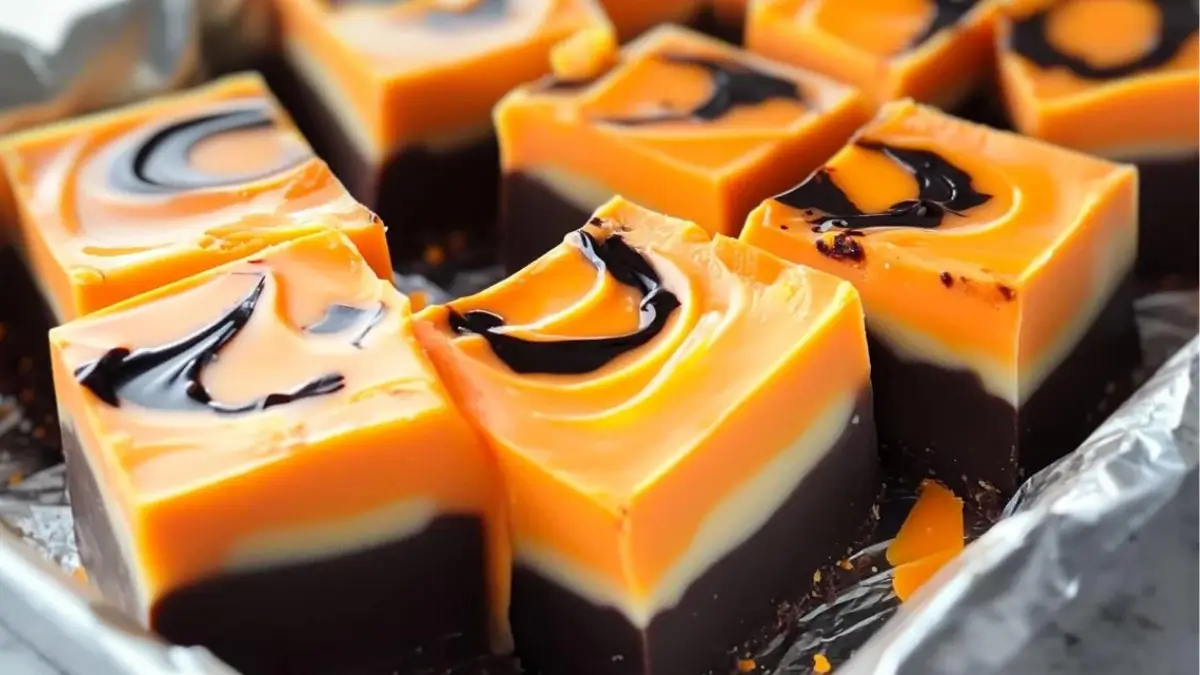
Halloween Fudge is a variation of traditional fudge, customized to fit the Halloween theme with vibrant layers of orange, black, and sometimes white or purple. This no-bake dessert uses white chocolate, sweetened condensed milk, and food coloring to create eye-catching layers that are then topped with festive sprinkles. The result? A decadent, chewy, and visually striking treat that’s sure to impress.
Ingredients You’ll Need for Halloween Fudge
To create this spooky delight, you’ll need the following basic ingredients:
- 3 cups white chocolate chips – These form the base of your fudge and give it a rich, creamy texture.
- 1 can (14 ounces) sweetened condensed milk – Adds sweetness and helps bind the fudge layers together.
- Orange and black gel food coloring – Essential for achieving those Halloween colors. Gel food coloring works better than liquid since it doesn’t affect the consistency of the fudge.
- Halloween-themed sprinkles – For a fun, decorative touch. Choose sprinkles that feature pumpkins, ghosts, bats, or any other spooky shapes.
Optional: You can also use other Halloween-themed colors like purple or green for a unique twist.
How to Make Halloween Fudge: Step-by-Step Directions
1. Prepare Your Pan
Before you begin, line an 8×8-inch pan with aluminum foil. This makes it easier to remove the fudge once it’s set. Then, spray the lined pan with nonstick cooking spray to ensure the fudge doesn’t stick.
2. Create the First Layer
In a microwave-safe bowl, combine 1 cup of white chocolate chips with 1/3 cup of sweetened condensed milk. Microwave in 30-second intervals, stirring after each session, until the mixture is smooth and fully melted.
Once melted, add orange gel food coloring and mix until you achieve the perfect Halloween orange. Pour the mixture into your prepared pan, spreading it out evenly. Pop the pan into the fridge for 10 minutes to allow this layer to set.
3. Repeat for the Second Layer
Now, melt the second 1 cup of white chocolate chips and 1/3 cup sweetened condensed milk. Add black gel food coloring, stirring until fully combined. Pour this black layer over the orange fudge in your pan and spread it evenly. Place the pan back in the refrigerator for another 10 minutes.
4. Finish with the Third Layer
For the final layer, melt the remaining 1 cup of white chocolate chips and 1/3 cup of sweetened condensed milk. You can either leave this layer white or add another Halloween color, like purple or green. Spread the mixture evenly over the previous layers. While the fudge is still soft, add your Halloween-themed sprinkles for a festive finish.
5. Chill and Serve
Refrigerate the entire pan for at least 2 hours, or until the fudge is completely set. Once firm, use the foil to lift the fudge out of the pan, then slice it into bite-sized squares. Your Halloween Fudge is ready to serve!
Tips and Tricks for Perfect Halloween Fudge
1. Avoid Overheating the Chocolate
White chocolate can be temperamental and burns easily. Be sure to heat it in short bursts and stir frequently to avoid scorching.
2. Use Gel Food Coloring
Gel food coloring is more concentrated than liquid and won’t affect the texture of your fudge. It’s also much easier to achieve those vibrant Halloween colors.
3. Get Creative with Toppings
If you want to mix things up, consider using candy eyeballs, candy corn, or even crushed Oreos to add extra crunch and Halloween flair.
4. Store Properly
To keep your fudge fresh, store it in an airtight container in the refrigerator. If you’re making it ahead of time, you can freeze it for up to two months.
Halloween Fudge Variations: Make It Your Own
If you’re looking to get creative with your Halloween Fudge, here are some fun variations:
- Marble Effect: Instead of layering the colors, use a toothpick to swirl the orange and black layers together for a marbled effect.
- Peanut Butter Fudge: Add a layer of peanut butter fudge between the orange and black layers for a richer flavor.
- Dark Chocolate: For a less sweet option, substitute the white chocolate with dark chocolate and use food coloring accordingly.
Nutritional Information & Health Benefits of Halloween Fudge
Although Halloween Fudge is a sweet treat, it’s still important to be mindful of what you’re eating. Here’s the nutritional breakdown:
Nutritional Information (Per Serving):
- Calories: 180 kcal
- Carbohydrates: 22g
- Protein: 2g
- Fat: 9g
- Saturated Fat: 5g
- Cholesterol: 15mg
- Sodium: 40mg
- Fiber: 0g
- Sugar: 20g
- Vitamin D: 0mcg
- Calcium: 80mg
- Iron: 0.1mg
Health Considerations:
While this treat is high in sugar, enjoying a small portion can satisfy your sweet tooth without derailing a balanced diet. The white chocolate contains calcium, which is good for your bones, but keep in mind that moderation is key, especially around the holidays!
FAQs About Halloween Fudge
Yes! If you don’t have a microwave, you can melt the white chocolate chips and condensed milk on the stovetop using a double boiler. Just be sure to stir constantly to avoid burning.
Absolutely! If you prefer the taste of milk chocolate, you can substitute it for white chocolate. However, note that the colors may not be as vibrant.
When stored in an airtight container in the fridge, Halloween Fudge can last up to one week. If you freeze it, it will stay fresh for up to two months.
Of course! Feel free to add chopped nuts, mini marshmallows, or even small candy pieces to the fudge layers before they set.
Why You Should Try Halloween Fudge This Year
Halloween Fudge isn’t just about indulging in something sweet—it’s about getting into the spooky spirit of the season! This easy-to-make treat adds a festive touch to your Halloween celebrations and is a fun project for the entire family. With its vibrant colors, creamy texture, and customizable options, it’s sure to be a hit with kids and adults alike.
Plus, the simplicity of the recipe means you don’t need to be a pro in the kitchen to pull it off. So, whether you’re hosting a party, looking for Halloween-themed desserts, or just want to add something fun to your holiday snack repertoire, give this fudge a try. Your taste buds will thank you!
Final Thoughts on Halloween Fudge
Making Halloween Fudge is a great way to embrace the spooky season without spending hours in the kitchen. With minimal ingredients and simple steps, it’s an ideal recipe for busy parents, novice bakers, or anyone looking for a festive and delicious treat. Not to mention, it’s a showstopper at any Halloween gathering.
So, if you’re looking to make a splash this Halloween, whip up a batch of Halloween Fudge—you won’t regret it!
More Relevant Recipes
- Peanut Butter Fudge
- Halloween Pizza Skulls
- Jack-O-Lantern Hand Pies: A Fun and Tasty Halloween Dessert
- Jamaican Purple Rain: The Ultimate Tropical Cocktail
- Candy Grapes

Halloween Fudge
- Total Time: 2 hours 15 minutes (including chilling time)
- Yield: 16 pieces
- Diet: Vegetarian
Description
This Halloween Fudge is a vibrant and fun treat perfect for spooky celebrations. Made with creamy white chocolate, colorful layers, and festive sprinkles, it’s an easy no-bake dessert that delights both kids and adults alike.
Ingredients
- 3 cups of white chocolate chips
- 1 can (14 ounces) sweetened condensed milk
- Orange and black gel food coloring
- Halloween-themed sprinkles
Instructions
- Prepare the Pan: Start by lining an 8×8-inch pan with foil. This makes it easier to remove the fudge once it’s set. Spray the lined pan with nonstick cooking spray to prevent sticking.
- Create the First Layer: Place 1 cup of white chocolate chips and 1/3 cup of sweetened condensed milk in a microwave-safe bowl. Heat the mixture in 30-second intervals, stirring after each session. You’ll know it’s ready when the chocolate is melted and the mixture is smooth.
- Once the mixture is ready, add a few drops of orange gel food coloring. Stir until the color is evenly distributed and you achieve that vibrant Halloween orange. Pour this orange fudge layer into your prepared pan and spread it evenly. Place the pan in the fridge for about 10 minutes to let the layer set.
- Repeat for the Black Layer: Now, for the spooky black layer. Follow the same process as before: microwave another 1 cup of white chocolate chips and 1/3 cup of sweetened condensed milk until melted. Stir in black gel food coloring to get that rich, Halloween-appropriate shade. Once again, pour this layer over the orange fudge in your pan and chill for another 10 minutes.
- The Final Layer: For the third and final layer, melt the last 1 cup of white chocolate chips and 1/3 cup sweetened condensed milk. You can leave this layer plain white or add another fun color like purple or green—whatever fits your spooky mood! Pour the final layer over the previous two, and before it fully sets, sprinkle it with Halloween-themed sprinkles. This final touch adds both crunch and festivity!
- Chill and Cut: Refrigerate the entire pan for about 2 hours or until the fudge is fully set. Once firm, remove the fudge from the pan using the foil lining. Cut into bite-sized squares and enjoy your spook-tacular creation!
Notes
- Tip 1: Don’t overheat the chocolate. Melting white chocolate can be tricky. Be sure to heat it in 30-second intervals and stir often to avoid burning.
- Tip 2: Use high-quality gel food coloring rather than liquid food coloring, as gel tends to produce more vibrant colors without affecting the consistency of the fudge.
- Tip 3: Add some extra flair by incorporating other spooky toppings like candy eyeballs, mini chocolate chips, or crushed Halloween candies.
- Tip 4: Keep the fudge refrigerated if not serving immediately. It will stay fresh and firm for up to a week when stored in an airtight container.
- Prep Time: 15 minutes
- Cook Time: 10 minutes (microwave intervals)
- Category: Dessert
- Method: No-Bake
- Cuisine: American
Nutrition
- Serving Size: 1 piece (approx. 1/16 of the batch)
- Calories: 180 kcal
- Sugar: 20g
- Sodium: 40mg
- Fat: 9g
- Saturated Fat: 5g
- Unsaturated Fat: 2g
- Trans Fat: 0g
- Carbohydrates: 22g
- Fiber: 0g
- Protein: 2g
- Cholesterol: 15mg