
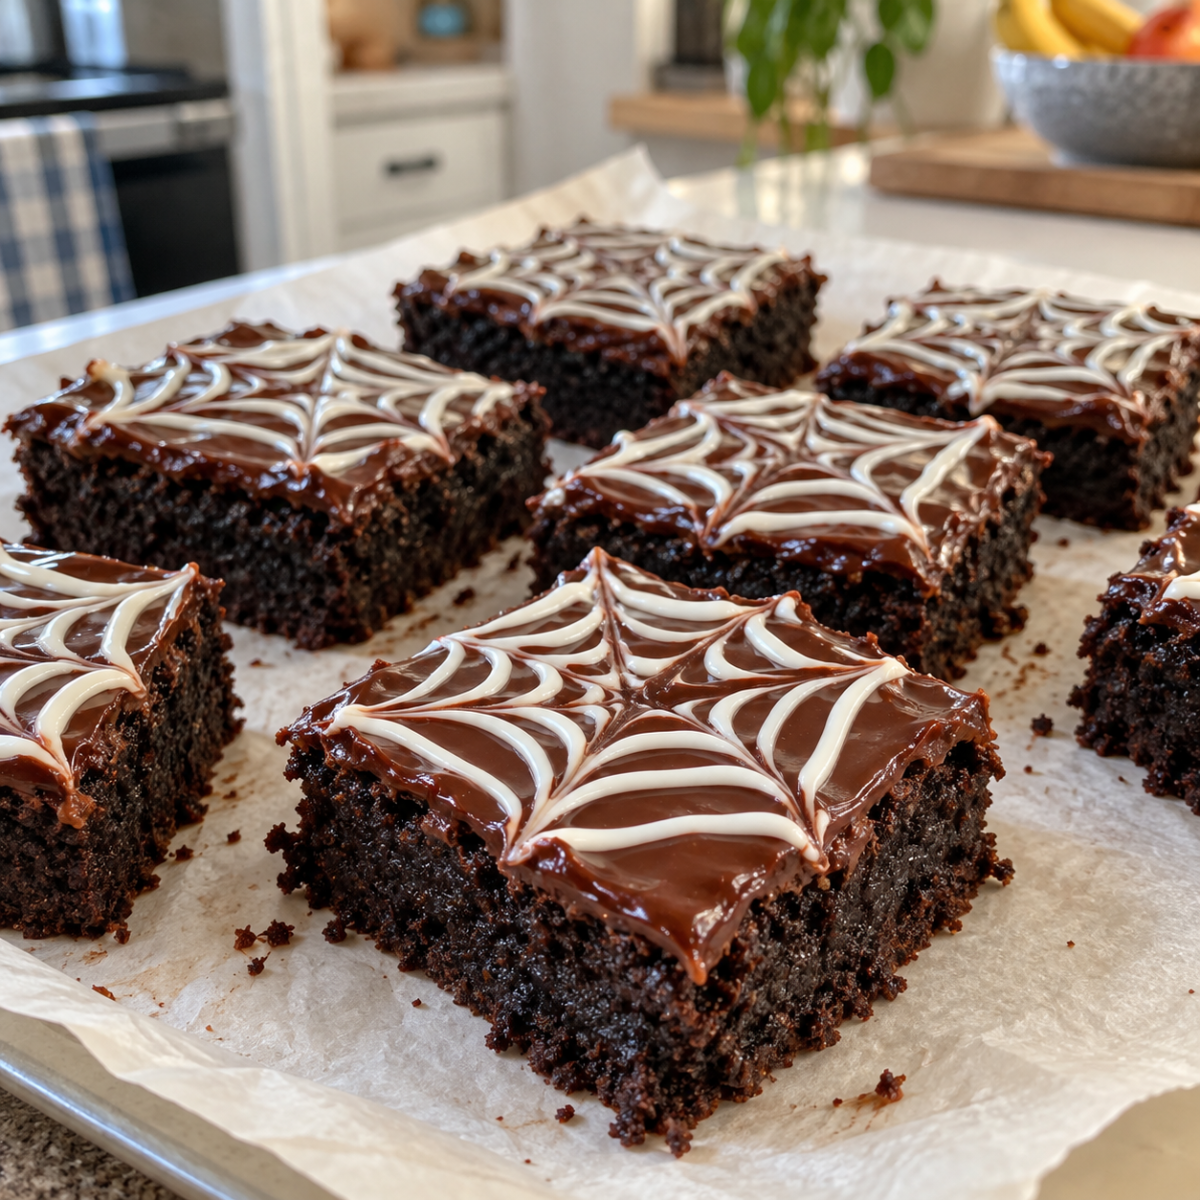
Spiderweb Brownies are the perfect Halloween treat for anyone who loves rich chocolate desserts with a spooky twist. These fudgy brownies feature a smooth chocolate ganache topping and delicate white chocolate spiderwebs, creating a festive dessert that looks impressive but is surprisingly easy to make. Whether you’re preparing treats for a Halloween party, a family gathering, or a cozy autumn evening, this recipe delivers delicious results without complicated decorating techniques.
What makes these homemade brownies especially appealing is their irresistible texture. They are gooey at room temperature, wonderfully fudgy when chilled, and packed with deep chocolate flavor. Even better, you can adapt the recipe to suit gluten-free and dairy-free diets without sacrificing that classic brownie experience.
If you’re looking for a Halloween dessert that combines simple ingredients, beautiful presentation, and rich flavor, these Spiderweb Brownies deserve a place on your seasonal baking list.
Table of Contents
Why You’ll Love These Spiderweb Brownies
There are plenty of reasons to make these chocolate Halloween brownies beyond their eye-catching appearance. They are easy to prepare, require no special food coloring, and use familiar baking ingredients to create a dessert that looks professionally decorated.
The brownie base is made with cocoa powder rather than melted chocolate, making preparation straightforward. You simply combine the dry ingredients, mix the wet ingredients separately, and bring everything together before baking.
The chocolate ganache adds a silky finish, while the white chocolate decoration creates the signature spiderweb effect. You don’t need advanced piping skills or expensive decorating equipment to achieve a beautiful result.
Here are a few more reasons to try this recipe:
- Rich chocolate flavor: Dutch-process cocoa powder gives the brownies a deep, chocolatey taste.
- Fudgy texture: Proper mixing and careful baking help create a moist, dense center.
- Simple decoration: A spiral of white chocolate and a toothpick are all you need for the spiderweb design.
- Flexible ingredients: Several traditional and gluten-free flour options work well.
- Make-ahead convenience: The brownies can be prepared in advance and refrigerated or frozen for later.
These Spiderweb Brownies are ideal for Halloween dessert tables, school celebrations, autumn potlucks, and homemade edible gifts.
Ingredients for Rich and Fudgy Spiderweb Brownies
Each ingredient contributes to the brownies’ flavor, texture, or decorative finish. For the best results, prepare everything before you begin baking.
Ingredients for the Brownie Base
- All-purpose flour: Provides structure while keeping the brownies tender. Whole spelt flour and whole wheat flour are alternatives.
- Dutch-process cocoa powder: Delivers a rich chocolate flavor and dark color. Natural cocoa powder can also work, although the flavor and texture may differ.
- Salt: Balances the sweetness and enhances the chocolate.
- Refined coconut oil or butter: Adds moisture and richness. Refined coconut oil has a neutral flavor, while butter contributes a familiar buttery taste.
- Granulated sugar or coconut sugar: Sweetens the brownies and helps create their characteristic fudgy texture.
- Vanilla extract: Adds warmth and complements the chocolate.
- Eggs: Bind the ingredients together and provide structure without making the brownies dry when baked correctly.
Ingredients for the Chocolate Spiderweb Topping
- Semisweet chocolate chips or chopped chocolate: Form the smooth, rich ganache coating.
- Heavy cream or whipping cream: Creates a silky ganache that spreads easily over each brownie.
- White chocolate chips or chopped white chocolate: Provide the contrasting lines needed to create the spiderweb decoration.
Choose good-quality chocolate because its flavor will be noticeable in both the ganache and the finished dessert.
Gluten-Free and Dairy-Free Substitutions
You can adapt Spiderweb Brownies to accommodate different dietary preferences with a few thoughtful ingredient swaps.
For a gluten-free version, use a tested one-to-one gluten-free baking flour. Light buckwheat flour and teff flour are additional options, although their textures may differ slightly. If you have celiac disease, ensure that all ingredients, including the flour and chocolate, are certified or labeled gluten-free as appropriate.
For dairy-free brownies, use refined coconut oil instead of butter, dairy-free semisweet chocolate, and dairy-free white chocolate. Replace the heavy cream with canned full-fat coconut milk for the ganache.
Egg-free baking requires a different approach. Because eggs are important to the structure and texture of this particular brownie recipe, simply replacing them with a standard egg substitute may not produce the intended result. A specifically developed vegan brownie recipe is a more reliable choice.
How to Make Spiderweb Brownies Step by Step
Follow these instructions carefully to create a moist brownie base, glossy chocolate topping, and classic spiderweb decoration.
Step 1: Prepare the Baking Pan
Preheat your oven to 350°F (175°C). Line an 8-by-8-inch baking pan with parchment paper, leaving a little overhang on the sides so you can lift out the brownies after cooling.
Measure your ingredients before mixing. Having everything ready makes the process easier and helps prevent overmixing once the batter comes together.
Step 2: Combine the Dry Ingredients
In a medium bowl, stir together the flour, cocoa powder, and salt until evenly distributed. Break up any cocoa lumps so the mixture is smooth.
Set the bowl aside while you prepare the wet ingredients. Even distribution is important because it ensures that every brownie has a consistent chocolate flavor.
Step 3: Mix the Wet Ingredients
In a large bowl, combine the melted coconut oil or butter with the sugar and vanilla extract. Stir until the mixture is well blended.
Add the eggs one at a time, stirring after each addition until incorporated. Avoid beating the mixture excessively, as the goal is a dense, fudgy brownie rather than a light, cake-like texture.
Step 4: Make the Brownie Batter
Add the dry ingredients to the wet mixture. Stir gently until almost no streaks of flour remain.
Stop mixing as soon as the ingredients are combined. Overmixing can affect the final texture, making the brownies less tender. The batter should look thick and chocolatey.
Step 5: Bake Until Just Set
Spread the batter evenly into the prepared pan. Bake for approximately 15–20 minutes, checking the brownies carefully near the end of the baking time.
The center should remain moist, and a toothpick inserted into the middle may come out wet with thick brownie crumbs. The sides should show moist crumbs rather than completely raw batter.
Do not wait for the brownies to look like a fully baked cake. They will continue to set as they cool, and overbaking can make them dry and cakey.
Step 6: Cool and Cut the Brownies
Allow the brownies to cool in the pan at room temperature for about one hour. Then transfer them to the refrigerator for another hour.
Once thoroughly chilled, lift the brownies out using the parchment paper and cut them into 16 squares. Chilling makes the brownies firmer and helps you achieve clean edges before decorating.
Step 7: Prepare the Chocolate Ganache
Place the semisweet chocolate in a heatproof bowl. Warm the cream in a small saucepan over medium heat until hot and steamy, but do not allow it to boil.
Pour the hot cream over the chocolate and leave it undisturbed for about 10 minutes. Stir gently until the chocolate melts completely and the mixture becomes smooth and glossy.
If a few chocolate pieces remain unmelted, continue stirring gently until the ganache reaches a spreadable consistency.
Step 8: Melt the White Chocolate
Place the white chocolate in a microwave-safe bowl. Heat it at half power in 30-second intervals, stirring between each interval until smooth.
Alternatively, melt it gently in a small saucepan over low heat. Avoid overheating white chocolate because it can become thick and difficult to pipe.
Transfer the melted chocolate to a piping bag fitted with a small round tip. A clean, food-safe piping bag with a tiny opening also works.
Step 9: Create the Spiderweb Design
Spread a thin layer of chocolate ganache over one brownie at a time, or dip the top of each brownie into the ganache.
Pipe a spiral of white chocolate from the center toward the outer edge. While the white chocolate is still melted, use a toothpick to draw lines from the center of the spiral outward to the edges.
Repeat this motion around the brownie, wiping the toothpick clean between strokes. The lines will pull the white chocolate into a spiderweb pattern.
Continue decorating the remaining brownies, then allow the chocolate topping to firm up before serving.
Expert Tips for Perfect Spiderweb Brownies
A few simple techniques can make the difference between ordinary brownies and a batch that looks and tastes exceptional.
Avoid overbaking. The brownies should remain moist in the center. Because ovens vary, start checking at the lower end of the recommended baking time. If the brownies consistently bake too quickly or slowly, use an oven thermometer to check the actual temperature.
Measure flour accurately. Too much flour can make brownies dry and crumbly. Weighing ingredients with a kitchen scale gives the most consistent results.
Let the brownies cool completely. Decorating warm brownies can cause the ganache to slide and the white chocolate to lose its definition. Chilling also makes cutting easier.
Use a gentle hand when mixing. Stir only until the ingredients are combined. Excessive mixing can change the texture you want in a fudgy brownie.
Work quickly when decorating. The ganache and white chocolate need to remain workable while you create the design. If the topping begins to set, allow it to soften slightly before continuing.
Keep the web simple. Perfectly symmetrical lines aren’t necessary. Slightly irregular strokes can make the finished Halloween brownies look even more like real spiderwebs.
Delicious Ways to Serve and Customize Spiderweb Brownies
These Spiderweb Brownies are delicious on their own, but you can personalize them to match your Halloween party theme or dessert table.
Add Festive Halloween Decorations
Arrange the brownies on a dark serving platter to highlight the white spiderweb pattern. You can also surround them with Halloween-themed cookies, chocolate truffles, or other seasonal sweets.
For an elegant presentation, keep the decorations simple. The contrast between the dark ganache and white chocolate is already striking, so additional toppings are optional.
Experiment With Chocolate Flavors
Dark chocolate creates a more intense topping, while semisweet chocolate provides a balanced flavor. Milk chocolate is generally less suitable here because its extra sweetness can overwhelm the already rich brownies.
You can also add a small amount of espresso powder to the brownie batter to enhance the chocolate flavor without making the dessert taste strongly of coffee.
Make Smaller Party Portions
Cut the brownies into smaller squares if you’re serving a large group or preparing a Halloween dessert buffet. Smaller portions are easier to arrange on trays and let guests sample several desserts.
For the neatest presentation, wipe your knife clean between cuts and make sure the brownies are thoroughly chilled before slicing.
Pair Them With Your Favorite Treats
Serve the brownies with vanilla ice cream, lightly sweetened whipped cream, or fresh strawberries for a contrast to the rich chocolate. Coffee, hot chocolate, and cold milk are also excellent beverage pairings.
For a complete Halloween dessert spread, combine them with caramel apples, pumpkin cookies, or chocolate-dipped pretzels.
Make-Ahead, Storage, and Freezing Instructions
One of the best things about these Halloween brownies is that you can prepare them ahead of time. In fact, chilling is an important part of achieving a neat finish.
After decorating, allow the chocolate topping to firm up. Place the brownies in an airtight container and refrigerate them for up to five days.
For serving, you can enjoy them straight from the refrigerator for a firm, fudgy texture or let them sit briefly at room temperature for a softer center. Keep in mind that the ganache will soften as it warms.
These brownies also freeze well for up to three months. Place them in a freezer-safe container with parchment paper between layers to protect the spiderweb decorations. Thaw them in the refrigerator before serving.
If you prefer to prepare the dessert in stages, bake the brownie base ahead of time, cool and chill it, then cut and decorate it closer to your event. This approach makes Halloween party preparation much more manageable.
Make These Spiderweb Brownies for Your Next Halloween Celebration
Spiderweb Brownies bring together everything you want in a festive homemade dessert: rich chocolate flavor, a soft and fudgy center, a glossy ganache topping, and a simple decoration that instantly creates a Halloween theme.
With straightforward preparation and a few easy decorating steps, this recipe is suitable for experienced bakers and beginners alike. You can also adapt the ingredients for gluten-free or dairy-free preferences, making it easier to share these treats with friends and family.
Prepare a batch for your next Halloween party, autumn gathering, or cozy night at home. Once you master the simple spiral-and-toothpick technique, these Spiderweb Brownies may become one of your favorite seasonal baking traditions.
Frequently Asked Questions
Why Are My Spiderweb Brownies Cakey Instead of Fudgy?
Overbaking is one of the most common reasons brownies turn out cakey. Too much flour or reducing the sugar substantially can also affect the texture. Follow the recommended baking time and allow the brownies to finish setting as they cool.
Can I Use Regular Cocoa Powder?
Yes, natural cocoa powder can be used, although the brownies may have a slightly different chocolate flavor and a somewhat cakier texture than versions made with Dutch-process cocoa powder.
Do I Need a Piping Bag to Make Spiderwebs?
No. A piping bag with a small round tip offers good control, but you can also use a clean food-safe bag with a very small corner opening. The important thing is to pipe thin lines and draw through them with a toothpick before the chocolate sets.
More Relevant Recipes
- Easy Butter Pecan RumChata Punch for Fall Parties
- Easy Drop Style Christmas Sugar Cookies
- Easy Halloween Popcorn Mix Recipe: Monster Munch
Spiderweb Brownies
- Total Time: 2 hours 50 minutes
- Yield: 16 brownies
- Diet: Vegetarian
Description
Spiderweb Brownies are rich, fudgy Halloween brownies topped with silky chocolate ganache and an easy white chocolate spiderweb design. They are simple to prepare, festive for parties, and can also be adapted with gluten-free or dairy-free ingredients.
Ingredients
- 1 cup (125 g) all-purpose flour
- 3/4 cup (86 g) Dutch-process cocoa powder
- 1/4 teaspoon salt
- 3/4 cup + 2 tablespoons (196 g) refined coconut oil or butter, melted and slightly cooled
- 1 1/2 cups (300 g) granulated sugar or coconut sugar
- 1 tablespoon vanilla extract
- 3 large eggs, about 50 g each without shell, room temperature
- 1 cup (170 g) semisweet chocolate chips or chopped chocolate
- 1/2 cup (120 ml) heavy cream, whipping cream, or full-fat canned coconut milk
- 1/2 cup (85 g) white chocolate chips or chopped white chocolate
Instructions
- Preheat the oven to 350°F (175°C) and line an 8-inch by 8-inch baking pan with parchment paper.
- In a medium bowl, stir together the flour, Dutch-process cocoa powder, and salt until evenly combined.
- In a large bowl, mix the melted coconut oil or butter with the sugar and vanilla extract.
- Add the eggs one at a time, stirring only until each egg is incorporated.
- Add the dry ingredients to the wet ingredients and gently stir until almost no flour streaks remain. Do not overmix.
- Spread the batter evenly in the prepared pan and bake for 15 to 20 minutes. A toothpick inserted into the center should still look moist, while one inserted near the sides should come out with moist crumbs.
- Cool the brownies at room temperature for about 1 hour, then refrigerate for another hour before cutting into 16 squares.
- To make the ganache, place the semisweet chocolate in a heatproof bowl. Heat the cream in a small saucepan until hot and steamy but not boiling.
- Pour the hot cream over the semisweet chocolate and let it stand uncovered for 10 minutes. Stir until completely smooth.
- Melt the white chocolate in a microwave-safe bowl at half power in 30-second intervals, stirring after each interval, or melt gently over low heat.
- Spread or dip the top of one brownie at a time with the chocolate ganache.
- Transfer the melted white chocolate to a piping bag with a small round tip and pipe a spiral from the center toward the outside edge of each brownie.
- Drag a toothpick from the center of the spiral toward the outer edge several times to create the spiderweb pattern. Clean the toothpick between brownies.
- Allow the chocolate topping to firm up before serving or storing.
Notes
- Do not overmix the brownie batter, as this can create a cakier texture.
- Avoid overbaking. The center should remain moist because the brownies continue to set as they cool.
- For gluten-free Spiderweb Brownies, use 1 cup (158 g) teff flour, 1 cup (125 g) gluten-free light buckwheat flour, 1 cup (138 g) Bob’s Red Mill Gluten-Free 1-to-1 Baking Flour, or 1 cup (125 g) King Arthur Measure for Measure Gluten-Free Flour.
- For a dairy-free version, use refined coconut oil instead of butter, dairy-free semisweet and white chocolate, and full-fat canned coconut milk instead of heavy cream.
- Chilling the brownies before cutting makes them easier to slice cleanly and gives them a denser, fudgier texture.
- Store covered in the refrigerator for up to 5 days.
- Freeze the brownies in a freezer-safe container for up to 3 months.
- For the easiest spiderweb decoration, pipe one continuous white chocolate spiral rather than separate circles.
- Prep Time: 30 minutes
- Cook Time: 17 minutes
- Category: Dessert
- Method: Baking
- Cuisine: American
Nutrition
- Serving Size: 1 brownie
- Calories: 352 kcal
- Sugar: 27 g
- Sodium: 58 mg
- Fat: 23 g
- Saturated Fat: 17 g
- Unsaturated Fat: 5 g
- Trans Fat: 0.01 g
- Carbohydrates: 37 g
- Fiber: 3 g
- Protein: 4 g
- Cholesterol: 41 mg