
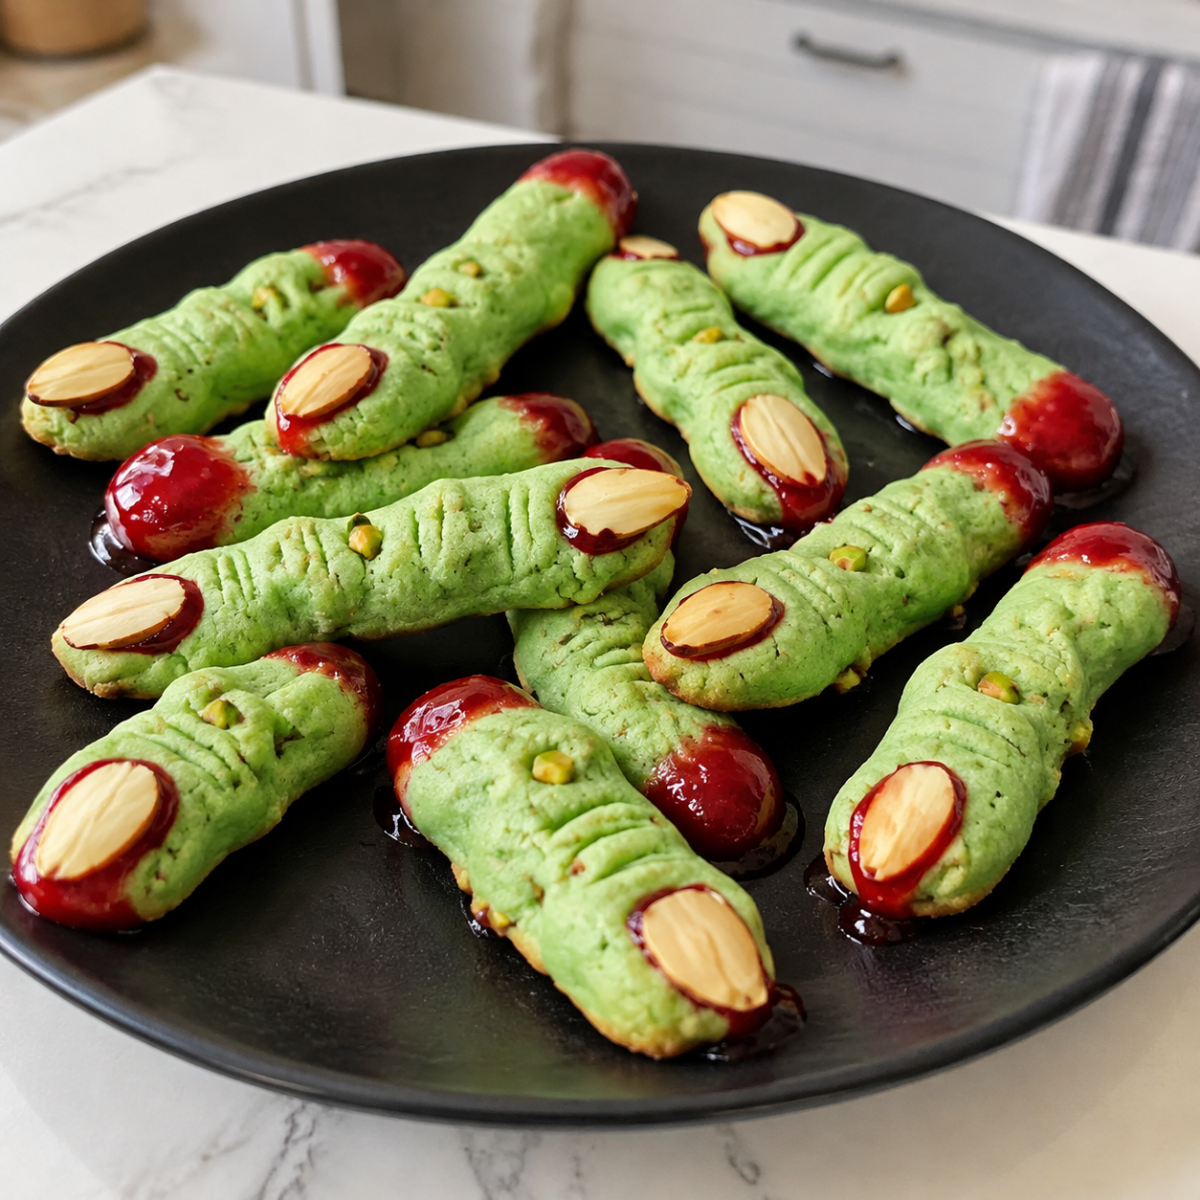
Witch Finger Cookies are the kind of Halloween dessert that gets a reaction before anyone takes a bite. Their green color, almond fingernails, pistachio “warts,” and bright red jam make them wonderfully creepy, while the cookie itself is tender, buttery shortbread with almond and vanilla flavor. They are perfect for a Halloween party or spooky baking afternoon.
The best part is that Witch Finger Cookies do not require complicated decorating skills. The shape does most of the work, which makes Witch Finger Cookies approachable for beginner bakers. A few simple knife marks create realistic knuckles, and a dab of red jam gives each cookie its gruesome finishing touch. The dough does need time to chill, but that step is essential for keeping the fingers defined as they bake.
Table of Contents
Why Witch Finger Cookies Are So Spooky and Delicious
Witch Finger Cookies combine playful Halloween decoration with classic shortbread. The dough is rich from butter, crisp at the edges, and tender in the center. Confectioners’ sugar creates a fine crumb, while almond and vanilla add a warm aroma.
Their appearance comes from a few clever details. Green food coloring gives the dough its witchy shade, sliced almonds become the nails, and finely chopped pistachios create tiny bumps that resemble warts. Cherry jam supplies the blood-red effect, although strawberry or raspberry jam works just as well.
Because Witch Finger Cookies are shaped before baking rather than covered with icing, they are surprisingly practical to make. Once you learn the knuckles and grooves, you can create a tray of creepy treats without advanced decorating skills.
Ingredients for Witch Finger Cookies
• Confectioners’ sugar: Creates a smooth, delicate shortbread texture and blends easily with softened butter.
• Unsalted butter: Provides the rich, buttery foundation and tender crumb.
• Large egg: Binds the dough and helps give it a cohesive texture.
• Almond extract: Adds a pronounced nutty flavor that complements the almond nails.
• Pure vanilla extract: Rounds out the flavor with familiar vanilla aroma.
• Green food coloring: Gives the cookies their distinctive supernatural color.
• All-purpose flour: Builds structure while keeping the shortbread tender.
• Kosher salt: Balances sweetness and sharpens the buttery flavor.
• Finely chopped pistachios: Add subtle crunch and convincing “warts.”
• Sliced almonds: Form the edible fingernails.
• Cherry jam: Creates the dripping blood effect and adds fruity sweetness.
Simple Ingredient Alternatives
For a nut-free version, leave out the pistachios and replace the almond fingernails with large pieces of dried coconut. You can also replace almond extract with extra vanilla extract, although the finished flavor will be less nutty.
Strawberry or raspberry jam is an easy substitute for cherry. Choose a thick, deeply colored preserve so the red effect stays visible. If using gel food coloring, start with less because it is more concentrated than standard liquid coloring.
How to Make Witch Finger Cookies Step by Step
- Cream the butter and sugar. In a large mixing bowl, beat 1 1/4 cups confectioners’ sugar with 1 cup, or 2 sticks, softened unsalted butter on medium speed for about 2 minutes. Beat until pale and fluffy.
- Add the egg and flavorings. Beat in 1 large egg for about 1 minute. Add 1 teaspoon almond extract, 1 teaspoon pure vanilla extract, and 5 to 6 drops green food coloring. Mix until evenly colored.
- Mix the dry ingredients. In another bowl, whisk 2 3/4 cups all-purpose flour with 1 teaspoon kosher salt. Add this mixture to the butter mixture and beat on low just until combined. Do not overmix, or the cookies may lose their tender texture.
- Add the pistachios. Fold in 1/2 cup finely chopped pistachios, distributing them evenly through the dough.
- Chill the dough. Cover and refrigerate for at least 30 minutes or up to 2 days. Cold dough is easier to shape, and chilled butter helps prevent spreading.
- Shape the fingers. Line two rimmed baking sheets with parchment. Work with about one-quarter of the dough at a time and keep the rest refrigerated. Divide the portion into about 12 to 13 tablespoon-sized pieces. Roll each between your palms into a log about 3 inches long and 1/2 inch wide.
- Add the creepy details. Place the logs on the baking sheets. Press a sliced almond into one end for the nail. Pinch the dough below the nail and around the middle to suggest knuckles. Use a sharp knife to cut several uneven horizontal grooves, then add one or two small pistachio pieces for warts.
- Freeze the shaped dough. Freeze the trays for 30 minutes. This extra chilling helps the fingers keep their shape during baking.
- Bake. Heat the oven to 375°F. Bake for 7 to 9 minutes, rotating the trays front to back halfway through. The edges should be firm and the tops dry. Avoid waiting for deep browning.
- Finish with jam. Let the cookies cool slightly, then gently lift off each almond nail. Add a tiny dab of jam to the fingertip and press the almond back into place so a little red filling oozes around it. Spread a small amount of jam onto the bottom of each cookie and let them cool completely.
Tips for Better Witch Finger Cookies
Keep the dough cold from start to finish. If it becomes soft while shaping, return it to the refrigerator for several minutes. Soft dough is harder to form and more likely to spread.
Do not make the fingers perfectly straight or identical. Slight bends, uneven lengths, and varied knuckle marks make Witch Finger Cookies look more convincing. A little irregularity is part of the fun.
Use a light touch when shaping. The logs should be slender but sturdy enough to handle. When adding the almond nails, press firmly enough to create an impression without flattening the fingertip.
Watch the baking time closely. Because the cookies are small, an extra minute can change their texture quickly. Pull them when the edges are firm and the tops are dry.
For a dramatic presentation, keep jam visible around the nail and underneath the finger. The green dough, pale almond, and dark red jam create the signature spooky effect.
Serving Ideas for Witch Finger Cookies and Halloween Variations
Witch Finger Cookies are made for a Halloween dessert table. Arrange them on a dark platter with the almond nails pointing in different directions. A little extra red jam around the serving plate can make the display even more theatrical.
For a Halloween movie night, serve Witch Finger Cookies with hot chocolate, coffee, apple cider, or a vanilla milkshake. Their buttery texture pairs especially well with warm drinks.
You can also build a mixed Halloween cookie platter with chocolate spider cookies, pumpkin-shaped sugar cookies, ghost meringues, or caramel popcorn. Several shapes and textures make the spread festive without requiring every dessert to be heavily decorated.
Fun Ways to Change the Recipe
For monster fingers, skip the red jam and use colorful candies or dried fruit as nails. You can also change the green coloring to another eerie shade for a different creature theme.
For a richer dessert, serve the finished cookies with chocolate dipping sauce. For a dramatic “severed hand” display, arrange several fingers together with extra jam around the base.
Make-Ahead and Storage Guide
The dough can be refrigerated for up to 2 days before shaping, which makes these Halloween cookies useful for party planning. It can also be frozen for up to 3 months when wrapped securely. Thaw frozen dough in the refrigerator before shaping.
After baking, cool the cookies completely before storing them. Keep them in an airtight container at room temperature for up to 3 days, with parchment between flat layers to protect the decorations.
For a party, baking Witch Finger Cookies the day before is a smart option. They will still have a pleasant shortbread texture, while you can use party day for decorating and preparing other Halloween food.
Why Witch Finger Cookies Belong on Your Halloween Table
Witch Finger Cookies work because they deliver both visual impact and genuine cookie-shop flavor. Beneath the green coloring is a classic shortbread dough built around butter, confectioners’ sugar, flour, vanilla, and almond.
The recipe also leaves plenty of room for creativity. Make the fingers crooked, change the jam flavor, adjust the pistachio “warts,” or try the nut-free variation. The chilling step is the key to keeping the shapes recognizable and the knuckle details visible after baking.
Whether you are hosting a Halloween party, filling a seasonal cookie tin, or planning a family baking project, Witch Finger Cookies bring plenty of character to the table. They are creepy enough to get attention, delicious enough to disappear quickly, and simple enough to become an annual Halloween tradition.
Final Thoughts on Witch Finger Cookies
Witch Finger Cookies are a fun way to turn a simple buttery shortbread recipe into a memorable Halloween treat. The green cookie dough, sliced almond nails, pistachio details, and bright red jam create a creepy appearance without requiring complicated decorating techniques.
The key to successful Witch Finger Cookies is keeping the dough cold and shaping the fingers with a light, imperfect touch. Small variations in the knuckles, grooves, and finger lengths make the finished cookies look even more realistic.
Whether you are preparing treats for a Halloween party or baking with the family, these cookies are sure to become a seasonal favorite. Make a batch ahead of time, arrange them on a festive platter, and let their spooky appearance do the talking.
Witch Finger Cookies FAQs
Can I make Witch Finger Cookies ahead of time?
Yes, Witch Finger Cookies are excellent for making ahead. The dough can be prepared and refrigerated for up to 2 days before shaping and baking. You can also freeze the wrapped dough for up to 3 months.
For the best texture, thaw frozen dough in the refrigerator before shaping. Baked cookies should be cooled completely and stored in an airtight container at room temperature.
Why did my Witch Finger Cookies spread in the oven?
The most common reason is that the dough became too warm before baking. Soft butter and warm dough can cause the shaped fingers to lose their definition.
To prevent this, chill the dough before shaping and freeze the shaped cookies for about 30 minutes before they go into the oven. If your kitchen is particularly warm, work with smaller portions of dough while keeping the remaining dough refrigerated.
Can I make these Halloween cookies without nuts?
Yes. To make Witch Finger Cookies without nuts, omit the chopped pistachios and replace the almond nails with a suitable nut-free decoration, such as pieces of coconut or another edible candy decoration.
You can also replace the almond extract with additional vanilla extract. The cookies will have a slightly different flavor, but they will still have the same spooky finger shape and buttery shortbread texture.
More Relevant Recipes
- Easy Zombie Cookies for a Spooky Halloween Treat
- Easy Christmas Jewel Squares Recipe
- Easy Halloween Popcorn Balls for Spooky Parties

Witch Finger Cookies
- Total Time: 1 hour 9 minutes
- Yield: 48 to 52 cookies
- Diet: Vegetarian
Description
These spooky Witch Finger Cookies are tender, buttery shortbread cookies dyed green and shaped like creepy severed fingers. Sliced almonds create the nails, chopped pistachios add realistic wart-like details, and cherry, strawberry, or raspberry jam provides a gruesome blood-red finish. They are an eye-catching Halloween dessert that is perfect for parties, cookie trays, and festive baking.
Ingredients
- 1 1/4 cups (145 g) confectioners’ sugar
- 1 cup (2 sticks) unsalted butter, softened
- 1 large egg
- 1 teaspoon almond extract
- 1 teaspoon pure vanilla extract
- 5 to 6 drops green food coloring
- 2 3/4 cups (330 g) all-purpose flour
- 1 teaspoon kosher salt
- 1/2 cup finely chopped pistachios (about 70 g), plus more for decorating
- 3/4 cup sliced almonds (about 85 g)
- 1/2 cup (135 g) cherry, strawberry, or raspberry jam
Instructions
- In a large bowl fitted with a whisk attachment, or using a handheld mixer, beat the confectioners’ sugar and softened butter on medium speed until pale and fluffy, about 2 minutes.
- Add the egg and continue beating until fully incorporated and fluffy, about 1 minute. Add the almond extract, vanilla extract, and green food coloring, then mix until the color is evenly distributed.
- In a separate bowl, whisk together the all-purpose flour and kosher salt. Add the dry ingredients to the butter mixture and beat on low speed just until combined.
- Fold in the finely chopped pistachios. Cover the bowl with plastic wrap and refrigerate the dough for at least 30 minutes or up to 2 days.
- Line 2 rimmed baking sheets with parchment paper. Remove about one-quarter of the chilled dough and portion it into 12 to 13 balls, about 1 tablespoon each.
- Roll each ball between your palms into a finger-shaped log about 3 inches long and 1/2 inch wide. Arrange the logs on the prepared baking sheets.
- Press a sliced almond into the end of each cookie to create the fingernail. Carefully pinch the dough below the almond and halfway down the log to form knuckles.
- Using a sharp knife, carve horizontal grooves of varying lengths into the knuckles. Add 1 or 2 small pistachio pieces to each finger to create wart-like details. Repeat with the remaining dough.
- Freeze the shaped cookies for 30 minutes. Meanwhile, preheat the oven to 375°F.
- Bake the cookies for 7 to 9 minutes, rotating the baking sheets front to back halfway through. The edges should be firm and the tops dry. Let the cookies cool slightly.
- Gently lift the almond fingernail from each cookie. Add a tiny dab of jam to the fingertip, replace the almond, and press gently so the jam oozes around the nail.
- Spread a little more jam onto the bottom of each cookie for an extra blood-like effect. Allow the Witch Finger Cookies to cool completely before serving or storing.
Notes
- Do not skip chilling or freezing the dough. Cold dough helps the shortbread fingers retain their shape and prevents excessive spreading.
- If using concentrated gel food coloring instead of regular food coloring, begin with about half the amount and add more as needed.
- Keep unused dough refrigerated while shaping the cookies in batches.
- Strawberry or raspberry jam can replace cherry jam for the red blood-like decoration.
- For a nut-free variation, omit the pistachios and almonds and use large coconut flakes for the nails and decorations.
- The cookie dough can be refrigerated for up to 2 days or frozen for up to 3 months.
- Store completely cooled baked cookies in an airtight container in flat layers separated by parchment paper at room temperature for up to 3 days.
- Prep Time: 30 minutes
- Cook Time: 9 minutes
- Category: Dessert
- Method: Baking
- Cuisine: American
Nutrition
- Serving Size: 1 cookie
- Calories: 95 kcal
- Sugar: 4.5 g
- Sodium: 49 mg
- Fat: 5.3 g
- Saturated Fat: 2.5 g
- Unsaturated Fat: 2.8 g
- Trans Fat: 0.2 g
- Carbohydrates: 10.4 g
- Fiber: 0.6 g
- Protein: 1.5 g
- Cholesterol: 14 mg