
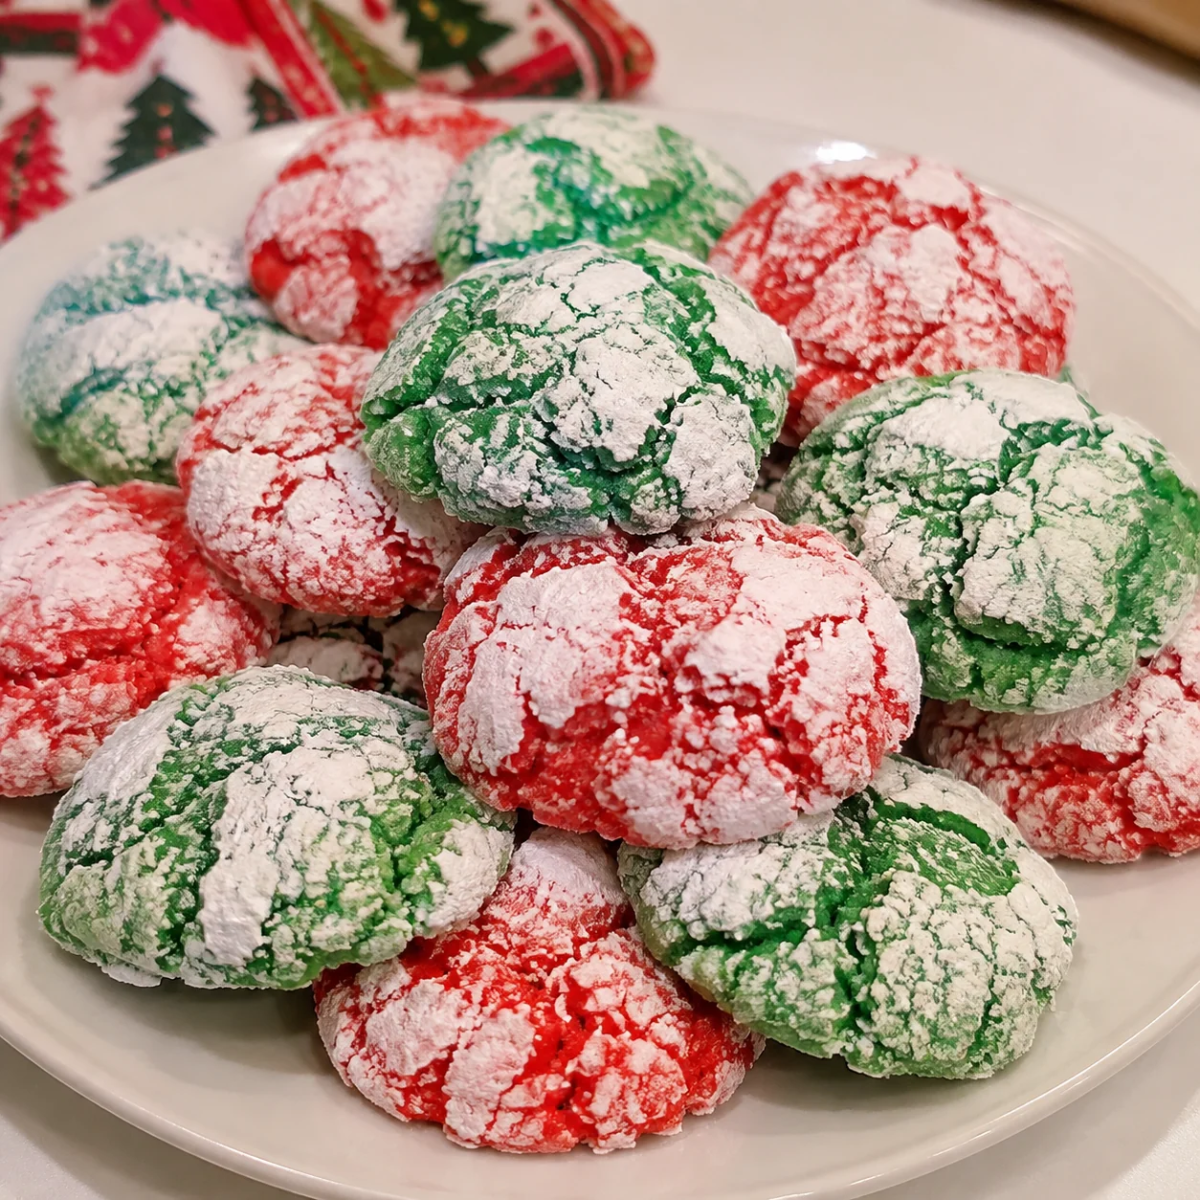
Christmas Crinkle Cool Whip Cookies are a festive holiday treat with soft, chewy centers, beautiful crackled tops, and a snowy coating of powdered sugar. Made with vanilla cake mix, Cool Whip, and a few simple ingredients, these colorful cookies are incredibly easy to prepare. Red and green cookie dough makes them especially perfect for Christmas parties, cookie exchanges, holiday dessert trays, and baking with kids.
If you love homemade Christmas cookies but don’t want to spend hours measuring ingredients and preparing complicated dough, this recipe is a great choice. The dough comes together in one bowl, requires no rolling pin or cookie cutters, and transforms into delicious crinkle cookies with very little effort. The best part is that you can prepare an entire batch in about 40 minutes!
Table of Contents
What Makes These Christmas Crinkle Cookies So Special?
There are plenty of reasons to add Christmas Crinkle Cool Whip Cookies to your holiday baking list.
- Easy preparation: Cake mix takes care of most of the measuring, so you only need a handful of additional ingredients.
- Festive holiday colors: Red and green food coloring give each cookie a cheerful Christmas appearance.
- Soft and chewy texture: Cool Whip helps create a tender interior that contrasts beautifully with the delicate powdered sugar coating.
- Perfect for sharing: These cookies look lovely on Christmas dessert platters and make wonderful additions to cookie exchange boxes.
- Kid-friendly baking: Children can help mix the dough, add food coloring, and roll the cookie portions in powdered sugar.
- Simple ingredients: You don’t need special baking equipment or complicated techniques to make these colorful treats.
Unlike traditional crinkle cookies that require preparing and chilling dough from scratch, this cake mix version makes holiday baking much more manageable.
Ingredients for Christmas Crinkle Cool Whip Cookies
You only need six simple ingredients to prepare these Christmas cookies. Each ingredient plays an important role in creating their soft texture, sweet flavor, and festive appearance.
- Vanilla cake mix: A standard box of vanilla cake mix provides the main structure and sweetness. Use the dry cake mix directly without preparing it according to the package instructions.
- Large egg: A lightly beaten egg helps bind the ingredients together and gives the cookies structure as they bake.
- Cool Whip: Thawed whipped topping creates the soft, sticky cookie dough and contributes to the tender texture. Use an 8-ounce tub.
- Vanilla extract: A little vanilla enhances the cake mix flavor and gives the cookies a warm, familiar sweetness.
- Red and green gel food coloring: These colors create the traditional Christmas appearance. Gel coloring is especially useful because it produces vibrant shades without adding too much liquid.
- Powdered sugar: Also called confectioners’ sugar or icing sugar, it coats the cookie dough before baking and creates the beautiful white crinkle finish.
Ingredient Substitutions and Alternatives
You can adjust these Christmas crinkle cookies with a few simple ingredient swaps while keeping the basic preparation method.
Cake mix flavors: Vanilla cake mix is ideal for the classic red-and-green version, but white cake mix also works well. Chocolate, red velvet, lemon, strawberry, and spice cake mixes offer different flavors for other occasions.
Cool Whip alternatives: If Cool Whip isn’t available, a stabilized whipped topping may be worth experimenting with. However, ordinary homemade whipped cream can have a different consistency, so the results may not be identical.
Food coloring: Gel food coloring is recommended for strong, vibrant colors. Liquid food coloring can also be used, although you may need more to achieve the same intensity.
Vanilla extract: Almond extract can provide a slightly different flavor profile. Start with a small amount because almond extract has a stronger taste.
How to Make Christmas Crinkle Cool Whip Cookies
These Christmas Crinkle Cool Whip Cookies require only a few preparation steps. The most important thing is to handle the sticky dough carefully and leave enough space between the cookies on the baking sheet.
Step 1: Prepare the Oven and Baking Sheet
Preheat your oven to 350°F (175°C). Line a large baking sheet with parchment paper or a silicone baking mat.
Preparing the baking sheet beforehand makes transferring the sticky cookie dough much easier. It also helps prevent the cookies from sticking during baking.
Step 2: Mix the Cookie Dough
Add the dry vanilla cake mix, lightly beaten egg, thawed Cool Whip, and vanilla extract to a large mixing bowl.
Using a hand mixer, beat the ingredients until everything is thoroughly combined. The mixture should become thick, soft, and quite sticky.
Don’t worry if the dough looks different from traditional cookie dough. Its sticky consistency is normal for this recipe and helps create the soft texture of the finished cookies.
Step 3: Divide and Color the Dough
Divide the cookie dough evenly between two mixing bowls.
Add a few drops of red gel food coloring to one portion and mix until the color is evenly distributed. Add more coloring if needed to achieve a bright Christmas red.
Repeat the process with the second portion using green food coloring.
Try to mix each color thoroughly so there are no visible streaks of plain dough. The two separate colors will give your Christmas cookie platter a beautiful festive appearance.
Step 4: Coat the Dough in Powdered Sugar
Pour the powdered sugar into a small, shallow bowl.
Using a tablespoon-sized cookie scoop, portion the red dough directly into the powdered sugar. Roll it gently until the entire surface is generously coated.
Repeat with the green dough.
The dough will be sticky, so avoid handling it more than necessary. Make sure each portion receives a complete coating of powdered sugar. This coating creates the distinctive crackled appearance as the cookies spread and bake.
Step 5: Arrange the Cookies on the Baking Sheet
Transfer the coated cookie dough balls to your prepared baking sheet.
Leave approximately 2 inches of space between each cookie because the dough spreads considerably during baking.
Avoid overcrowding the baking sheet. If necessary, bake the cookies in several batches rather than placing them too close together.
Step 6: Bake Until Set
Place the baking sheet in the preheated oven and bake for 12–15 minutes.
The cookies should look set around the edges, while their centers remain soft. Don’t wait for the centers to become completely firm in the oven because the cookies will continue setting as they cool.
Keep an eye on the first batch, as oven temperatures and baking sheets can affect the final baking time.
Step 7: Cool Before Serving
Remove the baking sheet from the oven and allow the cookies to rest for 5–10 minutes.
They will initially feel very soft, but this is completely normal. As they cool, their structure becomes firmer, making them easier to transfer.
Carefully move the cookies to a wire cooling rack and let them cool completely before serving.
Your Christmas Crinkle Cool Whip Cookies are now ready to enjoy!
Expert Tips for Perfect Christmas Crinkle Cool Whip Cookies
Although this is a beginner-friendly recipe, a few simple techniques can make a noticeable difference in the final results.
Use completely thawed Cool Whip. Make sure the whipped topping has thawed before mixing it with the cake mix. Frozen or partially frozen topping can make it difficult to combine the ingredients evenly.
Expect sticky dough. The dough is naturally much stickier than traditional sugar cookie dough. Don’t add extra flour to make it easier to handle, as this can change the texture of the finished cookies.
Choose gel food coloring. Gel coloring provides vibrant red and green shades without significantly changing the dough consistency. This is particularly helpful when making brightly colored Christmas treats.
Apply enough powdered sugar. A generous coating helps create the classic crinkle appearance. Make sure the dough balls are covered on all sides before placing them on the baking sheet.
Leave enough space between cookies. These cookies spread during baking, so keep approximately 2 inches between each dough ball. Baking in batches is better than overcrowding the pan.
Don’t overbake. The centers should remain soft when you remove the cookies from the oven. They will firm up as they cool, so avoid leaving them in the oven until they look completely dry.
Allow sufficient cooling time. Moving the cookies too soon can cause them to break or lose their shape. Give them at least 5 minutes on the baking sheet before transferring them to a wire rack.
Fun Ways to Customize Your Christmas Crinkle Cookies
One of the best things about cake mix cookies is how easily you can change their flavor and appearance.
Chocolate Christmas Crinkle Cookies
Replace the vanilla cake mix with chocolate or devil’s food cake mix. You can skip the red and green food coloring and use the same powdered sugar coating for a beautiful chocolate-and-white combination.
For a deeper chocolate flavor, replace the vanilla extract with a tablespoon of strong coffee.
Red Velvet Crinkle Cookies
Use red velvet cake mix instead of vanilla cake mix. This creates naturally vibrant red cookies with a delicious cocoa flavor.
The powdered sugar coating provides a beautiful contrast against the red dough, making this variation perfect for Christmas and Valentine’s Day.
Lemon Crinkle Cookies
For a refreshing citrus variation, use lemon cake mix. Add a tablespoon of lemon juice and the zest of half a lemon to enhance the flavor.
These cookies are particularly delicious when you want something lighter and fruitier among your holiday desserts.
Strawberry Crinkle Cookies
Strawberry cake mix creates naturally pink cookies with a sweet berry flavor. You can use almond extract instead of vanilla for a slightly different taste.
This variation is also lovely for Valentine’s Day celebrations.
Spiced Christmas Cookies
Use spice cake mix and add a little ground cinnamon to the powdered sugar before coating the dough balls.
The warm cinnamon aroma makes these cookies especially suitable for cold winter evenings and festive holiday gatherings.
How to Store Christmas Crinkle Cool Whip Cookies
Proper storage helps maintain the soft texture and delicious flavor of your homemade cookies.
At Room Temperature
Allow the cookies to cool completely before storing them. Place them in an airtight container and keep them at room temperature.
For the best texture, enjoy them within 2–3 days. These cookies can become firmer as they sit, so keeping them sealed is important.
Avoid stacking warm cookies because trapped moisture can affect their powdered sugar coating.
Can You Freeze Christmas Crinkle Cool Whip Cookies?
Yes! These cookies can be frozen, making them convenient for preparing holiday desserts ahead of time.
First, allow the baked cookies to cool completely. Arrange them in a single layer in a freezer-safe container or tin. If you need to stack them, place parchment paper between the layers to prevent sticking.
Seal the container tightly and freeze.
When you’re ready to serve, allow the cookies to thaw until they return to a soft, enjoyable texture. Freezing is especially helpful when preparing several batches for Christmas parties or cookie exchanges.
Can You Make the Dough Ahead of Time?
The dough can be prepared ahead, but its sticky consistency makes it easier to handle when properly chilled.
If you want to prepare it in advance, cover the bowl and refrigerate the dough for a short period before portioning. This can help make scooping and rolling more manageable.
For the best results, coat the dough portions in powdered sugar shortly before baking.
What to Serve with Christmas Crinkle Cool Whip Cookies
These colorful Christmas cookies are delicious on their own, but they also pair wonderfully with other holiday treats and drinks.
- Hot chocolate: Serve the cookies alongside a warm mug of hot chocolate topped with whipped cream.
- Coffee: Their sweet vanilla flavor complements freshly brewed coffee or a creamy latte.
- Christmas dessert platters: Arrange red and green crinkle cookies alongside sugar cookies, chocolate truffles, and peppermint bark.
- Holiday cookie exchanges: Package several cookies in decorative boxes or treat bags for friends, family, and neighbors.
- Ice cream: Serve a couple of cookies with vanilla ice cream for a simple holiday dessert.
- Festive dessert tables: Combine them with brownies, Christmas fudge, and other colorful baked treats.
Their bright colors and snowy powdered sugar coating make them an attractive addition to almost any Christmas dessert spread.
Easy Christmas Crinkle Cool Whip Cookies for Your Holiday Table
Christmas Crinkle Cool Whip Cookies are a simple way to bring festive color and homemade sweetness to your holiday celebrations. With convenient cake mix, fluffy Cool Whip, and a beautiful powdered sugar coating, these cookies deliver delicious results without complicated preparation.
Whether you’re baking with children, preparing treats for a Christmas party, or filling holiday cookie boxes for friends and family, this recipe is an easy addition to your seasonal baking traditions. Make a batch with red and green dough, let the cookies cool, and enjoy these soft, colorful Christmas treats throughout the holiday season!
Frequently Asked Questions
Why Is My Cool Whip Cookie Dough So Sticky?
Sticky dough is completely normal for this recipe. Cool Whip gives the mixture a soft consistency that differs from traditional cookie dough. Use a cookie scoop to portion it directly into powdered sugar, which makes rolling much easier.
Why Did My Christmas Crinkle Cookies Spread Too Much?
These cookies naturally spread during baking. However, overcrowding the baking sheet, inaccurate ingredient measurements, or using an unusually thin dough can affect their final shape. Make sure to measure the ingredients correctly and leave approximately 2 inches between each cookie.
Can I Use Liquid Food Coloring Instead of Gel?
Yes. Liquid food coloring works, but gel coloring generally produces stronger shades with fewer drops. If using liquid coloring, add it gradually to avoid introducing too much additional moisture.
More Relevant Recipes
- Easy Rainbow Sherbet Punch Recipe for Parties
- Old-Fashioned Brown Sugar Fudge (Creamy Penuche)
- Easy Grinch Christmas Crack – A Festive Holiday Treat
Christmas Crinkle Cool Whip Cookies
- Total Time: 40 minutes
- Yield: 24 cookies
- Diet: Vegetarian
Description
These Christmas Crinkle Cool Whip Cookies are soft, chewy, and festive holiday treats made with vanilla cake mix, Cool Whip, and a few simple ingredients. Colored red and green and coated in powdered sugar, these easy cake mix cookies have a beautiful crinkled appearance and a delicious sweet vanilla flavor. Perfect for Christmas parties, cookie exchanges, holiday dessert trays, and baking with kids, they come together in just 40 minutes!
Ingredients
- 13.25 ounces vanilla cake mix (1 box)
- 1 large egg, lightly beaten
- 8 ounces Cool Whip (1 tub), thawed
- 1 teaspoon vanilla extract
- Red and green gel food coloring, as needed
- 1 cup powdered sugar
Instructions
- Preheat the oven to 350°F (175°C). Line a baking sheet with parchment paper or a silicone baking mat.
- In a large mixing bowl, beat together the dry vanilla cake mix, lightly beaten egg, thawed Cool Whip, and vanilla extract until combined. The dough will be thick and sticky.
- Divide the cookie dough evenly between two bowls. Add a few drops of red gel food coloring to one portion and mix until evenly colored. Add green food coloring to the second portion and mix until combined.
- Place the powdered sugar in a small bowl. Using a 1-tablespoon cookie scoop, portion the dough directly into the powdered sugar and roll until completely coated.
- Arrange the coated dough balls on the prepared baking sheet, leaving approximately 2 inches between each cookie because they will spread during baking. Work in batches if necessary.
- Bake for 12–15 minutes, or until the cookies are set around the edges. The centers will still be soft.
- Remove the baking sheet from the oven and let the cookies cool for 5–10 minutes. Carefully transfer them to a wire cooling rack and allow them to cool completely before serving.
Notes
- Use thawed Cool Whip for the best dough consistency.
- The cookie dough will be very sticky. Use a cookie scoop to make portioning easier.
- Gel food coloring produces vibrant red and green colors without adding too much liquid to the dough.
- Coat each dough ball generously in powdered sugar to achieve the classic crinkle appearance.
- Leave approximately 2 inches between cookies because they spread considerably while baking.
- Do not overbake. The centers should remain soft when removed from the oven and will firm up as they cool.
- Allow the cookies to cool on the baking sheet for at least 5 minutes before transferring them to a wire rack.
- Store completely cooled cookies in an airtight container at room temperature for 2–3 days.
- These cookies can be frozen in a freezer-safe container with parchment paper between layers.
- For different flavors, experiment with chocolate, red velvet, lemon, strawberry, or spice cake mix.
- Prep Time: 15 minutes
- Cook Time: 15 minutes
- Category: Dessert
- Method: Baking
- Cuisine: American
Nutrition
- Serving Size: 1 cookie
- Calories: 97 kcal
- Sugar: 13 g
- Sodium: 130 mg
- Fat: 1 g
- Saturated Fat: 1 g
- Unsaturated Fat: 0.3 g
- Trans Fat: 0.001 g
- Carbohydrates: 21 g
- Fiber: 0.04 g
- Protein: 1 g
- Cholesterol: 9 mg