
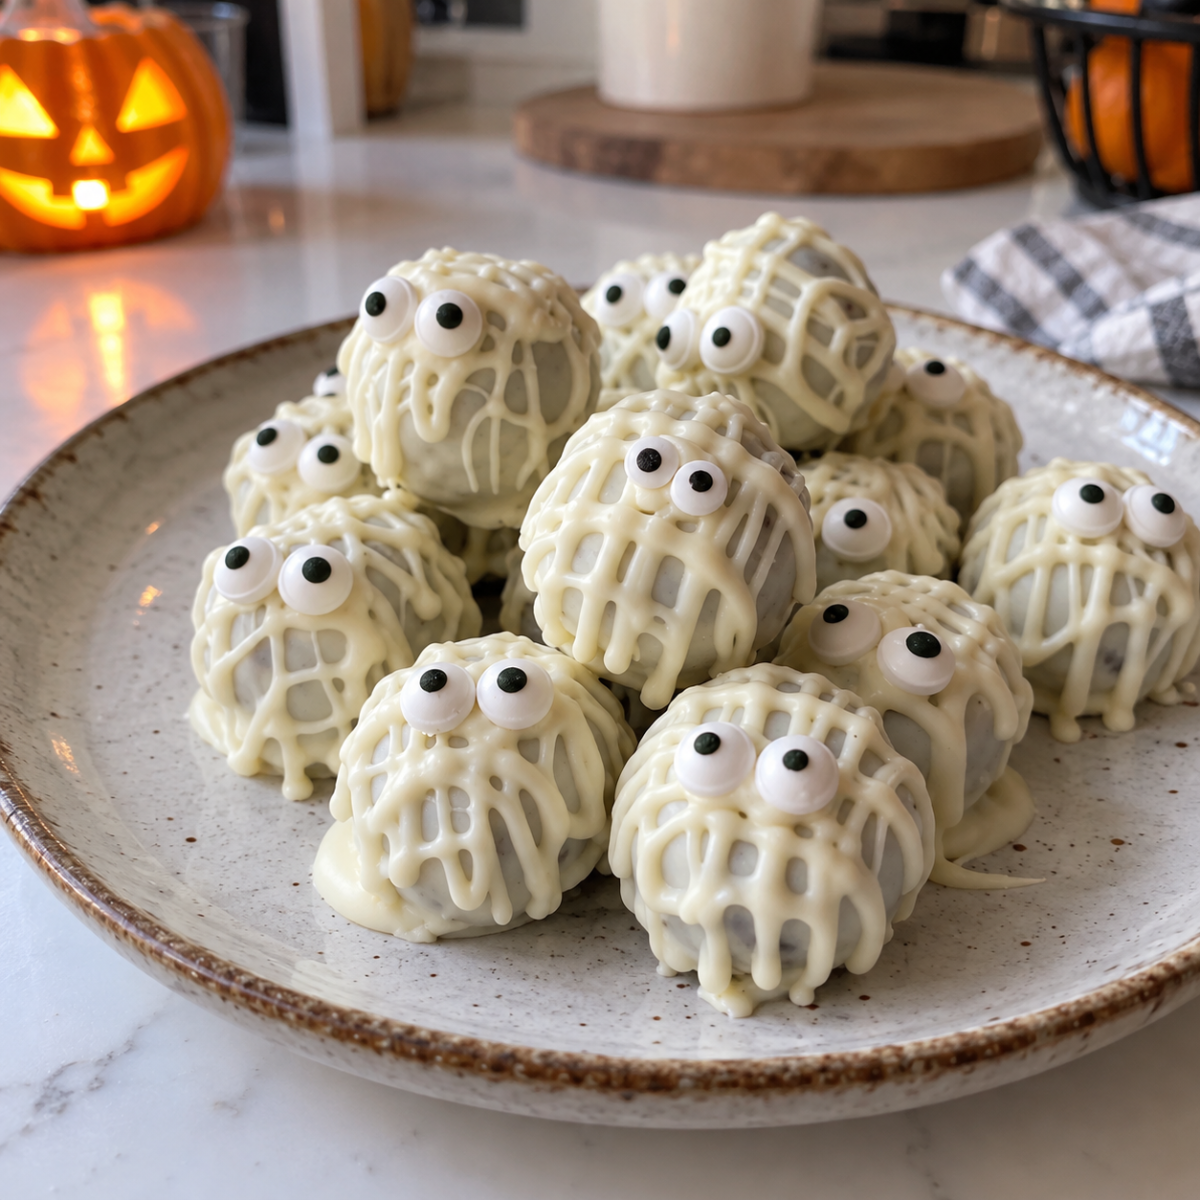
Halloween Truffles are the perfect combination of chocolatey Oreo cookies, creamy cheesecake-like filling, and a smooth white chocolate coating. Decorated with little candy eyes and drizzled white chocolate, these adorable mummy truffles make a festive Halloween dessert that looks impressive but requires no baking.
Whether you’re preparing treats for a Halloween party, making something special for the kids, or putting together a spooky dessert platter, these Halloween Truffles are an easy choice. You only need four main ingredients, a little refrigerator time, and a few simple decorating steps to turn ordinary chocolate sandwich cookies into delicious Halloween Oreo balls.
The best part is that you don’t need any special baking skills. The cookie crumbs and cream cheese create a soft, rich center, while the white chocolate coating adds a sweet, delicate crunch. Each truffle is small enough to serve as a party bite, making these homemade Halloween treats convenient for sharing.
Table of Contents
Why You’ll Love These Halloween Truffles
Halloween Truffles are one of those desserts that look complicated but are surprisingly simple to prepare. Because the recipe doesn’t require an oven, it’s an excellent option when your kitchen is already busy with other Halloween party preparations.
- No baking required: Simply crush the cookies, mix the filling, roll the balls, and chill them before decorating.
- Only four main ingredients: Oreo cookies, cream cheese, white chocolate melting wafers, and candy eyeballs are all you need.
- Perfect for Halloween parties: The white chocolate mummy design makes these treats stand out on dessert tables, snack boards, and party platters.
- Rich chocolate flavor: Chocolate sandwich cookies provide a deep cocoa taste that pairs beautifully with tangy cream cheese.
- Easy to make ahead: Prepare the truffle centers in advance and decorate them when you’re ready.
- Fun for family activities: Children can help place the candy eyes or decorate the cooled truffles with supervision during the chocolate-melting process.
These Halloween Oreo truffles are also easy to customize. You can change the cookie flavor, experiment with different candy decorations, or use colored chocolate coatings to create ghosts, pumpkins, and other spooky characters.
Ingredients for Halloween Truffles
The ingredients for these Halloween Truffles are easy to find at most grocery stores, especially during the fall season. Each ingredient plays an important role in creating the smooth filling and decorative outer shell.
- Oreo cookies: These chocolate sandwich cookies form the base of the truffles. Their chocolate wafers provide flavor, while the cream filling contributes sweetness and helps create a rich cookie mixture.
- Cream cheese: Softened cream cheese binds the crushed cookies together and creates a smooth, slightly tangy center. Full-fat cream cheese generally produces the richest texture.
- White chocolate melting wafers: These provide the smooth outer coating and create the white background for the mummy decorations. Melting wafers are particularly convenient because they’re designed for dipping and coating.
- Candy eyeballs: These small edible decorations transform ordinary Oreo balls into cute little mummies. Use two eyes per truffle for the classic Halloween appearance.
For the original version, use one 14.3-ounce package of Oreo cookies, 8 ounces of softened cream cheese, 18 ounces of white chocolate melting wafers, and 48 candy eyeballs. This makes approximately 24 truffles, depending on their final size.
Ingredient Substitutions and Alternatives
You can adapt this Halloween Truffles recipe to suit the ingredients you already have in your pantry.
Chocolate sandwich cookies: If you don’t have Oreos, another brand of chocolate sandwich cookies can work well. Golden sandwich cookies create a lighter-colored filling, while flavored varieties can introduce different tastes.
Cream cheese: Reduced-fat cream cheese may work, although the filling can have a slightly different texture. Avoid using a particularly soft or watery cream cheese product because excess moisture can make the mixture difficult to roll.
White chocolate: White chocolate baking bars or other suitable white chocolate products can replace melting wafers. Chop the chocolate into small, even pieces before melting, and remember that some products may require more careful temperature control.
Candy eyeballs: If you cannot find candy eyes, use small dots of contrasting melted chocolate or other edible decorations. Make sure any decorations are food-safe and suitable for the dessert.
Dairy-free alternative: Dairy-free chocolate and plant-based cream cheese may work, but their moisture levels and melting behavior vary. Test the mixture before rolling the entire batch, and keep in mind that this substitution may change the final texture.
How to Make Halloween Truffles Step by Step
Making Halloween Truffles involves preparing the cookie mixture, chilling the centers, dipping them in white chocolate, and adding the mummy decorations. Allow enough time for chilling and setting so the truffles hold their shape throughout the process.
Step 1: Crush the Oreo Cookies
Place the Oreo cookies in a food processor and pulse until they become fine, even crumbs. Stop occasionally to scrape down the sides and break up any larger pieces.
Fine crumbs are important because they help the cream cheese distribute evenly throughout the mixture. Large cookie chunks can make the truffles harder to roll and may create an uneven texture.
If you don’t have a food processor, place the cookies in a sturdy zip-top bag and crush them with a rolling pin. Work carefully to break down the cookies as thoroughly as possible.
Step 2: Mix the Cookie Crumbs and Cream Cheese
Transfer the crushed cookies to a large mixing bowl. Add the softened cream cheese and stir until the ingredients are thoroughly combined.
A sturdy spatula works well for mixing, although clean hands can help bring the mixture together if it becomes difficult to stir. Continue mixing until no large streaks of cream cheese remain.
The finished mixture should resemble a thick, moist cookie dough that holds together when pressed between your fingers. If it feels excessively soft, refrigerate it briefly before shaping.
Step 3: Shape the Halloween Oreo Balls
Line a small baking sheet or tray with wax paper or parchment paper.
Scoop portions of the mixture and roll them between your palms to create smooth, round balls approximately 1½ inches in diameter. A small cookie scoop helps keep the portions consistent, so the truffles look uniform when arranged on a serving platter.
Place each ball on the prepared tray, leaving a little space between them. Continue until you’ve used all the mixture.
If the mixture sticks to your hands, chill it for a few minutes before continuing. Avoid adding extra cookie crumbs immediately unless the mixture is genuinely too wet, because too many crumbs can make the centers dry.
Step 4: Chill the Truffle Centers
Refrigerate the shaped Oreo balls for approximately one hour.
This chilling period allows the cream cheese mixture to firm up, making the truffles easier to dip without falling apart. It also helps them retain their round shape when they come into contact with the melted white chocolate.
Don’t skip this step. Soft centers can break apart during dipping, leaving cookie crumbs in the coating and making the finished Halloween treats look less polished.
Step 5: Melt the White Chocolate
Place the white chocolate melting wafers in a completely dry, heat-safe bowl or candy melter.
If using a microwave, heat the chocolate at about 70% power in 30-second intervals, stirring thoroughly after each interval. Continue until the chocolate is smooth and fully melted. Adjust the timing according to your microwave and the product instructions.
You can also use a double boiler, keeping the bowl above gently simmering water without allowing the bowl to touch the water.
Avoid introducing steam or water into the chocolate, as moisture can cause it to become thick and grainy. Once melted, keep the chocolate warm enough to remain fluid without overheating it.
Step 6: Dip the Oreo Truffles
Remove the chilled truffle centers from the refrigerator. Using a dipping fork, carefully lower one ball into the melted white chocolate.
Turn it gently until the entire surface is covered. Lift the truffle out and allow excess chocolate to drip back into the bowl.
Transfer it to the lined baking sheet, carefully sliding the fork out from underneath. Repeat with the remaining truffles.
If the coating becomes too thick, gently rewarm it in short intervals while stirring. If needed, add a very small amount of neutral vegetable oil to help thin the coating, provided the chocolate product allows this adjustment.
Step 7: Add the White Chocolate Mummy Wrappings
Allow the initial coating to set before decorating.
If the dipping chocolate has collected too many dark cookie crumbs, melt a fresh portion of white chocolate for the decorative drizzle. Transfer the smooth chocolate to a piping bag fitted with a small opening.
Pipe thin, irregular lines across each truffle, moving in different directions to resemble mummy bandages. Leave a small space for the eyes, and avoid making every line perfectly straight. Slightly uneven stripes create a more playful mummy appearance.
Work in small batches if the chocolate sets quickly. The truffles should have a fully coated white surface with visible decorative lines on top.
Step 8: Attach the Candy Eyes
While the decorative chocolate is still slightly wet, place two candy eyeballs on each truffle.
Press them gently into the coating so they stay in place without sinking completely beneath the chocolate. If the drizzle has already hardened, use a tiny dot of melted white chocolate as edible glue.
Let the finished Halloween Truffles sit until the chocolate coating has fully set. Refrigerate them if necessary, then arrange them in mini paper candy cups or on a serving platter.
Tips for Perfect Halloween Truffles
A few simple techniques can make the difference between messy cookie balls and beautifully decorated Halloween desserts.
Use softened cream cheese. Cream cheese that has softened slightly at room temperature blends more evenly with the cookie crumbs. Cold cream cheese can leave small lumps in the mixture.
Make the balls uniform. Consistent sizing helps the truffles chill evenly and gives the finished batch a professional appearance. A cookie scoop is especially useful when preparing a large quantity.
Chill before dipping. Firm centers are less likely to crumble or slide off the dipping fork. If the balls begin to soften while you’re working, return the tray to the refrigerator.
Keep the coating smooth. White chocolate can thicken as it cools. Stir it regularly and rewarm it gently when necessary. Avoid overheating, which can cause the chocolate to seize or become difficult to work with.
Use fresh chocolate for the mummy stripes. Cookie crumbs can discolor the coating, especially when you’re working with a large batch. Freshly melted white chocolate creates cleaner, brighter decorative lines.
Let excess chocolate drip away. After dipping each ball, allow a moment for extra coating to fall back into the bowl. This helps prevent thick puddles from forming around the bottom.
Decorate before the drizzle sets. Candy eyeballs adhere more easily when the decorative chocolate is still soft. If it has hardened, use a small amount of melted chocolate to secure them.
Keep everything dry. Make sure bowls, utensils, and piping equipment are dry before they come into contact with melted chocolate.
Halloween Truffle Variations and Serving Ideas
The classic mummy design is a fun starting point, but these Halloween Truffles can be adapted for different party themes and dessert tables.
Make Pumpkin Oreo Truffles
Replace the white chocolate coating with orange candy melts. After dipping, add small green candy pieces or suitable edible decorations to suggest pumpkin stems.
You can also use a toothpick to create subtle vertical grooves in the orange coating before it sets. This gives the truffles a pumpkin-like appearance without changing the chocolate cookie filling.
Create Halloween Ghost Truffles
Dip the Oreo balls in white chocolate and allow the coating to set. Add two candy eyes and a small mouth using edible black decorating gel or melted dark chocolate.
These ghost truffles pair well with the mummy version because both designs use the same basic ingredients.
Add a Chocolate Drizzle
For a simpler decoration, drizzle dark or milk chocolate over the white-coated truffles. The contrasting lines create an attractive finish without requiring candy eyeballs or detailed piping.
This option is especially useful when preparing Halloween desserts for guests who prefer a more traditional chocolate appearance.
Serve Them on a Halloween Dessert Board
Arrange the truffles on a platter with chocolate cookies, pretzels, candy corn, and seasonal fruit. Use mini cupcake liners to separate the individual treats and make serving easier.
For a coordinated presentation, combine mummy truffles, pumpkin-shaped sweets, and chocolate-covered strawberries decorated with Halloween-inspired details.
Package Them as Edible Gifts
Place the finished truffles in small treat boxes or food-safe bags, separating layers with parchment paper if necessary. Add a seasonal label or ribbon to create a simple homemade Halloween gift.
Because these truffles contain cream cheese, keep them refrigerated and use insulated packaging if they need to remain cold during transport.
Can You Make Halloween Truffles Ahead of Time?
Yes. Halloween Truffles are ideal for preparing ahead because the cookie centers can be made in advance and decorated later.
You can prepare and roll the centers a day ahead, then keep them covered in the refrigerator until you’re ready to dip them. Alternatively, complete the entire recipe in advance and refrigerate the finished truffles in an airtight container.
For the best appearance, store the truffles in a single layer whenever possible. If you need to stack them, place parchment paper between the layers and handle them gently to avoid damaging the decorative coating.
Before serving, arrange the chilled truffles on a clean platter. They can be served cold, which keeps the cream cheese filling firm and the chocolate coating crisp.
How to Store Halloween Truffles
Because these Halloween Truffles contain cream cheese, they should be refrigerated rather than left at room temperature for extended periods.
Refrigerator: Store the truffles in an airtight container for up to two weeks, following the source recipe’s storage guidance. For the best quality, keep them chilled and avoid repeated temperature changes.
Freezer: Freeze the finished truffles in a freezer-safe airtight container for up to two months. Allow the chocolate coating to harden completely before packing them, and separate layers with parchment paper to prevent sticking.
Thawing: Transfer frozen truffles to the refrigerator and let them thaw gradually before serving. Keeping them covered during thawing helps reduce condensation on the chocolate coating.
For a Halloween party, remove only the amount you plan to serve and return the remaining truffles to the refrigerator promptly. Discard any that have been left at room temperature beyond the recommended food-safety window.
Final Thoughts on Halloween Truffles
Halloween Truffles are an easy, festive dessert that combines a creamy Oreo center with a smooth white chocolate shell and adorable mummy decorations. With just four main ingredients and no baking required, they’re a practical choice for Halloween parties, family gatherings, and homemade seasonal gifts.
Prepare the cookie mixture, chill the centers, dip each ball in white chocolate, and finish with simple mummy stripes and candy eyes. Once you master the basic method, you can use the same technique to create pumpkins, ghosts, and other Halloween-inspired sweets.
Make a batch of these Halloween Truffles ahead of your celebration, keep them chilled until serving, and enjoy a homemade treat that’s as fun to display as it is to eat.
Frequently Asked Questions
Do Halloween Truffles Need to Be Baked?
No. These Halloween Truffles are a no-bake dessert made from crushed Oreo cookies and cream cheese. The centers are chilled until firm, then dipped in melted white chocolate and decorated.
Why Are My Oreo Truffles Too Soft?
The mixture may be too warm, the cream cheese may contain excess moisture, or the cookie crumbs may not be fine enough. Refrigerate the mixture before rolling and chill the shaped balls thoroughly before dipping.
How Do I Keep the White Chocolate From Cracking?
Allow the chilled truffle centers to sit briefly while you prepare the coating, rather than dipping extremely cold balls directly into very warm chocolate. Avoid large temperature differences, and let the coating set gradually in a cool environment.
More Relevant Recipes
- Easy Christmas Lush: A Festive No-Bake Layered Dessert
- Easy Spiderweb Brownies for Halloween
- Cherries in the Snow: Easy No-Bake Cherry Dessert
Halloween Truffles
- Total Time: 1 hour 20 minutes
- Yield: 24 truffles
- Diet: Vegetarian
Description
These easy no-bake Halloween Truffles combine crushed Oreo cookies and cream cheese in a rich, creamy center, coated with white chocolate and decorated with candy eyes and mummy-style chocolate stripes. They make a fun, festive treat for Halloween parties.
Ingredients
- 1 package (14.3 ounces) Oreo cookies
- 8 ounces cream cheese, softened
- 18 ounces white chocolate melting wafers
- 48 candy eyeballs
Instructions
- Place the Oreo cookies in a food processor and pulse into fine crumbs. Alternatively, crush them in a sealed zip-top bag with a rolling pin.
- Combine the cookie crumbs and softened cream cheese in a large bowl. Mix until evenly combined and the mixture holds together.
- Roll the mixture into approximately 24 balls, about 1½ inches wide, and place them on a parchment-lined tray.
- Refrigerate the truffle centers for about 1 hour, or until firm.
- Melt the white chocolate wafers in a dry, heat-safe bowl in the microwave in 30-second intervals at about 70% power, stirring between intervals until smooth. Alternatively, use a double boiler.
- Dip each chilled truffle into the melted white chocolate, allowing excess coating to drip back into the bowl. Place the coated truffles on the lined tray.
- Once the coating has set, drizzle thin lines of melted white chocolate over each truffle to resemble mummy bandages.
- While the decorative drizzle is still wet, add two candy eyeballs to each truffle. If the drizzle has hardened, attach the eyes with a small dot of melted white chocolate.
- Allow the coating to set completely. Refrigerate the truffles in an airtight container until serving.
Notes
- Fine cookie crumbs help create a smooth, evenly mixed filling.
- Make sure the cream cheese is softened before mixing.
- Chill the truffle centers thoroughly before dipping so they hold their shape.
- Keep all bowls and utensils completely dry when melting white chocolate; even a little water can cause it to seize.
- If the coating becomes too thick, gently rewarm it in short intervals. A very small amount of neutral vegetable oil may help thin it if compatible with the chocolate product.
- For cleaner white stripes, use fresh melted white chocolate for decorating if the dipping chocolate has picked up cookie crumbs.
- Store in an airtight container in the refrigerator because the truffles contain cream cheese. Freeze in a freezer-safe container for up to 2 months; thaw in the refrigerator.
- Yield and nutrition vary with the size of the truffles and the specific brands used. Nutrition values below are estimates, not laboratory-tested values.
- Prep Time: 20 minutes
- Cook Time: 0 minutes
- Category: Dessert
- Method: No-Bake
- Cuisine: American
Nutrition
- Serving Size: 1 truffle
- Calories: 190 kcal (estimated)
- Sugar: 17 g (estimated)
- Sodium: 105 mg (estimated)
- Fat: 11 g (estimated)
- Saturated Fat: 7 g (estimated)
- Unsaturated Fat: 3.5 g (estimated)
- Trans Fat: 0 g (estimated)
- Carbohydrates: 22 g (estimated)
- Fiber: 0.5 g (estimated)
- Protein: 2 g (estimated)
- Cholesterol: 10 mg (estimated)