
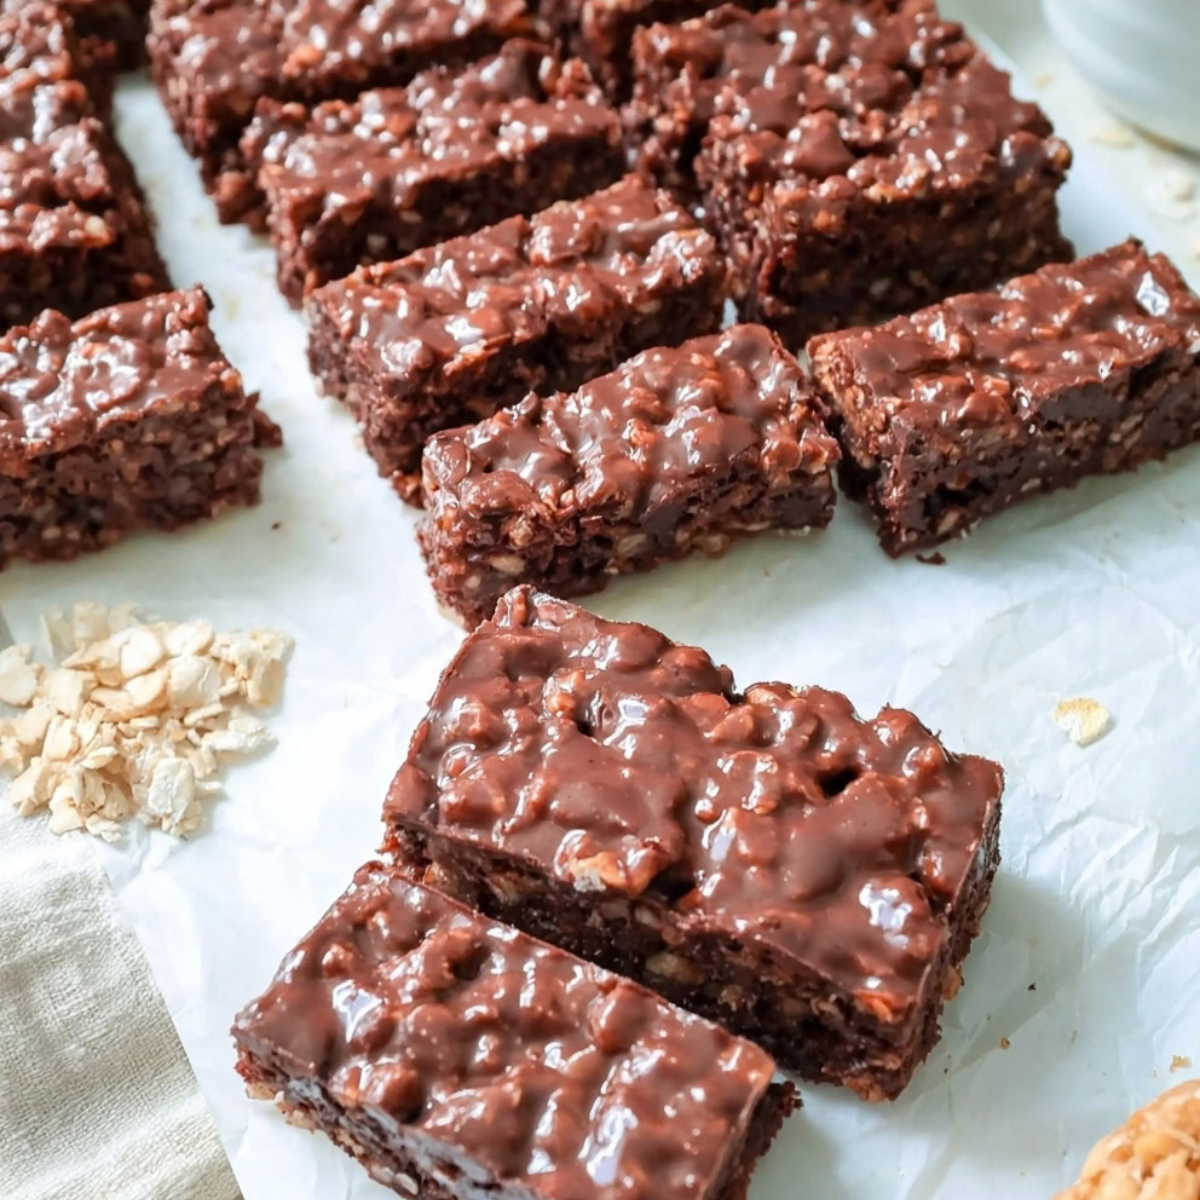
Homemade Crunch Bars are the kind of chocolate treat that proves you do not need a long ingredient list to make delicious candy at home. With creamy melted chocolate, peanut butter, and crispy rice cereal in every bite, these bars have the familiar combination of smooth chocolate and irresistible crunch that makes classic crunch candy so popular.
Even better, this recipe requires no baking and only a few minutes of hands-on preparation. You can make a batch for an after-dinner dessert, holiday candy tray, lunchbox treat, or whenever a chocolate craving hits. These Homemade Crunch Bars are also easy to customize with dark chocolate, dairy-free chocolate, gluten-free crispy rice cereal, or your favorite nut butter.
Table of Contents
Why These Homemade Crunch Bars Are So Easy
One of the best things about Homemade Crunch Bars is their simplicity. Instead of making complicated candy or working with a long list of ingredients, you simply melt, mix, press, and chill.
Peanut butter is especially useful in this recipe because it gives the melted chocolate a smoother, creamier consistency without requiring additional oil or emulsifiers. It also adds a subtle nutty flavor that complements semi-sweet or dark chocolate.
Crispy rice cereal provides the signature light crunch. Because the cereal contains plenty of tiny air pockets, the finished chocolate bars stay crisp instead of becoming overly dense.
There is no oven involved, either. Once the chocolate mixture is pressed into a loaf pan, the freezer does the rest of the work.
Ingredients for Homemade Crunch Bars
You only need four main ingredients to make these Homemade Crunch Bars. Quantities are included in the recipe instructions below, while this section explains what each ingredient contributes.
- Chocolate chips: These create the rich chocolate base of the candy bars. Semi-sweet chocolate gives you a balanced sweetness, while dark chocolate creates a more intense and less-sweet dessert.
- Peanut butter: Peanut butter makes the chocolate mixture creamy and smooth while contributing a mild roasted-nut flavor. Natural peanut butter works particularly well.
- Crisp rice cereal: This is responsible for the characteristic crispy texture. The cereal becomes completely coated in chocolate while maintaining its light crunch.
- Salt: A small amount of salt helps balance the sweetness and brings out the flavors of both the chocolate and peanut butter.
You will also need a small amount of oil or cooking spray for preparing the pan and a piece of parchment paper to make removing the chilled chocolate easier.
Ingredient Swaps and Dietary Options
These chocolate crunch bars are easy to adjust for different preferences.
For gluten-free Homemade Crunch Bars, choose crisp rice cereal that is specifically labeled gluten-free. Do not assume every rice-based cereal is gluten-free, because some varieties contain malt or other gluten-containing ingredients.
For vegan crunch bars, use dairy-free chocolate chips and check the labels on the remaining ingredients.
Dark chocolate is an excellent alternative if you prefer a richer chocolate flavor or want a treat with less added sugar than one made with sweeter chocolate.
You can also experiment with other creamy nut or seed butters. Almond butter can provide a milder nutty flavor, while sunflower seed butter may be useful when avoiding peanuts. Keep in mind that changing the nut butter can slightly alter the texture and flavor of the finished bars.
How to Make Homemade Crunch Bars
Making Homemade Crunch Bars is straightforward, but working carefully with the melted chocolate and cereal will give you the best texture.
- Prepare the pan. Lightly grease a 9-by-5-inch loaf pan. Place a piece of parchment paper along the bottom and sides so you can easily lift the chilled chocolate mixture from the pan later.
- Measure the ingredients. You will need 1 1/2 cups chocolate chips, 1/2 cup peanut butter, 1/4 teaspoon salt, and 2 cups crisp rice cereal. Having everything measured before melting the chocolate makes assembly much easier.
- Melt the chocolate mixture. Combine the chocolate chips, peanut butter, and salt in a heat-safe bowl. Melt them over a double boiler, stirring gently until completely smooth. To create a double boiler, place the bowl over a saucepan containing approximately an inch of simmering water without allowing the bowl to sit directly in the water.
- Use the microwave as an alternative. If you prefer, melt the chocolate and peanut butter in a microwave-safe bowl. Heat it in approximately 30-second intervals, stirring well between each interval. Stop once the mixture is smooth rather than continuing to heat it unnecessarily.
- Coat the cereal. Place 2 cups of crisp rice cereal in a large mixing bowl. Pour the warm chocolate and peanut butter mixture over the cereal.
- Mix gently. Fold everything together until every piece of crispy rice cereal is evenly covered with chocolate. Avoid aggressively crushing the cereal because maintaining those crisp pieces is what gives Homemade Crunch Bars their signature texture.
- Transfer to the pan. Spoon the chocolate cereal mixture into the prepared loaf pan. Use a spatula to spread it into an even layer, making sure the mixture reaches the corners.
- Chill until firm. Place the loaf pan on a level surface in the freezer. Chill until the chocolate is completely firm. Depending on your freezer and the thickness of the mixture, this can take roughly 20 minutes to an hour.
- Remove and slice. Once firm, lift the chocolate slab from the loaf pan using the parchment paper. Transfer it to a cutting board and slice it into approximately 1-inch-wide bars with a sharp knife.
- Make smaller candy bars if desired. Cut the bars across the center to create smaller, fun-size portions. Serve them chilled for the crispiest, firmest texture.
Tips for Perfect Homemade Crunch Bars
Although Homemade Crunch Bars are simple, a few techniques can make a noticeable difference.
Do not overheat the chocolate. Chocolate can become thick or grainy when exposed to excessive heat. Whether you use a microwave or double boiler, gentle heat and frequent stirring are best.
Make sure the cereal is thoroughly coated. Unevenly mixed cereal can cause sections of the bars to crumble when sliced. Fold the mixture until you no longer see large patches of uncovered cereal.
At the same time, avoid crushing the cereal while stirring. A gentle folding motion helps preserve the airy, crispy texture.
Salt may seem like a minor ingredient, but it has an important role. The small amount in this recipe balances the sweetness and enhances the chocolate and peanut butter flavors.
Finally, allow the chocolate to become completely firm before slicing. Trying to cut warm or partially set chocolate crunch bars can produce messy edges and bars that do not hold their shape.
How to Melt Chocolate Without Burning It
Smooth melted chocolate is the foundation of these Homemade Crunch Bars, so it is worth taking a little extra care during this step.
A double boiler offers excellent control because the chocolate is heated indirectly. Keep the water at a gentle simmer and stir the chocolate mixture frequently until smooth.
The microwave is faster but requires shorter heating periods. Heat the chocolate in 30-second intervals and stir after every interval. Chocolate often retains its shape even when it has begun melting, so stirring can reveal that it is already smooth enough.
Once only a few tiny pieces remain, vigorous stirring may provide enough residual heat to finish melting them.
Keeping water away from the chocolate is also important. Make sure bowls and utensils are dry before starting.
How to Get the Best Crispy Chocolate Texture
The contrast between creamy chocolate and crisp cereal is what makes Homemade Crunch Bars particularly satisfying.
For maximum crunch, use fresh crisp rice cereal. Cereal that has been sitting open for a long time can absorb moisture from the air and lose some of its crispness.
The ratio of cereal to chocolate also matters. Too much cereal can make homemade candy bars fragile, while too little can produce something closer to a solid chocolate bar. The combination of 2 cups cereal with 1 1/2 cups chocolate chips and 1/2 cup peanut butter creates plenty of crispy texture while providing enough chocolate mixture to bind everything together.
Serving the bars chilled also produces a firmer snap. They will gradually become softer at warmer room temperatures, particularly when made with natural peanut butter.
Delicious Homemade Crunch Bars Variations
Once you know the basic recipe, Homemade Crunch Bars are easy to personalize.
For dark chocolate crunch bars, replace semi-sweet chocolate chips with dark chocolate. This variation has a deeper cocoa flavor and pairs particularly well with the slight saltiness of peanut butter.
For an extra peanut flavor, sprinkle a small amount of finely chopped roasted peanuts over the mixture before chilling. Press them gently into the surface so they stay attached.
A tiny sprinkle of flaky sea salt on top can create a sweet-and-salty chocolate candy with more pronounced flavor.
If you enjoy layered desserts, drizzle a small amount of melted chocolate over the chilled bars before serving. White chocolate can provide visual contrast, while additional dark chocolate intensifies the cocoa flavor.
For smaller treats, cut the chocolate slab into bite-size squares rather than long candy bars. These portions work especially well for dessert platters and parties.
What to Serve with Chocolate Crunch Bars
Homemade Crunch Bars are delicious straight from the refrigerator, but they can also become part of a larger dessert.
Serve a small bar alongside coffee or espresso for a simple afternoon treat. The bitterness of coffee balances the sweetness of the chocolate nicely.
They also pair well with fresh strawberries, raspberries, or sliced banana. Fresh fruit adds brightness to the rich combination of chocolate and peanut butter.
For dessert night, chop one of the bars into small pieces and sprinkle them over vanilla ice cream or frozen yogurt. You will get crunchy chocolate pieces throughout every spoonful.
You can also add Homemade Crunch Bars to a holiday candy platter alongside peanut butter cups, chocolate bark, truffles, or other no-bake desserts.
How to Store Homemade Crunch Bars
Proper storage helps Homemade Crunch Bars maintain their crisp texture.
Place the sliced bars in an airtight container and keep them in the refrigerator. They can be refrigerated for up to about two weeks.
Chilled storage is particularly helpful when you use natural peanut butter. Because natural peanut butter can create a softer chocolate mixture at room temperature, refrigeration keeps the candy firm and easier to handle.
If you want to keep the bars longer, freeze them in an airtight freezer-safe container for up to three months. Separate layers with parchment paper if necessary to prevent the bars from sticking together.
When you are ready for one, you can enjoy it cold or allow it to sit briefly outside the freezer until it reaches your preferred texture.
Avoid leaving these chocolate crunch bars at warm room temperature for extended periods because they can soften.
Are Homemade Crunch Bars Gluten-Free?
Homemade Crunch Bars can easily be gluten-free, but choosing the correct cereal is essential.
Rice cereal might sound naturally gluten-free, but some popular varieties contain malt flavoring derived from barley. That means a rice-based cereal is not automatically suitable for someone following a gluten-free diet.
Look specifically for packaging marked gluten-free and check the ingredient label if you are preparing these bars for someone with celiac disease or gluten sensitivity.
The chocolate chips and peanut butter should also be checked for any dietary requirements that are important to you.
Why Peanut Butter Works So Well in This Recipe
Peanut butter does more than add flavor to Homemade Crunch Bars. It also changes the consistency of the chocolate.
Straight melted chocolate becomes quite firm after chilling. Combining it with creamy peanut butter creates a softer, smoother bite while still allowing the bars to hold together.
This makes the candy pleasantly creamy around the crunchy cereal rather than excessively hard.
Peanut butter also contributes roasted, slightly salty notes that complement chocolate naturally. Combined with the added pinch of salt, it creates a more balanced flavor than sweetness alone.
Easy Homemade Crunch Bars for Any Chocolate Craving
Homemade Crunch Bars combine everything you could want from an easy homemade candy: rich chocolate, creamy peanut butter, crispy rice cereal, and a satisfying crunch. With just four primary ingredients and no baking required, they are simple enough to prepare whenever you want a quick chocolate treat.
Keep a batch of Homemade Crunch Bars refrigerated for an easy dessert during the week, or freeze extras so you always have chocolate crunch candy ready when a craving arrives. Whether you make the classic version, use dark chocolate, choose gluten-free cereal, or experiment with your favorite nut butter, these crispy chocolate bars are an easy recipe worth keeping on hand.
Frequently Asked Questions About Homemade Crunch Bars
How do I keep Homemade Crunch Bars crispy?
For the best crispy texture, use fresh crisp rice cereal and make sure it is completely coated with the melted chocolate mixture. Store the finished Homemade Crunch Bars in an airtight container in the refrigerator. Keeping them chilled helps the chocolate stay firm while protecting the cereal from moisture that could make it soft.
Can I make Homemade Crunch Bars without peanut butter?
Yes. You can replace peanut butter with another smooth nut or seed butter, such as almond butter or sunflower seed butter. The flavor and firmness may change slightly depending on the alternative you choose. For the smoothest chocolate crunch bars, use a creamy variety that mixes easily with melted chocolate.
How long do Homemade Crunch Bars need to chill?
Homemade Crunch Bars should chill until the center is completely firm. Depending on the thickness of your bars and freezer temperature, this can take roughly 20 minutes to one hour. Avoid slicing them while the chocolate is still soft because the bars may crumble or lose their shape.
More Relevant Recipes
- Easy Orleans Style Bread Pudding & Bourbon Sauce
- Frosted Soft Pumpkin Sugar Cookies: Easy Fall Treat
- Easy Pumpkin Buttermilk Bundt Cake Recipe
Homemade Crunch Bars
- Total Time: 1 hour 15 minutes
- Yield: 18 fun-size bars
- Diet: Vegetarian
Description
Homemade Crunch Bars are an easy no-bake chocolate treat made with just four simple ingredients. Creamy chocolate and peanut butter coat crispy rice cereal for a crunchy, satisfying homemade candy bar that is quick to prepare and easy to customize.
Ingredients
- 1 1/2 cups semi-sweet chocolate chips
- 1/2 cup peanut butter
- 1/4 teaspoon salt
- 2 cups crisp rice cereal
- Cooking spray or a small amount of oil, for preparing the pan
Instructions
- Lightly grease a 9-by-5-inch loaf pan and line the bottom with parchment paper.
- Add the chocolate chips, peanut butter, and salt to a heat-safe bowl. Melt them over a double boiler, stirring gently until smooth. Alternatively, microwave the mixture in 30-second intervals, stirring after each interval until completely melted.
- Place the crisp rice cereal in a large mixing bowl.
- Pour the melted chocolate and peanut butter mixture over the cereal. Gently stir until all of the cereal is evenly coated.
- Transfer the chocolate cereal mixture to the prepared loaf pan and spread it into an even layer with a spatula.
- Place the pan on a flat surface in the freezer and chill until the chocolate is completely firm, about 20 minutes to 1 hour.
- Use the parchment paper to lift the firm chocolate slab from the pan.
- Cut into approximately 1-inch bars with a sharp knife. Cut each bar in half for smaller fun-size portions, if desired.
- Serve chilled or transfer the Homemade Crunch Bars to an airtight container for storage.
Notes
- Use crisp rice cereal specifically labeled gluten-free when preparing gluten-free Homemade Crunch Bars.
- For a less-sweet treat with a deeper cocoa flavor, use dark chocolate instead of semi-sweet chocolate.
- For a vegan variation, choose dairy-free chocolate chips and verify that the cereal and other ingredients are vegan-friendly.
- Almond butter or sunflower seed butter can be substituted for peanut butter, although the flavor and texture may vary.
- Avoid overheating the chocolate because excessive heat can cause it to become thick or grainy.
- Store the bars in an airtight container in the refrigerator for up to 2 weeks.
- For longer storage, freeze the bars in an airtight container for up to 3 months.
- The bars can soften when left at room temperature for an extended period, particularly when made with natural peanut butter.
- Prep Time: 10 minutes
- Cook Time: 5 minutes
- Category: Dessert
- Method: No-Bake
- Cuisine: American
Nutrition
- Serving Size: 1 fun-size bar
- Calories: 126
- Sugar: 10g
- Sodium: 73mg
- Fat: 7g
- Saturated Fat: 3g
- Unsaturated Fat: 3g
- Trans Fat: 1g
- Carbohydrates: 14g
- Fiber: 1g
- Protein: 2g
- Cholesterol: 2mg