
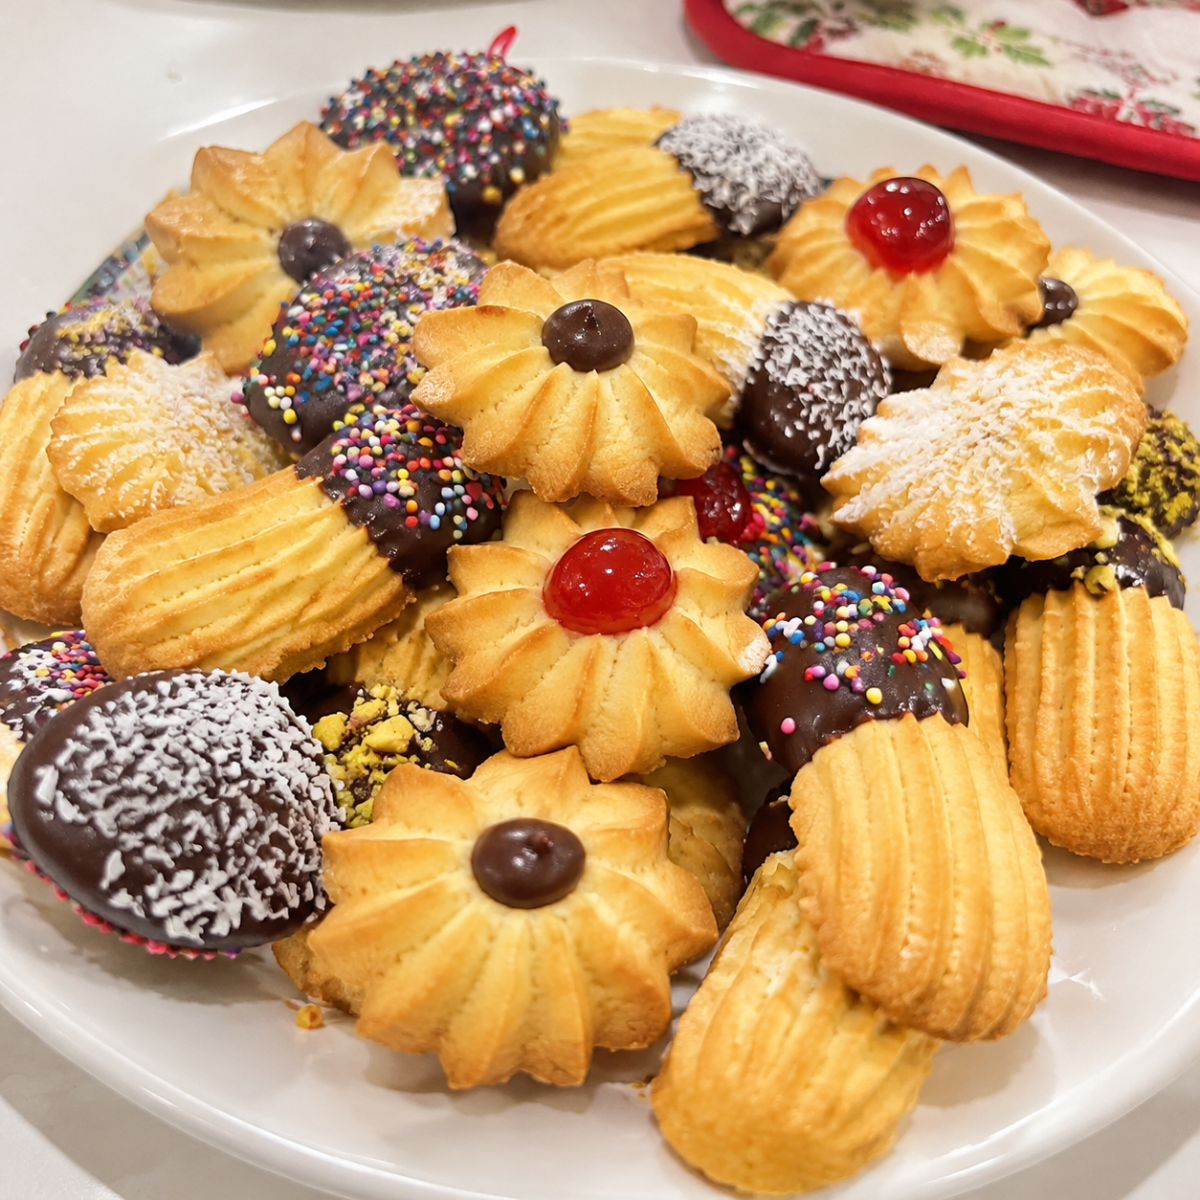
Italian Butter Cookies are classic bakery-style treats with a rich buttery flavor, delicate texture, and beautiful piped shapes. These traditional cookies, also known as biscotti al burro, are especially popular during Christmas, but they’re delicious enough to enjoy throughout the year. With a simple dough made from butter, sugar, egg yolks, and vanilla, you can create an assortment of homemade cookies that look just like the ones in an Italian bakery.
What makes these Italian Butter Cookies so special is their versatility. You can pipe them into stars, rosettes, or traditional S-shaped cookies, then decorate them with candied cherries, chocolate, colorful sprinkles, or powdered sugar. They’re wonderful for holiday cookie trays, afternoon coffee, and homemade edible gifts.
If you’ve ever wanted to recreate those delicate Italian bakery cookies at home, this recipe is a great place to start. The dough comes together with basic pantry ingredients, and with a few simple piping tips, you’ll have a beautiful batch ready to share.
Table of Contents
What Makes These Italian Butter Cookies So Special?
There are plenty of reasons to love homemade Italian Butter Cookies. Their simple ingredients create a delicious combination of buttery richness, gentle sweetness, and a tender texture that practically melts in your mouth.
- Rich buttery flavor: Good-quality butter gives these cookies their signature bakery-style taste.
- Simple ingredients: You only need everyday baking staples, including flour, butter, sugar, eggs, and vanilla.
- Beautiful shapes: A piping bag and star-shaped nozzle make it easy to create attractive cookies in different designs.
- Endless decorating options: Chocolate, candied cherries, sprinkles, nuts, and jam let you customize every batch.
- Perfect for gifting: Their pretty shapes and colorful decorations make them ideal for Christmas cookie boxes and special occasions.
- Make-ahead friendly: You can prepare and freeze the cookies ahead of time, making holiday baking easier.
Another reason these cookies stand out is that one basic dough can produce several different varieties. Instead of preparing multiple recipes, you can divide your batch and decorate each portion differently.
Ingredients You’ll Need for Italian Butter Cookies
The secret to delicious Italian Butter Cookies is using good-quality ingredients and measuring everything accurately. Each ingredient contributes to the flavor, texture, and consistency of the dough.
- Unsalted butter: The most important ingredient for a rich, buttery flavor. European-style butter with a higher fat content is particularly good for achieving a bakery-style result.
- Granulated sugar: Adds sweetness and helps create a delicate cookie texture.
- Egg yolks: Provide richness, color, and a smooth consistency. They also help bind the ingredients together.
- Vanilla extract: Gives the cookies a warm, sweet aroma that complements the butter.
- Almond extract: An optional ingredient that adds a subtle nutty flavor traditionally found in many bakery-style cookies.
- All-purpose flour: Provides the structure needed to hold the piped shapes while baking.
- Baking powder: Gives the cookies a little lift without making them overly puffy.
- Fine salt: Balances the sweetness and brings out the buttery flavor.
Optional Ingredients for Decorating
One of the best things about Italian Butter Cookies is how easily you can customize them.
- Candied cherries: Add a colorful, festive touch to the centers of rosette cookies.
- Chocolate chips: Perfect for pressing into the center of piped cookies before baking.
- Melted chocolate: Use dark, milk, or white chocolate for dipping or drizzling.
- Powdered sugar: Creates a delicate, elegant finish.
- Colored sprinkles: Make the cookies especially attractive for Christmas and birthday celebrations.
- Chopped nuts: Add a little crunch and extra flavor to chocolate-dipped cookies.
- Shredded coconut: Provides a sweet, slightly chewy coating.
- Raspberry jam or Nutella: Delicious fillings for making Italian sandwich cookies.
Ingredient Substitutions and Flavor Variations
You can easily adjust this Italian butter cookie recipe depending on your preferences or the ingredients available in your kitchen.
Butter Alternatives
Unsalted European-style butter is recommended because its higher fat content contributes to a rich flavor and helps control spreading. If you’re using salted butter, simply leave out the additional salt in the recipe.
Avoid replacing butter with liquid oils or spreads because they can significantly change the dough’s consistency and make piping more difficult.
Vanilla and Almond Extract
Vanilla extract provides the classic flavor, while almond extract adds a slightly nutty aroma. If you don’t enjoy almond flavor, leave it out without changing the rest of the recipe.
For a fresh citrus variation, replace the almond extract with finely grated lemon or orange zest.
Chocolate Butter Cookies
For a chocolate version, replace a portion of the all-purpose flour with unsweetened cocoa powder. This creates delicious chocolate Italian Butter Cookies with a deeper flavor.
You can also dip the finished cookies in melted chocolate for an extra indulgent treat.
Gluten-Free Option
A suitable gluten-free all-purpose baking flour blend can be used as an alternative to regular flour. Choose a blend designed for cookies and baking, preferably one containing xanthan gum. Since gluten-free flour absorbs moisture differently, check the dough consistency before piping.
How to Make Italian Butter Cookies
Making Italian Butter Cookies is straightforward, but the consistency of the dough is especially important. It needs to be soft enough to pipe but firm enough to hold its shape on the baking sheet.
Step 1: Prepare the Baking Sheets
Preheat your oven to 320°F (160°C). Line two or three large baking sheets with parchment paper.
Gather your piping bag, large open-star piping tip, mixing bowls, and measuring utensils. Having everything ready before mixing makes the process easier.
Step 2: Cream the Butter and Sugar
Place the softened butter and granulated sugar in a large mixing bowl. Using a stand mixer or electric hand mixer, beat until the ingredients are thoroughly combined and creamy.
Avoid overbeating because incorporating too much air can cause the cookies to spread during baking.
The butter should be soft and pliable but not melted, greasy, or shiny.
Step 3: Add the Egg Yolks and Flavorings
Add the egg yolks, vanilla extract, and optional almond extract to the butter mixture.
Beat until everything is evenly incorporated and the mixture looks smooth and creamy.
Scrape down the sides of the bowl with a spatula to make sure all the ingredients are combined.
Step 4: Combine the Dry Ingredients
In a separate bowl, whisk together the all-purpose flour, baking powder, and salt.
For accurate measurements, spoon the flour into your measuring cup and level it with a knife instead of scooping directly from the flour bag.
This step is important because too much flour can make the dough dry and difficult to pipe.
Step 5: Make the Cookie Dough
Gradually add the dry ingredients to the butter mixture while mixing on low speed.
Set aside a little flour initially, then add enough to create a firm but slightly sticky dough. Avoid overmixing once the flour has been incorporated.
The dough should hold together without being too stiff.
If it becomes too dry, gradually incorporate some of the reserved egg white until the consistency improves. If it’s too soft, add a small amount of flour.
Step 6: Pipe the Italian Butter Cookies
Fit a large piping bag with an open-star nozzle. A tip approximately half an inch wide works particularly well for these cookies.
Transfer about one-quarter of the dough into the piping bag at a time. Avoid overfilling because the dough requires consistent pressure to create attractive shapes.
Pipe the dough onto the prepared baking sheets, creating stars, rosettes, S-shapes, or short straight lines.
For the best results, hold the piping tip close to the baking sheet and apply steady pressure.
If the dough becomes too firm to pipe, let it soften slightly at room temperature. If it becomes too warm, refrigerate it for 15–20 minutes before continuing.
Step 7: Add the Decorations
Before baking, you can press a halved candied cherry or chocolate chip into the center of rosette-shaped cookies.
You can also leave some cookies plain and decorate them after baking.
If you want to use a cookie press instead of a piping bag, refrigerate the dough for approximately 30 minutes before shaping.
Step 8: Bake Until Lightly Golden
Place the baking sheets in the preheated oven and bake for approximately 10–15 minutes.
The cookies should remain relatively pale on top, with lightly golden bottoms. Larger cookies may require a few additional minutes.
Rotate the baking sheets halfway through baking to encourage even browning.
Once baked, allow the cookies to rest on the baking sheet for a minute or two before carefully transferring them to a wire cooling rack.
Step 9: Decorate and Serve
Allow the Italian Butter Cookies to cool completely before decorating.
For chocolate-dipped cookies, melt your preferred chocolate in a heatproof bowl over gently simmering water. Dip one end of each cookie into the melted chocolate and place it on parchment paper.
While the chocolate is still soft, add sprinkles, chopped nuts, or shredded coconut.
You can also sandwich two cookies together with raspberry jam or Nutella, drizzle them with melted chocolate, or finish them with a light dusting of powdered sugar.
Let all decorations set before serving or storing.
Tips for Perfect Italian Butter Cookies
A few small details can make a significant difference when preparing these homemade cookies.
- Use the right butter temperature: Butter should be soft enough to mix easily but still slightly cool. Melted butter can cause the cookies to spread.
- Measure flour carefully: Too much flour creates stiff dough that is difficult to squeeze through a piping tip.
- Choose a large piping nozzle: A large open-star tip makes piping easier and produces beautiful bakery-style ridges.
- Don’t overfill the piping bag: Working with smaller portions gives you better control and makes piping less tiring.
- Keep the dough consistent: If it becomes too warm, the butter softens and the cookies may lose their shape.
- Avoid overmixing: Once the flour is incorporated, stop mixing to prevent unnecessary changes in texture.
- Watch the baking time: These cookies should be pale golden rather than deeply browned.
- Cool before decorating: Warm cookies can cause melted chocolate and jam to become messy.
If you’re new to piping, don’t worry if your first few cookies aren’t perfectly shaped. You can scrape the dough back into the piping bag and try again.
Creative Ways to Decorate Italian Butter Cookies
Decorating is one of the most enjoyable parts of preparing Italian Butter Cookies. With one batch of dough, you can create a colorful assortment that looks like it came straight from an Italian pastry shop.
Chocolate-Dipped Cookies
Dip half of each cooled cookie into melted dark, milk, or white chocolate. Add chopped nuts, coconut, or sprinkles before the chocolate sets.
Italian Sandwich Cookies
Spread a small amount of raspberry jam, Nutella, or melted chocolate onto the flat side of one cookie. Place another cookie on top and press gently to create a sandwich.
Powdered Sugar Cookies
For a simple finish, lightly dust the cooled cookies with powdered sugar. This option works especially well for cookies that already have attractive piped shapes.
Festive Christmas Cookies
Decorate your cookies with red and green sprinkles, candied cherries, and white chocolate. Arrange different shapes and colors together for a beautiful holiday cookie platter.
Chocolate Drizzle
Melt white or dark chocolate and drizzle it over the cookies using a spoon or piping bag. Allow the chocolate to set before serving.
What to Serve with Italian Butter Cookies
Italian Butter Cookies are delicious on their own, but they pair wonderfully with a variety of drinks and desserts.
- Coffee or espresso: Their buttery sweetness balances the bold flavor of freshly brewed Italian coffee.
- Italian hot chocolate: A rich, creamy chocolate drink makes an especially delicious pairing during colder months.
- Tea: Serve them with black tea, Earl Grey, or herbal tea for a relaxing afternoon treat.
- Hot milk: A simple glass of warm milk is a lovely option for children and anyone who enjoys classic homemade cookies.
- Ice cream: Crumble the cookies over vanilla or chocolate ice cream for an easy dessert.
- Holiday dessert platters: Combine them with biscotti, shortbread, gingerbread, and other Christmas cookies.
How to Store Italian Butter Cookies
Proper storage helps preserve the delicate texture and buttery flavor of your cookies.
Once the cookies have cooled completely and any chocolate decorations have set, place them in an airtight container.
Plain Italian Butter Cookies can be stored at room temperature in a cool, dry place for approximately 5–7 days.
If stacking the cookies, place parchment or wax paper between the layers to prevent them from sticking together or breaking.
Cookies decorated with chocolate or ganache should be refrigerated when necessary, particularly in warm conditions. Store them in an airtight container and enjoy within approximately 5–7 days.
Can You Freeze Italian Butter Cookies?
Yes! These cookies freeze very well, making them convenient for holiday preparation and entertaining.
For the best results, freeze the cookies without decorations. Arrange them in an airtight freezer-safe container with parchment paper between the layers.
They can be frozen for up to 3 months.
When you’re ready to serve them, transfer the cookies to the refrigerator or let them thaw at room temperature. Once completely thawed, decorate them with chocolate, jam, powdered sugar, or sprinkles.
Enjoy These Homemade Italian Butter Cookies!
These Italian Butter Cookies are a wonderful addition to any homemade baking collection. With their delicate buttery texture, simple ingredients, and endless decorating possibilities, they’re perfect for everyday treats, holiday celebrations, and thoughtful homemade gifts.
Whether you pipe beautiful rosettes, create chocolate-dipped cookies, or sandwich them with raspberry jam, each variation offers something delicious.
Prepare a batch, decorate them with your favorite toppings, and serve them alongside a cup of coffee or Italian hot chocolate. These classic bakery-style cookies are sure to become a favorite whenever you want something sweet and homemade.
Frequently Asked Questions
Why are my Italian Butter Cookies difficult to pipe?
The most common reason is that the dough is too dry or contains too much flour. Make sure you’re measuring the flour correctly and adding enough reserved egg white if the dough needs additional moisture.
Using a large open-star piping tip also makes the process much easier.
Why did my cookies spread in the oven?
Cookies can spread when the butter is too warm, the dough is too soft, or the mixture contains too much air from overbeating.
Make sure your butter is softened but not melted, and avoid incorporating excessive air when creaming the butter and sugar.
If necessary, chill the piped cookies in the refrigerator for 20–30 minutes before baking.
Do I need to chill the dough before piping?
No. When using a piping bag and a large open-star nozzle, the dough generally does not need chilling.
However, if the dough becomes too warm or difficult to handle, refrigerate it briefly. If you’re using a cookie press, chilling the dough for approximately 30 minutes is recommended.
More Relevant Recipes
- Easy Rainbow Sherbet Punch Recipe for Parties
- Old-Fashioned Brown Sugar Fudge (Creamy Penuche)
- Easy Grinch Christmas Crack – A Festive Holiday Treat
Italian Butter Cookies
- Total Time: 37 minutes
- Yield: 36 cookies
- Diet: Vegetarian
Description
These Italian Butter Cookies are rich, buttery, and delicately crisp on the outside with a tender, melt-in-your-mouth texture. Made with simple ingredients like butter, sugar, egg yolks, vanilla, and flour, these classic bakery-style cookies are easy to pipe into beautiful shapes and decorate with melted chocolate, candied cherries, or colorful sprinkles. Perfect for Christmas cookie trays, afternoon coffee, homemade gifts, and special occasions.
Ingredients
- 1 cup (226 g) unsalted butter, softened
- 2/3 cup (135 g) granulated sugar
- 2 large egg yolks, room temperature
- 2 teaspoons vanilla extract
- 1/2 teaspoon almond extract (optional)
- 2 1/4 cups (280 g) all-purpose flour
- 1/2 teaspoon baking powder
- 1/4 teaspoon salt
- 2 tablespoons reserved egg white, as needed for adjusting dough consistency
- 1/2 cup melted chocolate, for decorating (optional)
- Candied cherries, sprinkles, or chopped nuts, for decorating (optional)
Instructions
- Preheat the oven to 320°F (160°C). Line two large baking sheets with parchment paper.
- In a large mixing bowl, beat the softened butter and granulated sugar until creamy and well combined, avoiding excessive beating.
- Add the egg yolks, vanilla extract, and optional almond extract. Mix until smooth and fully incorporated.
- In a separate bowl, whisk together the all-purpose flour, baking powder, and salt.
- Gradually add the dry ingredients to the butter mixture, mixing on low speed until a soft, slightly sticky dough forms. If the dough is too stiff to pipe, gradually incorporate a little reserved egg white.
- Transfer the dough into a piping bag fitted with a large open-star nozzle. Work with smaller portions to make piping easier.
- Pipe the dough onto the prepared baking sheets, forming rosettes, stars, S-shapes, or straight cookie shapes, leaving space between them.
- If desired, decorate the cookies with candied cherry halves or chocolate chips before baking.
- Bake for 10–15 minutes, or until the cookies are set and their bottoms are lightly golden while the tops remain relatively pale.
- Remove from the oven and allow the cookies to cool on the baking sheets for 1–2 minutes before transferring them to a wire rack.
- Once completely cooled, dip the cookies in melted chocolate or decorate with sprinkles, chopped nuts, or powdered sugar.
- Allow the decorations to set completely before serving or storing in an airtight container.
Notes
- Use softened but not melted butter for the best cookie texture and shape.
- Measure flour accurately to prevent the dough from becoming too dry and difficult to pipe.
- Use a large open-star piping tip to create traditional Italian bakery-style shapes.
- If the dough becomes too stiff, gradually add a little reserved egg white until it reaches a pipeable consistency.
- If the dough becomes too soft or warm, refrigerate it for 15–20 minutes before piping.
- Avoid overmixing after adding the flour to keep the cookies tender.
- Do not overbake. Italian Butter Cookies should remain relatively pale on top with lightly golden bottoms.
- Allow cookies to cool completely before dipping them in chocolate or adding decorations.
- Store plain cookies in an airtight container at room temperature for approximately 5–7 days.
- Freeze undecorated cookies in an airtight freezer-safe container for up to 3 months.
- Thaw frozen cookies at room temperature before decorating and serving.
- Almond extract is optional and can be omitted or replaced with lemon or orange zest.
- Prep Time: 25 minutes
- Cook Time: 12 minutes
- Category: Dessert
- Method: Baking
- Cuisine: Italian
Nutrition
- Serving Size: 1 cookie
- Calories: 100 kcal
- Sugar: 6 g
- Sodium: 35 mg
- Fat: 6 g
- Saturated Fat: 4 g
- Unsaturated Fat: 2 g
- Trans Fat: 0 g
- Carbohydrates: 11 g
- Fiber: 0.3 g
- Protein: 1 g
- Cholesterol: 25 mg